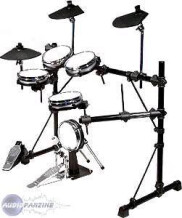
View other reviews for this product:
Published on 12/13/06 at 13:39
Preamble:
I possde DM5 module that suits me (12 entries when same) and I do not want to invest in the
Following the forum ddi MPS300 I do order and gives me a great! aim to make these pads silent, save in ergonomics, Aesthetics, quality of games over my pads PD5 (souferts my wrists are too!) cheaply
I shall decide dacheter kit with rack (348euros), the famous Roland cones (4), skin mesh (5) and EST all!.
I expect to see the assembly as jadopterait once java dpouill a pad!
Unpacking:
Everything is made of cardboard, cest well packed the installation instructions: 1 A4 (!) But it's a game denfant
Discoveries content small small: 2 par2 ranges pads and cymbals are together, feet at the bottom, all is being protected.
Note: I was missing a small screw on the bass drum pedal: I will not do a trial now!
5min aprsdballage jai began opening the first tom (ae: the guarantee takes a cut!) Vis poor quality circles steel trs trs bof, skin (j not even talk about it so no skin EST) and lintrieur EST Lorge: mosses of plaquesbref it seems quil wanted to fill and stuff with all that lespace their hands on!
following the topic of the passage in skin mesh, I mount my personal mimagine who will work most of the thunder! cest and simple!
here is my installation:
TOM PAD in 14 steps!
1. OPDs of lensemble (attachment included)
2. of welding of mono jack (the son of hair are: hyper for so gaffe)
3. all so much I throw Solidaris-white foam (the most ugly and more! bah)
4. I dcolle plastic plate (on which the sensor is al) of its mtallique plate (not even painted!).
5. I dcoupe Paisse the black foam to make portions of that pie in the longitudinal ribs of the plastic shell (jai did this because the plate is put above mtal plutt on the ribs: Depreciation impacts, elimination of vibrations of hollow areas gnratrices)
6. So I go back plate mtal (which is the glue thin dense foam black)
7. I stick the NEC on the transparent plastic plate (true!)
8. I stick with this set of double-sided on the thin dense foam (although focus)
9. I resolder the jack (in fact the thread is quite long)
10. I put the clip tom pice for a place (watch out son, go for the throat Pipelines Limited in the hull).
11. I put the wood strapping and I lensemble emissions to maintain fair.
12. I return I press the pad and lattache tom (2 Phillips screw)
13. I resume the tightness and tension of the skin mesh (the NEC is going to touch the skin cest normal, good tension relief erase the GNR by the CNE)
14. The trick is played! rendering is plutt class and has nothing do with loriginal
DRUM PAD
- Idem 1 5 that for toms pads except that the 5 I dcoupe foam white instead of black.
- Simply I put the black foam and I was grazing the bottom is the original post mounting (sensor + mtal plate) then I plate the ugly white foam (yes its thickness h is what is quil) that we'll see a little-through (well actually me too jai lespace Jam!)
- I is the circle of wood, I shake and I tend skin mesh.
- The round is played!
TESTS
Toms: SETTING THE NICKEL without my DM5! so I can even refine rglages, touch is super enjoyable, the little notes are played (especially in the middle, normal) but priphrie impacts are captured as well necessary.
The bass drum: no rebound toms identical to (normal skin touches the foam), but the rendering is good and fairly quiet, however I must find the right paramtres dclenchement because of too sensitive EST It's good sailing, with good rglages is the best!.
in parallle I equip an old CC Pearl 13 "Tiger (which I do not slaughter) with a mesh head: APRS several tries I position a damper that all rsoud problem of double triggering!
Voil goal achieved! I rgale ...
(Http://imageshack.us)


