

In the second and last installment, we’ll cover three main issues that you need to work out order to get your pedalboard up and running: The order of the pedals, how to get power to them, and how to attach them securely.
That’s an order
 |
Once you have your pedalboard purchased or constructed, it’s time to actually put the pedals on the board. Here you run into the issue of where to place them. The order doesn’t necessarily have to correspond to how they’ll be connected together, but the closer it is, the more convenient for cabling.
While there are no hard and fast rules, and you can use whatever sequence works for you, there is conventional wisdom about the best order for your pedals in the signal chain, and it’s based on logic.
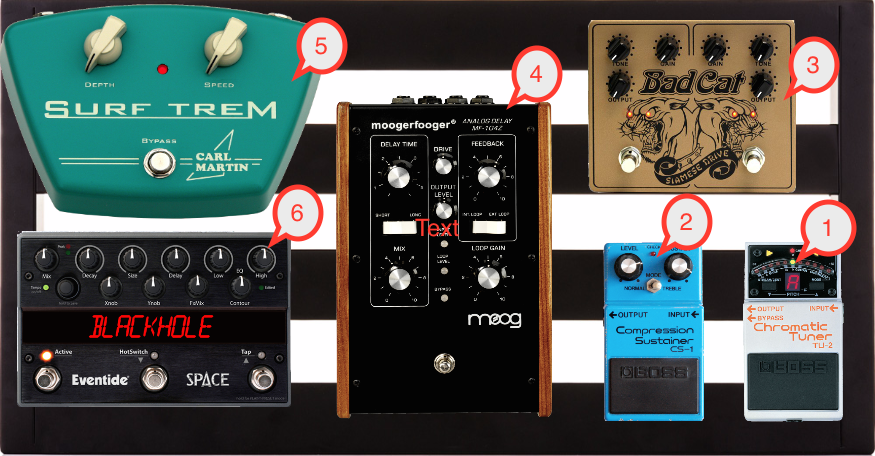
It’s generally agreed upon that your tuner should be the first stop on your pedalboard, and will be the pedal you plug your guitar into. It’s not critical to have it first, but for the most accurate results, it’s better for it to get the pure signal from your guitar rather than one that’s gone through a bunch of effects, especially distortion. Many guitarists like to put any filter effects, including wah pedals next, because they work best when fed a pure guitar signal.
If you have a compressor, that should go next in the chain, followed by distortion and overdrive. These pedals (especially compressors) can add buzzing and hum to the signal, and putting them later in the chain could make the noise issue worse. If you have an EQ pedal, place that next, so that you can change tone of the distortion and other tone-altering pedals that precede it.
Next, any pitch-shifting and modulation pedals including flangers, choruses, phasers, tremolos, vibrato pedals and so forth.
If you have a volume pedal, that should ideally be next in the chain. The reason it’s usually recommended to be placed in this spot that it’s after your overdrive and distortion pedals, so it can’t alter the sound of those effects like it would if it controlled the volume coming into them. It doesn’t usually go at the end of the chain either, because it can impact the performance of your ambience effects like delays and reverbs, which are generally last in the chain. And, of course, the output of your last pedal goes into your amplifier.
Here’s where it can get interesting. If you have a pedalboard with two rows, you have to factor in which pedals you interact with the most and place them in the front row. This may make it impossible to have the pedals physically in the order in which they’re connected, which can complicate the cabling a bit. Still, it’s best to have the placement be as convenient as possible for your playing style, and worry about the cabling later. After all, you can get or make cables of any length and run them underneath most pedalboards to get them to the correct location.
And, as mentioned in Part 1, plan to leave a little space between pedals for the cables that will connect them. If you’re adding a third-party power supply, don’t forget to leave space for it, too. Sometimes they can be mounted underneath to save space on the surface of the board.
Sticking points
 |
Once you’ve chosen the order, the next step is to affix your pedals to the board. The most common way to do this is by using Velcro. Easily available in hardware stores or online, you can cut custom sizes to fit the bottoms of your pedals and stick matching sized pieces, or long strips that go all the way across your pedalboard. Then just by pushing your pedal down, the two sides will stick together, adhering your pedal to the board.
Unfortunately, Velcro sometimes comes unstuck. I had a Pedaltrain pedalboard that came with Velcro strips to attach to the board itself, and within a few weeks, they were buckling and pulling up. This is not to say that Velcro won’t work, but get the most heavy duty version of it you can find, and apply it very carefully to your pedalboard to make sure it’s sitting totally flat.
Another Velcro-like option that may hold your pedals even more securely is 3M Dual Lock. It has tiny tines that stick out of one side and spaces for the tines to fit on the other. When pushed together, it’s very solid. Like Velcro, it has a sticky side for affixing it to your pedalboard and pedals.
Whether you use Velcro or Dual Lock, or some other similar product, you’re going to have to stick a piece or two on the bottom of your pedal. Try not to stick it onto any labels that might be there. Over time, the glue will be absorbed into the label and if you pull the Velcro off, it could take the label up with it. It can even take paint off of a pedal, as I discovered with a MXR GT-OD overdrive pedal that I had on my pedalboard (see above photo). If you want to sell your pedal, having the label or paint peeled off in spots will likely hurt the resale value.
Even if the Velcro peels off without pulling up a label or paint, it will probably leave residue wherever you stick it on the pedal. It might be better just to leave the Velcro on the pedal, in that case. Unless you’re selling a vintage pedal, having some Velcro strips on the bottom probably won’t turn off many buyers. I would buy a used pedal that had Velcro on the bottom.
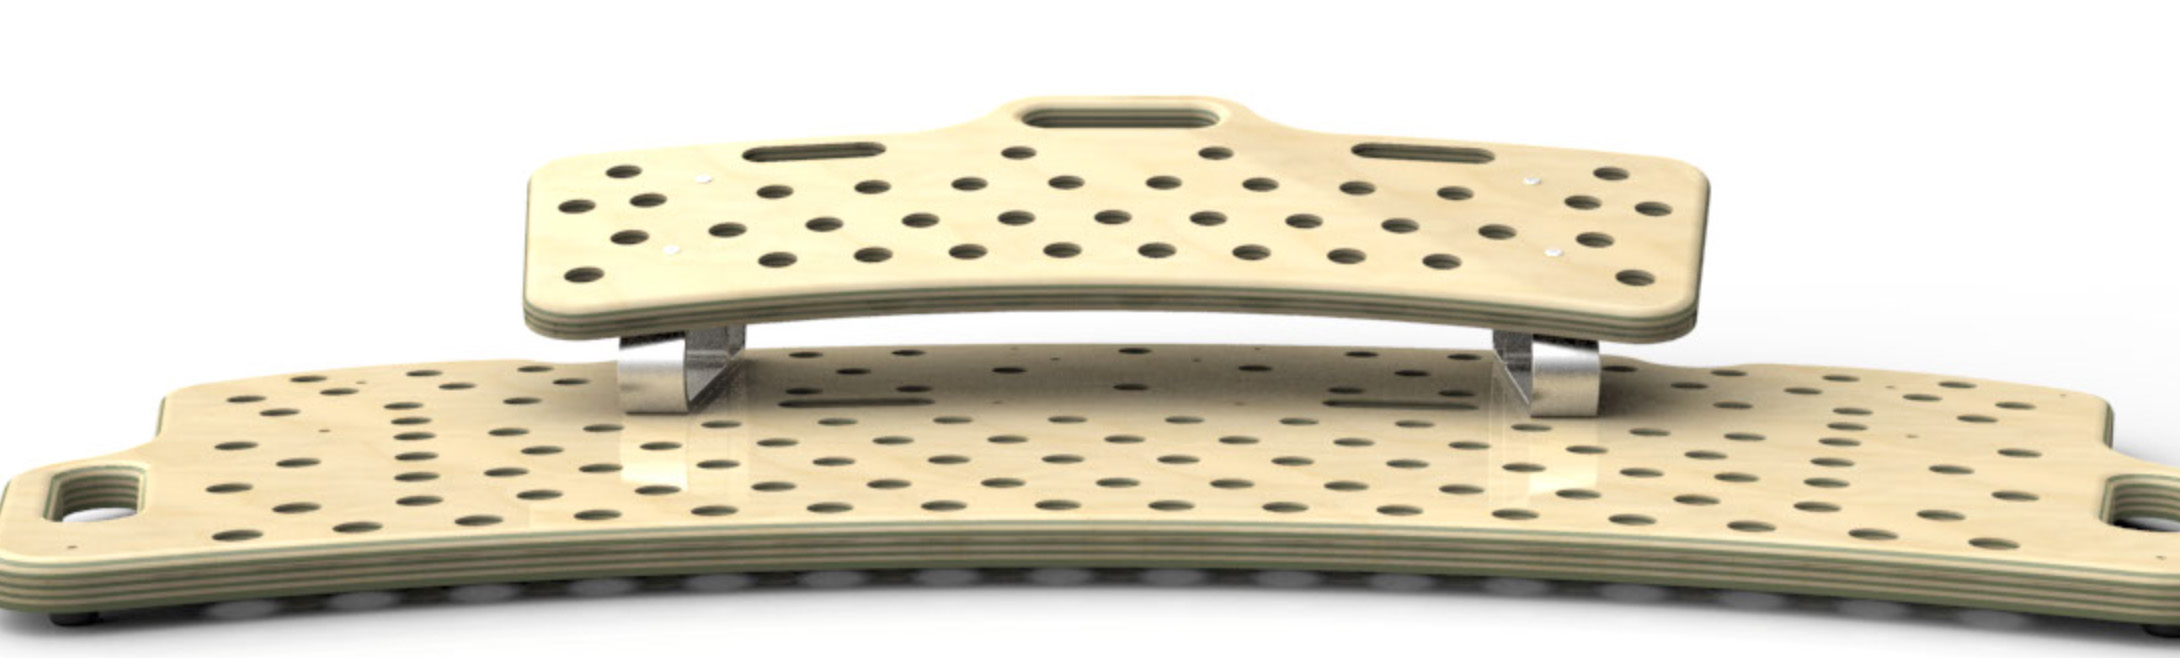
There are other options if you don’t want to go the sticky route. One is to drill small holes on either side of where your pedal will go, and wrap a zip tie around the pedal, connecting it underneath the pedalboard. It will hold your pedal in place, and is an inexpensive way to go, although some feel it’s cheesy looking. Chemistry Design Werks makes a line of pedalboards called Holeyboards, which have multiple holes drilled in the surface specifically so you can use zip ties (see picture below).
 |
Others are fond of the “bicycle chain method” in which you cut a bicycle chain into individual links that have a hole on either side. You unscrew one of the pedal’s backplate screws and screw it back in through one one of the holes in the chain link, and then drill a hole screw facing whole into the pedalboard. For a clear explanation with pictures, check out this link.
All wired up
If you have plenty of space, you can probably buy a set of dedicated pedalboard cables and use them for most or all of the wiring you’ll be doing. You can get packs of such cables, which are typically very short, with right angle plugs to save space. Depending on how you order your pedals, you may or may not be able to get away with a single cable length. Chances are that you’ll need at least one or two of differing lengths to make it work and look neat. Most boards either have open spaces between rows (such as Pedaltrain models) or holes drilled in various spots, which allow you to run cables underneath if you have to wire up non-adjacent pedals. If you’re making your own board, you can drill the holes yourself, as needed. Having access to the underside like that allows you to run longer cables across the board while keeping them out of sight. A well-designed pedalboard will have very little excess cable visiable on it.
 |
If you’re good at soldering, you might consider buying a bunch of right angle plugs and a length of plain cable (no connectors attached) and make your own patch cords. If you’re not good at soldering, you might want a product such as the DIY Solderless Pedalboard Cable Kit from Planet Waves. It features 10 feet of cable and 10 right-angle plugs that just screw onto the cable.
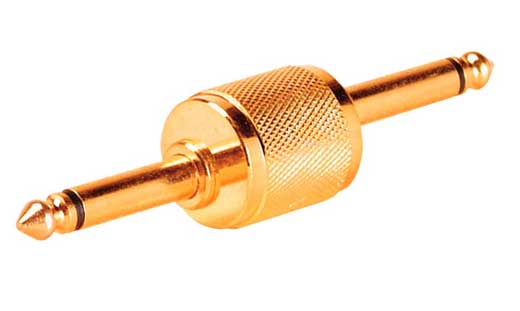
Another solution is pedal couplers (see photo on left). These are cable-less connectors featuring two opposite-facing male 1/4” jacks. They work great to connect adjacent pedals that are at or close to the same height. Most people find couplers convenient, but some recommend against them, saying that the sidewalls of pedals are not perfectly straight, so that several pedals coupled together could end up not sitting flat.
Don’t fight the power
 |
Although many stompboxes run on batteries, you don’t want to depend on them while you’re gigging. Not only might they run out on you in the middle of a show, but constantly replenishing batteries is way more expensive in the long run. For those reasons, you should get a pedalboard power supply, if your board doesn’t come with one built in. Luckily, most pedals run on standard voltages (typically 9V 200mA), which makes powering from a master power supply a lot more practical. Some pedals also run on 18V, but again, that voltage is also a standard within the pedal world, as is the size of the power cables that plug into the pedals. Occasionally you run into a pedal that requires a non-standard power supply, which is definitely a complicating factor. In those cases you might have to use a wall wart for that pedal, which you plug in to AC along with the power supply.
A lot of manufactured pedalboards come with power supplies built in. Typically, these have a bunch of 9V outlets and usually some 18V ones, too. They also typically come with short power cables jumpers to connect to the pedals. Luckily, most pedals use the same size power jacks.
If you can’t spend the money to buy a dedicated power supply, there is a workaround, albeit somewhat clunky. Get a regular power strip, one that’s small enough to fit on the underside or the top of your pedalboard. Then simply use the wall warts that come with the pedals to plug into that. You’ll want to tape them to the power strip with duct tape or affix them with zip ties so that they don’t fall out. In the long term, though, you’re better off with a dedicated power supply.
Ready to rock
The biggest takeaway I have from the various pedalboards I’ve owned in my life is that it’s best to plan in advance and do the necessary research before buying a pedalboard or starting to build one. It’s also important not to cut corners when choosing pedal placement, attaching pedals and cabling, as you’re likely to cause problems that will come back to bite you during a show. Take it slowly and carefully, think through each step of the process, and you’ll wind up with a quality pedalboard that can last you for a long time. Happy pedaling!
