

All DAWS are definitely not created equal. Yes they can all record and edit audio and MIDI, host effects and software instruments, and provide facilities for mixing. But beyond those bread-and-butter functions, most offer some specific features that either none of the others do, or that none of the others can do as well. Here we present a look at 10 such innovations, presented in alphabetical order by manufacturer.
Session View: Ableton Live (Mac/PC)
The Session view is one of two main screens in Live’s very powerful, yet streamlined GUI. With it, Live pioneered the idea of DAW clip launching, and although several other DAWs now offer a similar feature, the Session View still is the standard by which all other such features are judged.
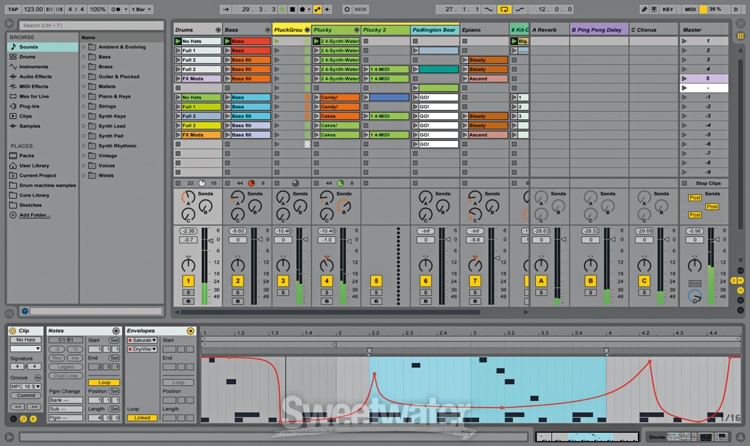
Although it looks like a mixer, the main window of the Session View is way more than that. At the top of each track are Clip Slots, into which you can drag audio clips and loops, MIDI files and more.
Clips can be launched from the Launch Button inside each slot, via keyboard commands or via MIDI. This makes Live a potent live performance tool, especially when used in conjunction with one of the third-party Live controllers such as Novation Launchpad. Each track can hold multiple clips, and horizontal rows of clips are considered Scenes. Scenes can be changed and triggered as well, and if you put Live into record, each track is recorded separately in the Arrangement view, Live’s other main screen. So you can experiment with different performances of the clips in Session View, and record them. When you perform one that you like, it’s captured as a multitrack file.
Video Editing: Acoustica Mixcraft (PC)
Most DAWs allow you to import a video, extract its audio track, and synchronize your music, but Acoustica Mixcraft lets you edit the video, as well. So not only is it a fully featured DAW, it’s a video editor, too.
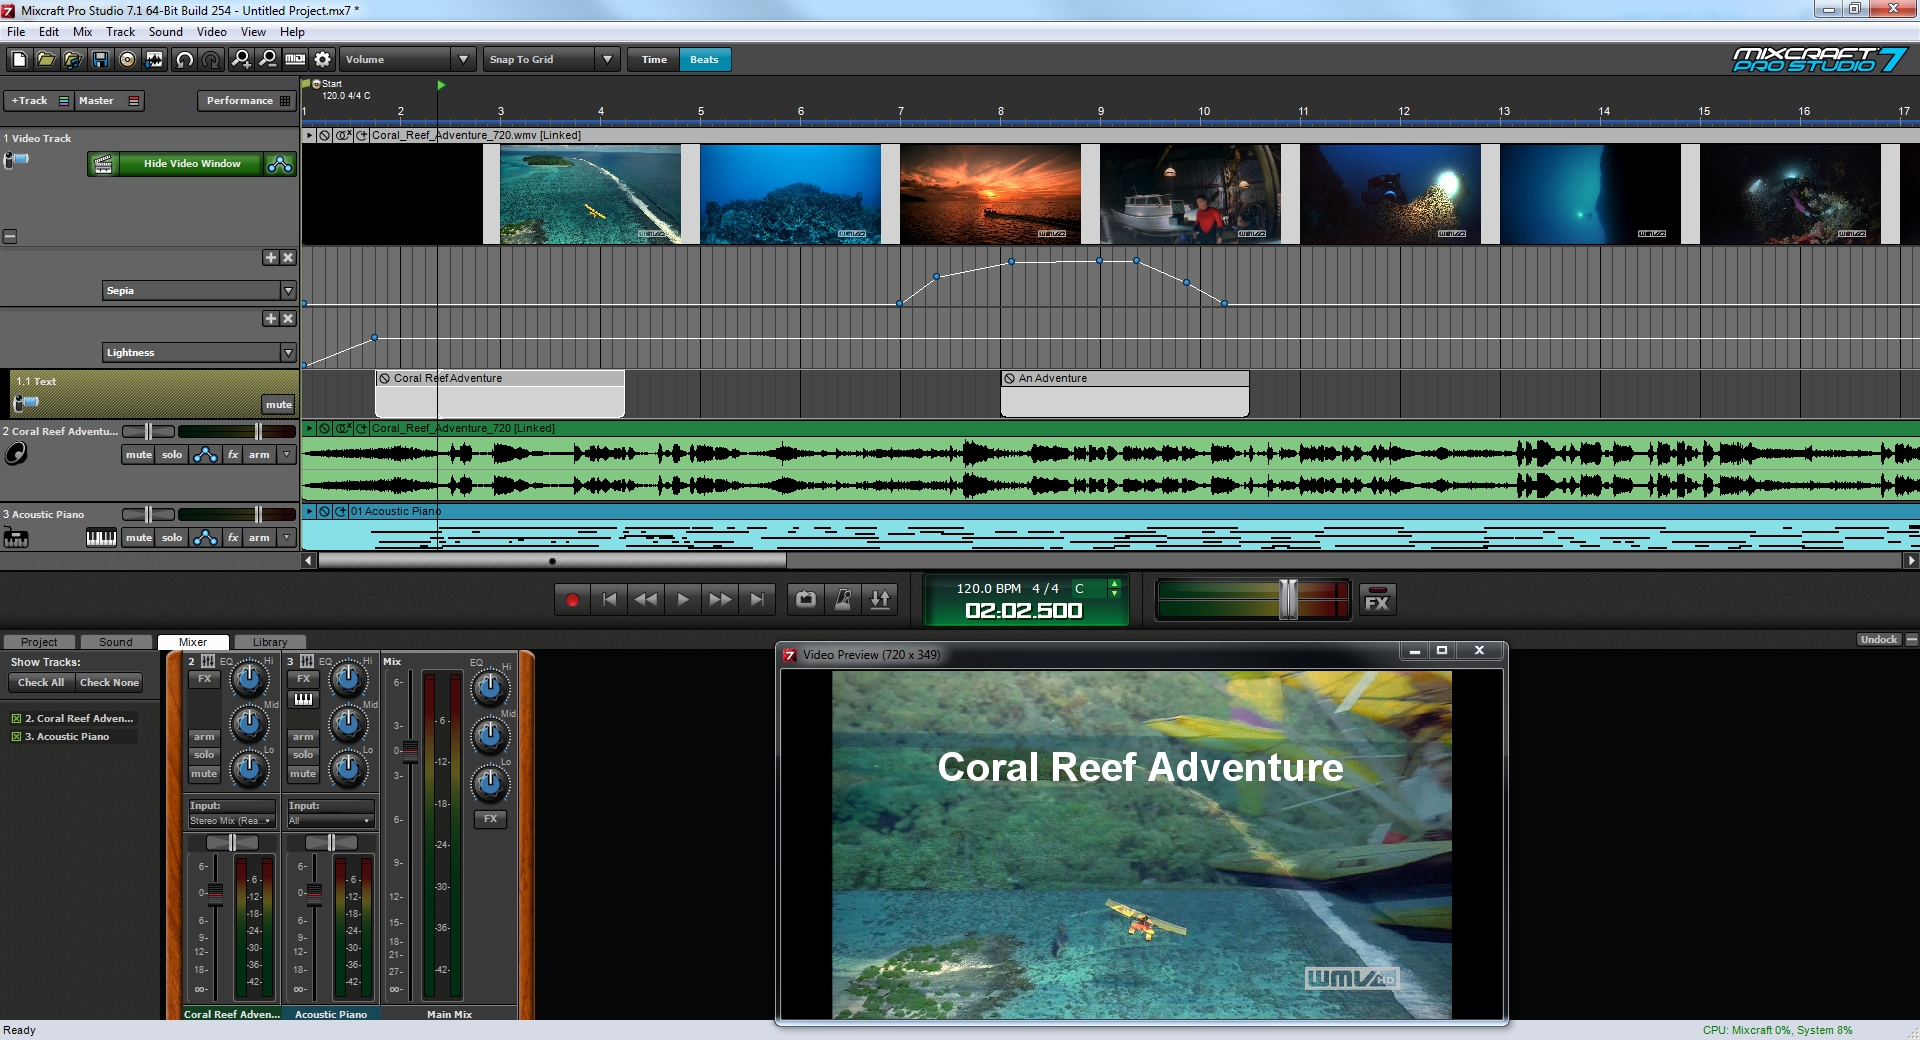
Mixcraft lets you import, load, edit and crossfade video clips or still images, and offers 25 different video effects, including transitions, blurs Posterize, Sepia, Blue Filter and many others. You can even automate the video effects with breakpoint automation. Mixcraft also offers pretty powerful text features for adding titles, based around the Text Track, which allows you to add both stationery and scrolling text in the form of Text Clips.
When you’re finished with the project, you can render your video in either the compressed WMV format, or the uncompressed AVI.
Drummer: Apple Logic Pro X (Mac)
Need a great sounding drum track for your song in a hurry, Logic’s Drummer feature has you covered. Simply open a new Drummer Track, and you’ll see two 8-bar regions in the drummer track, with the default “drummer” and kit. Logic Pro X now includes over 25 different “drummers, ” each with his or her own name, kit, playing style and selection of available beats.
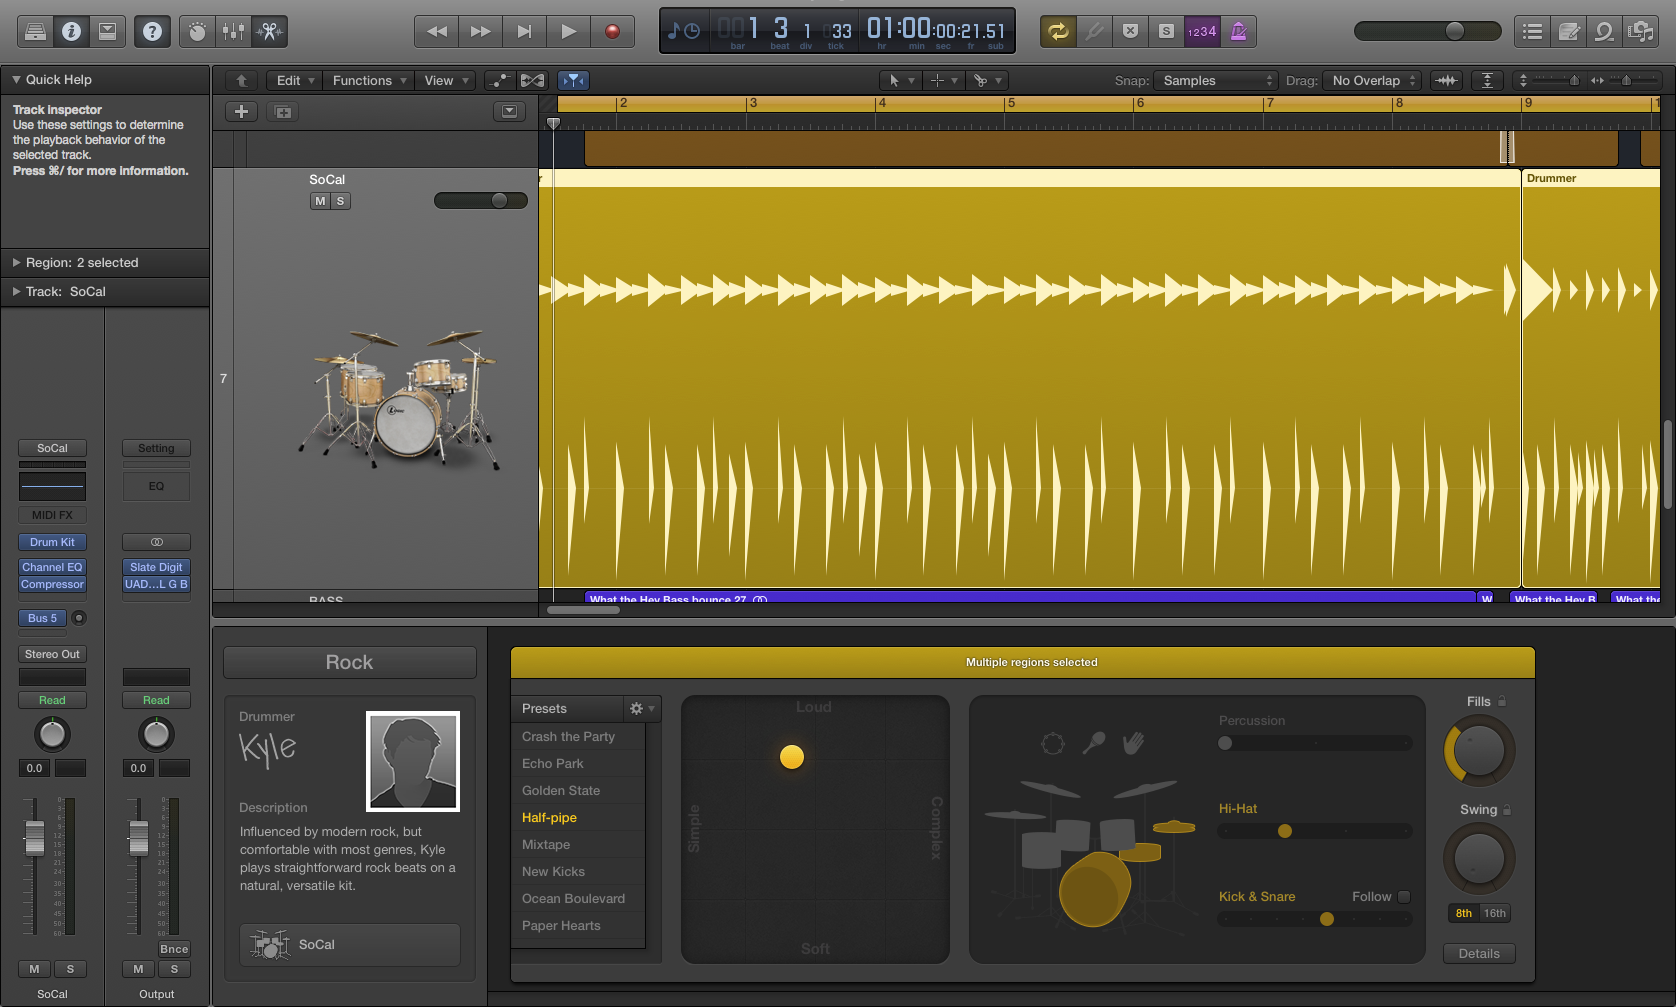
Add more regions at will, and for each region you can control such factors as complexity, dynamics, how many fills, and whether the beat is hi-hat-, ride- or even tom-based.
Clicking the details button offers you deeper parameters such as the amount of push or pull on the beat, whether the hi-hat is predominantly open or closed, and how much emphasis there is on Ghost Notes.
The Drummer Track has its own format, but you can easily convert it to MIDI if you want to edit individual notes. You can edit the kits themselves using Logic’s Drum Kit Designer feature.
Clip Gain: Avid Pro Tools (Mac/PC)
It seems simple enough, a breakpoint line that adjusts the gain of a particular track or region. But the Clip Gain feature in Pro Tools is different from volume automation, because it’s adjusting the level of the audio (or audio region) whereas volume automation adjusts the track level. Having Clip Gain means that you have a second layer of volume automation.

How does it come into play? For one thing, it lets you go through a track and even out volume discrepancies, before you even start to automate. It’s really fast for, say, cutting peaky levels in a vocal track or making bass part’s volume consistent throughout a track.
Because it’s changing gain at the clip level, it’s great for lowering hot tracks that make your inputs clip, something that volume automation, because of where it is in the signal chain, can’t do. It’s really convenient for lowering all the tracks together by the same amount. Simply turn on the “All Tracks” group, select a time range, and drag the clip gain line up or down in one track, and the rest follow suit.
Pro Tools’ Clip Gain feature is one that you might not initially think is important, but which you’d miss terribly if you switched to another DAW.
VocalSync: Cakewalk Sonar Platinum (PC)
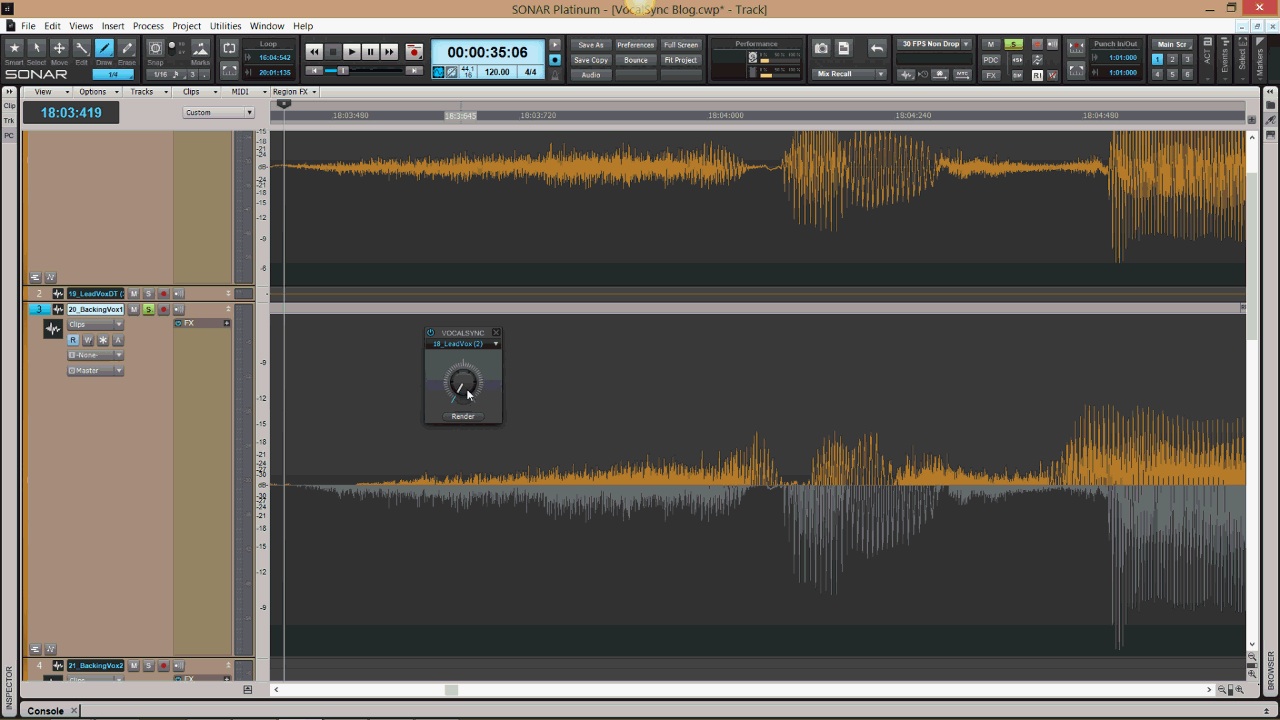
Vocal alignment software is typically only available as an expensive, third-party plug-in — that is, unless you have Cakewalk Sonar Platinum. That’s right, included in the DAW is a feature called VocalSync, which lets you precisely align both sung and spoken vocals.
VocalSync can be applied either to an entire track or to a selected region. You access the effect from right in the Track View window, via the Region Effect menu. Select one vocal as your guide track and VocalSync will align the other vocal with it. You can even loop a region and adjust how closely aligned the tracks will be in real time, allowing you to hear when you’ve found the perfect setting.
Finally, when you’re satisfied with the setting, you can render the aligned track or region in place and you’re good to go.
Macros: Cockos Reaper (Mac/PC)
It’s common wisdom among recordists that using key commands in a DAW helps you work faster. But what if you could set up custom key commands that trigger multiple actions? Well you can in Cockos Reaper.
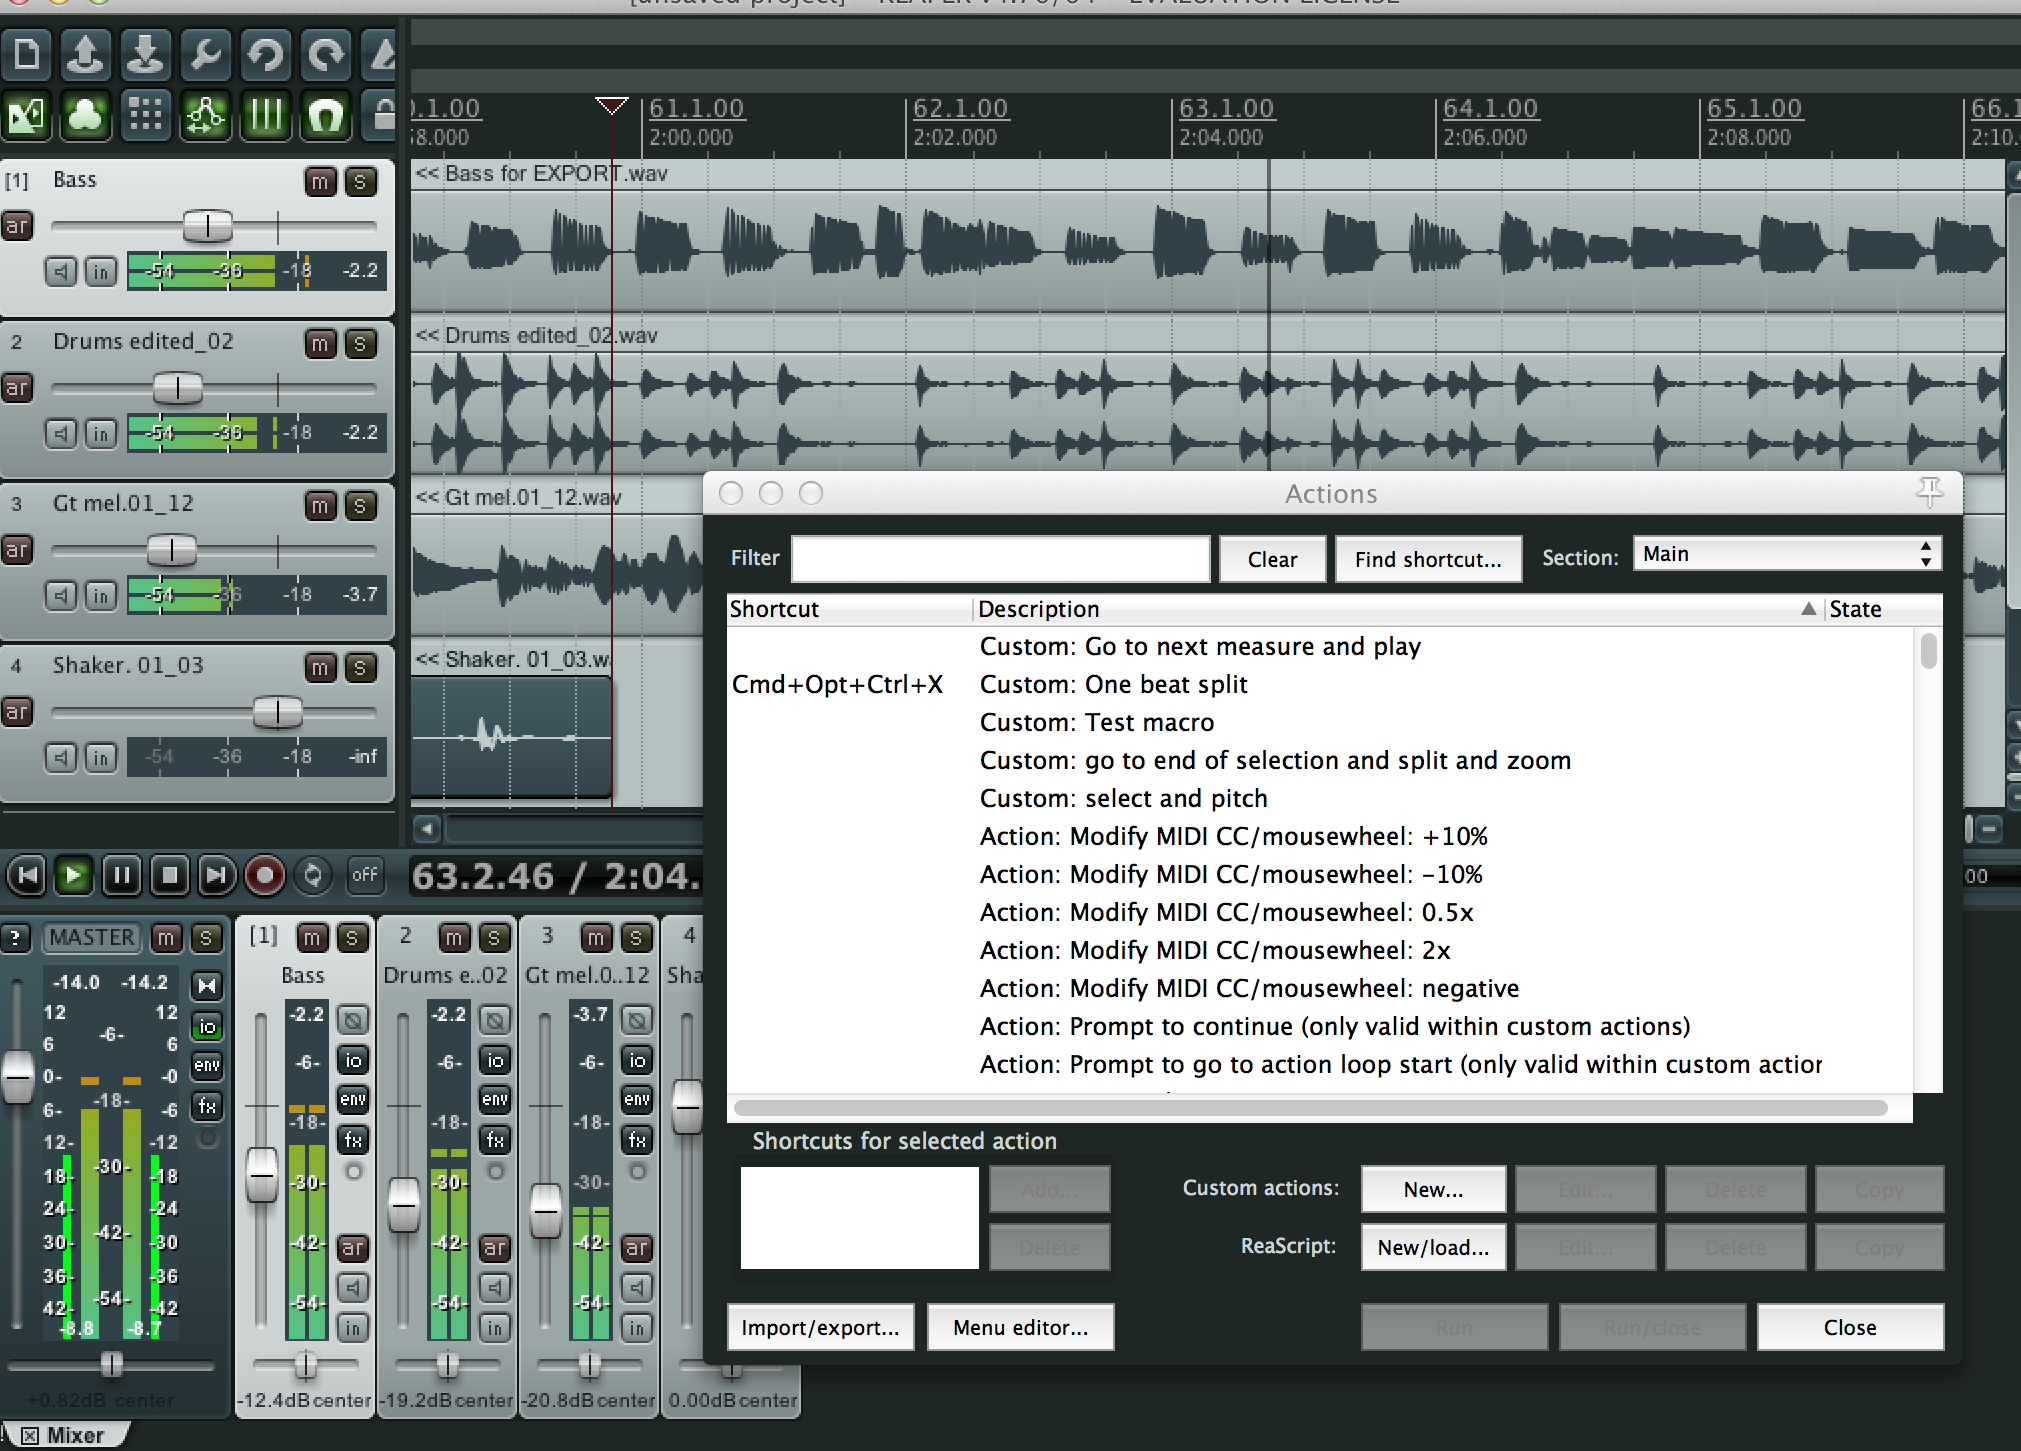
The Macros feature lets you choose from a huge list of actions, and drag them into a new macro window to create customized behavior that can be triggered by a keystroke. From transport commands to zooming to creating tracks and much more, you can automate repetitive tasks that would normally require two, three or more keystrokes.
Here’s a very simple example. You could make a macro that includes these action: “Go to start project” and “Transport: Play.” Add a keystroke command, and then whenever you hit that, the cursor would go to the beginning and start playing. That lets you accomplish an action that would need two keystrokes with only one.
You can use any of the actions in Reaper’s Actions List as fodder for your macros, and even use macros to access items that you can’t get at from the regular menus.
Consolidated Window: MOTU Digital Performer (Mac/PC)
Workflow is one of the factors that distinguishes one DAW from another, and while most are customizable to a certain degree, Digital Performer (Mac/PC)
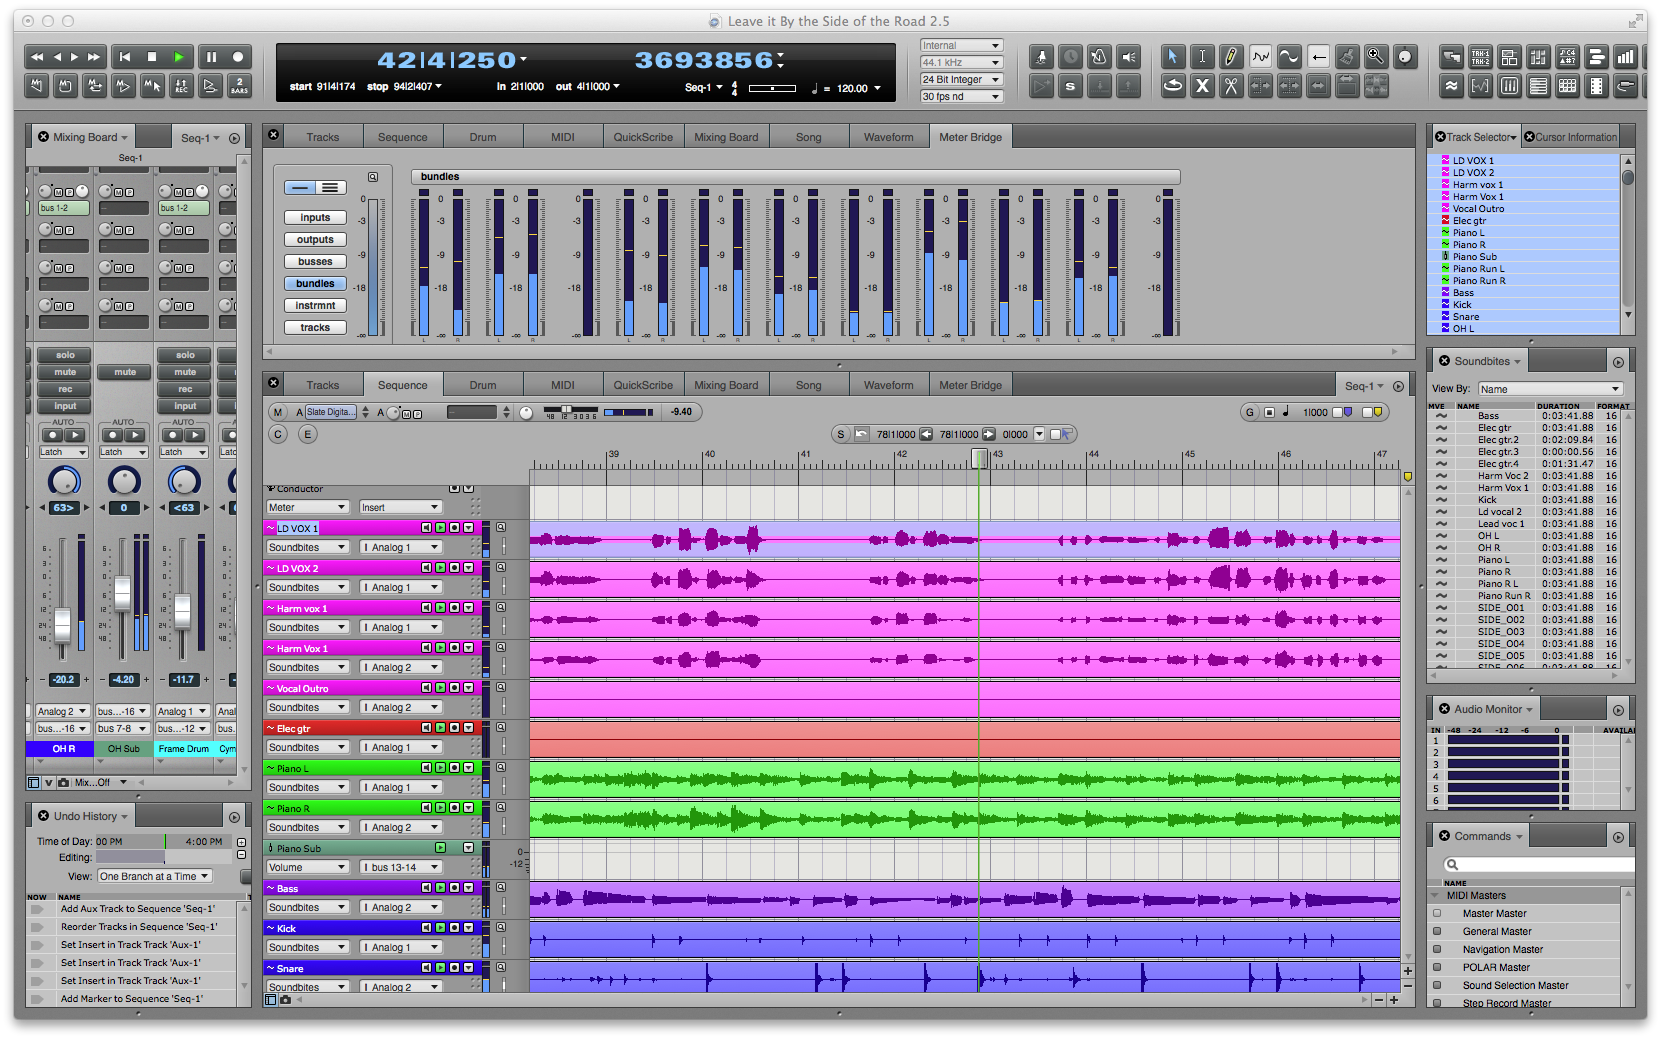
goes the extra mile in terms of customization with its Consolidated Window feature. The Consolidated Window contains two main resizable center sections, which is where you’d typically have the Tracks and Mixer windows, or perhaps the Tracks and Sequence Editor windows. Here’s the innovative part: you can open up “sidebars, ” vertically oriented strips on either side, inside which many of DP’s ancillary windows can be open simultaneously. Each of these can be resized vertically in order to stack more on top of each other.
For example, you could set yourself up for editing audio and MIDI by putting the Sequence Editor and MIDI editor in the main section. Then in the right sidebar you could put the Event List, Markers List, and Track Selector, and in the left sidebar the Mixing Board above the Meter Bridge. You can save your configuration and recall it as a Window Set at any time, so you could have dedicated consolidated windows for editing, tracking, mixing and so forth.
Even if you don’t save separate configurations, each of the two main areas of the Consolidated Window has tabs at the top that let you switch between the different editors and other window types at the click of a mouse. DP also lets you change the graphic look of the GUI with a choice of more than 20 Themes, which can change the color scheme and thus the vibe, giving you even more choice.
The Project Page: PreSonus Studio One (Mac/PC)
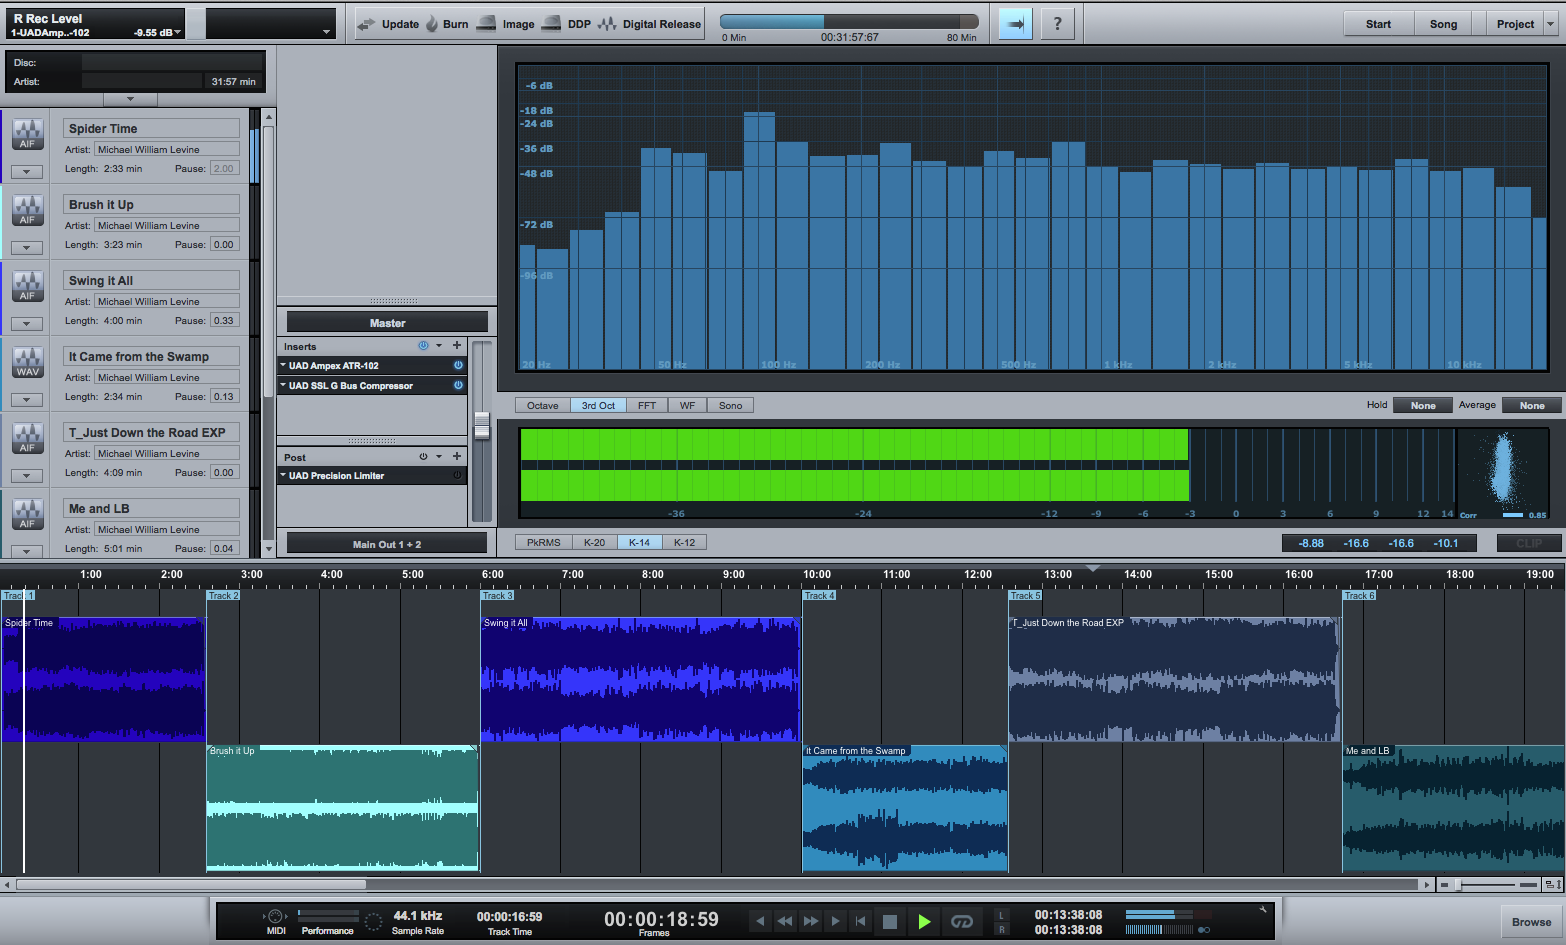
Studio One truly provides the complete recording experience. Not only can you record, produce, arrange and mix in it, it also has its own dedicated mastering environment called the Project Page. Create a new Project and open it, and you can import all your mixes in and view them in a horizontal two-level waveform display, where you can easily reorder them, trim the beginnings and ends, add fades and change levels.
But that’s just the beginning. A huge real-time analyzer display shows you the levels of all the frequencies in your audio in a variety of formats, and below it a master level meter lets you view the main left and right levels. A stereo correlation meter is provided, too.
The Project Page also lets you add effects globally or to individual tracks, so you could do all your mastering without leaving it. Finally, it lets you burn CDs, export CD images, DDP files and more, and export your tracks for a digital release.
Chord Track: Steinberg Cubase (Mac/PC)

Steinberg Cubase has been in the top echelon of the DAW world for years, and one reason it’s remained popular is that it’s constantly adding useful and innovative features. One example is the Chord Track, an intelligent composition tool that gives you the ability to add chords to your compositions in a variety of ways and to control MIDI instruments. The chord track can then be used as a template for the MIDI tracks in your song, which will follow it to a user adjustable degree. What’s more, when used in conjunction with Cubase’s VariAudio 2.0 feature, you can precisely harmonize your vocal tracks from the audio files, based on the chords in the Chord Tracks window.
Chords can be added to a song via the Chord Editor, which makes it easy to add anything from a simple triads to complex chords with altered tensions. Minor, major, diminished, augmented, you name it, the Chord Editor will create it for you. The Chord Assistant window offers you choices of chords to add or substitute in your song, and you can select the level of intensity. What’s more, you can choose piano or guitar voicings, so that you can more authentically create the chords for a particular MIDI instrument.
Real-Time CPU Manager: TSC Tracktion (Mac/PC)
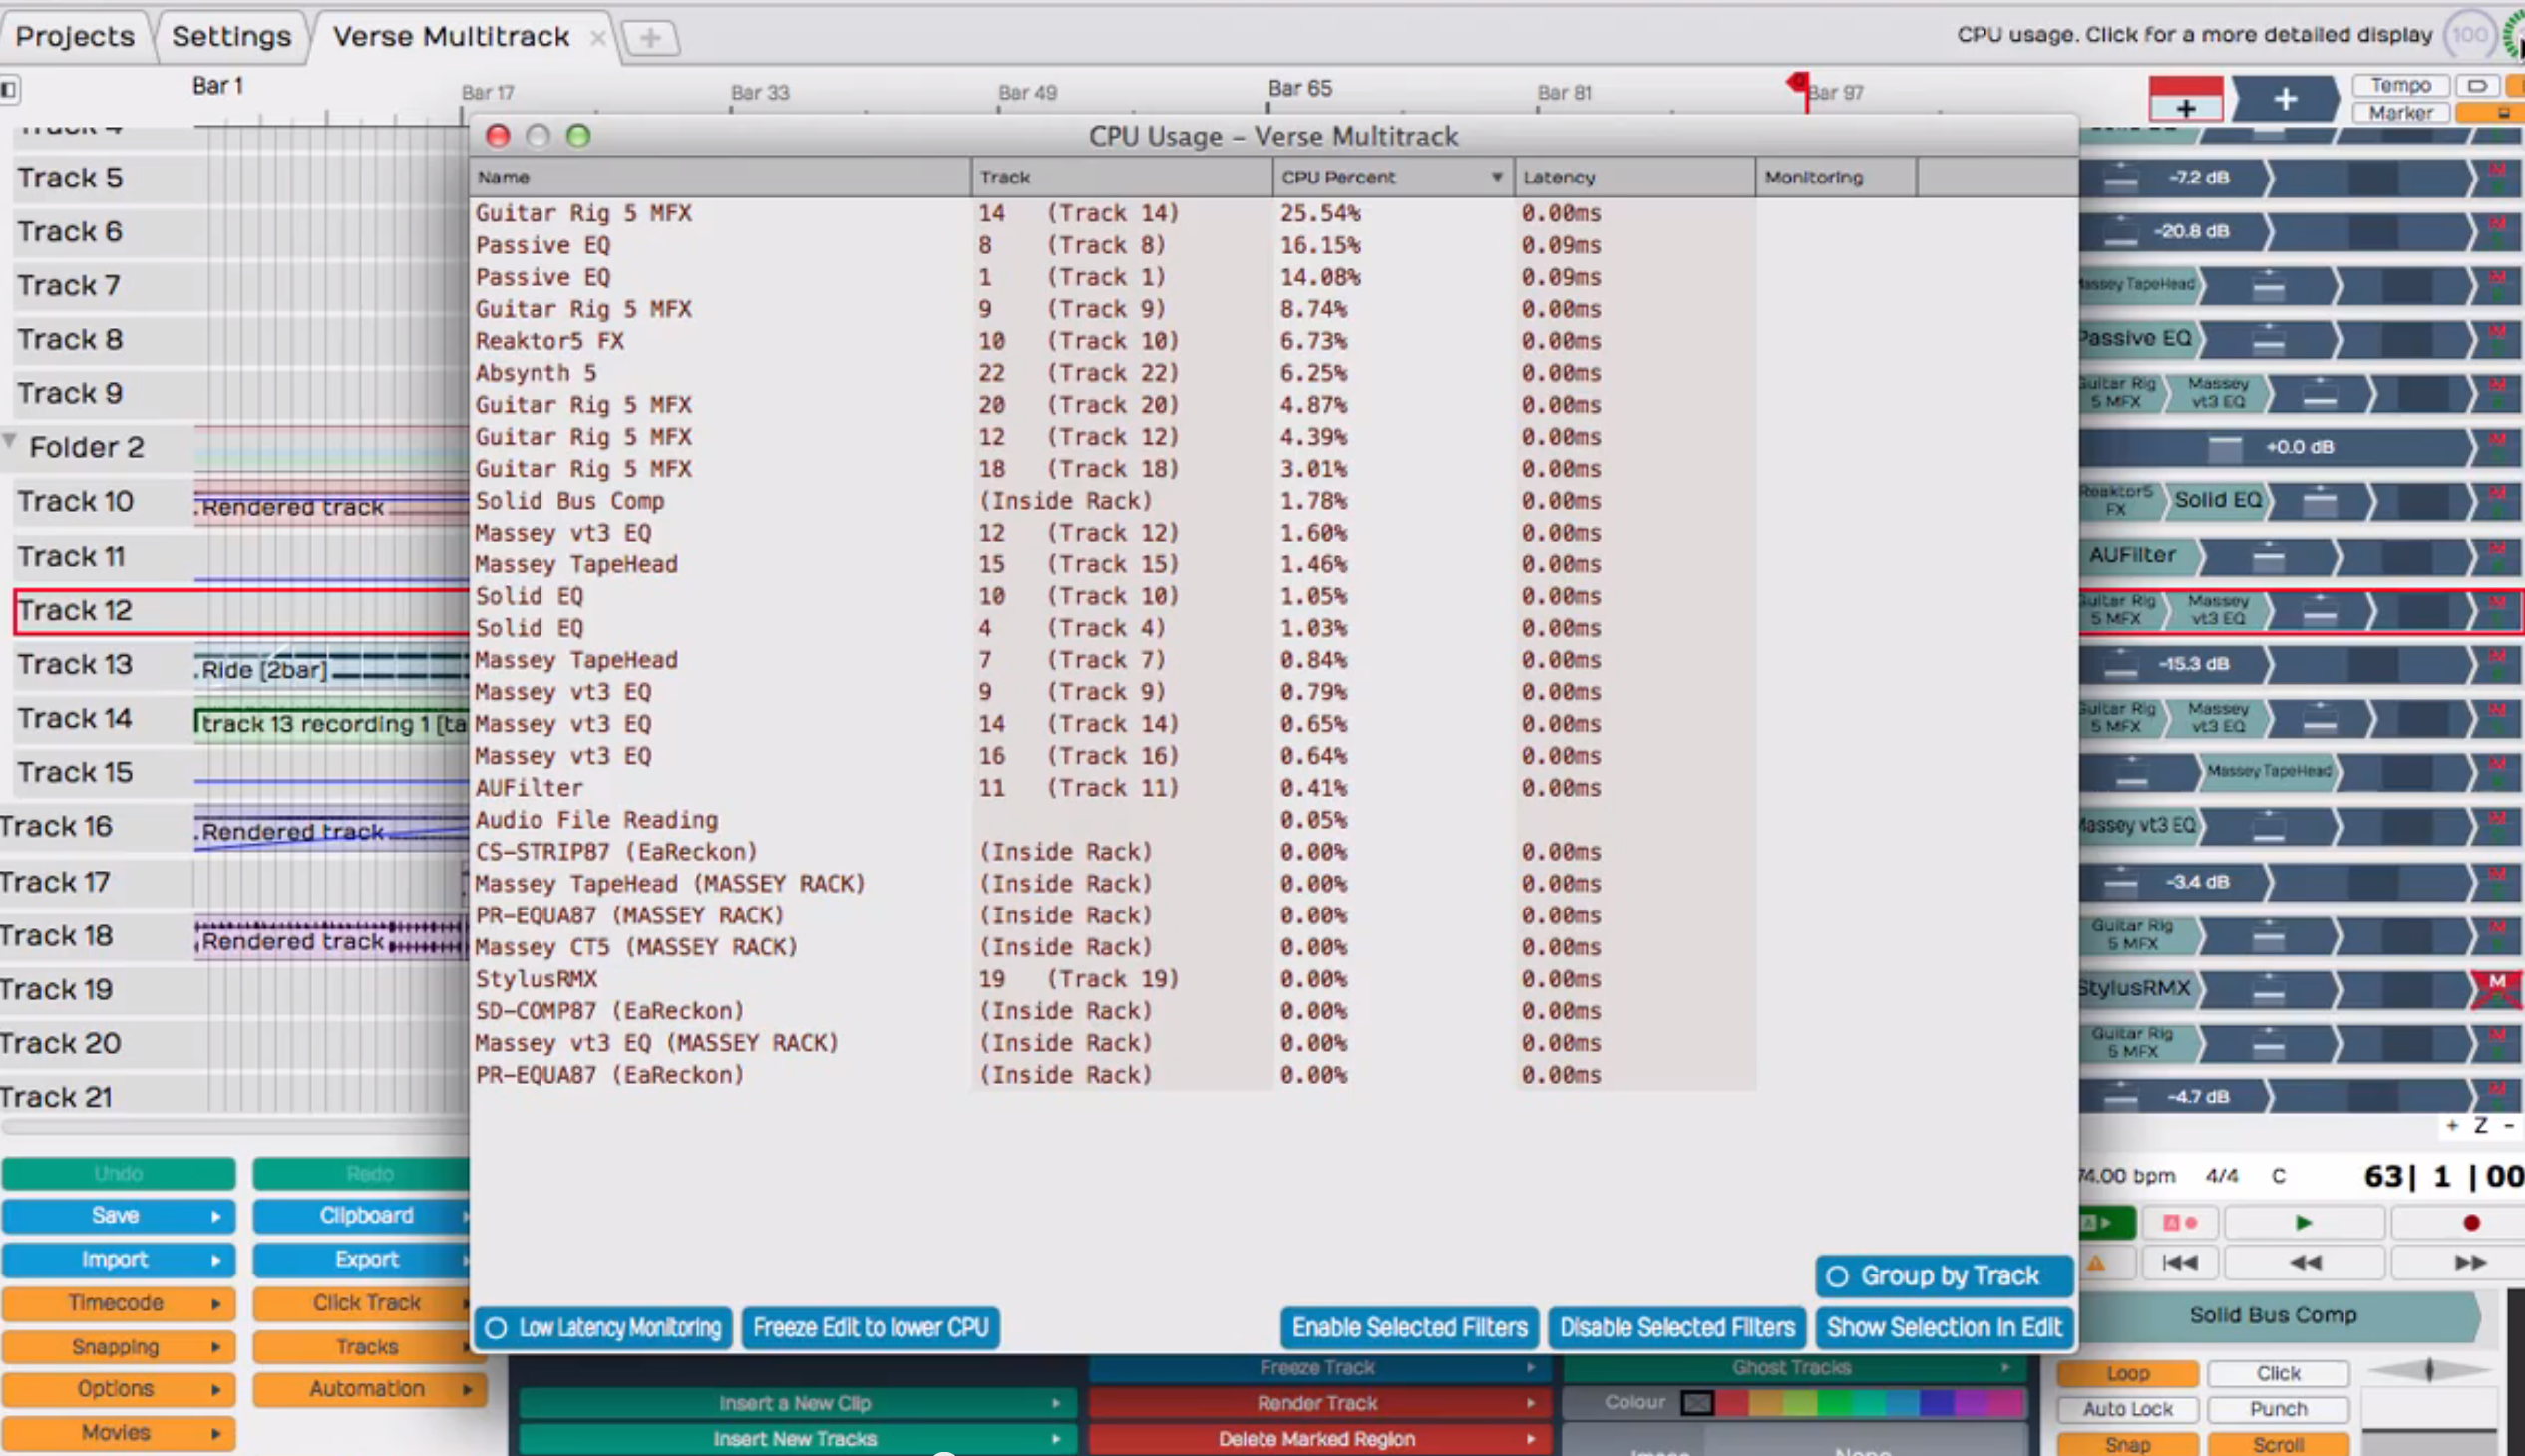
Computers may be getting faster and faster, but the CPU appetite of software seems to grow along with it, gobbling up that extra power with more complex DSP and other features. The folks at the Tracktion Software Company came up with a unique way to handle the problem of CPU hogging plug-ins inside the Tracktion DAW. It’s called Real-Time CPU Management.
If you open the Real Time CPU Management window, you’ll see a lilts of all your active plug-ins and the percentage of CPU they’re taking up. Find the plug-ins that are taxing your system the most and click on them, and Tracktion will temporarily freeze the track through the point where that plug-in is in the signal path, creating what the company calls a “Freeze Point. Any plug-ins after the Freeze Point will still be unfrozen and adjustable. You’ll still hear the affect of the frozen plug-in or plug-ins on your track, just like on a normal “frozen” track. Freeze points can also be created with filters that you apply directly to the signal chain in your track.
But Tracktion’s real-time resource management goes even further: activate the Low Latency Monitoring option at the bottom of the CPU Manager screen, and it will temporarily render your entire session. Why is that important? Because with all the CPU resources freed up by freezing all your tracks and plug-ins, you can set your buffer to its lowest setting, thus reducing latency to a bare minimum.