


The folks at Synchro Arts, renowned for their VocAlign software, recently came out with Revoice Pro 3, the latest version of their application that incorporates vocal alignment, pitch correction, doubling and more. We took it for a test drive, and here’s what we found.
What it is
 |
Revoice Pro 3 is a powerful and versatile vocal processor. It can tighten timing and pitch on doubled vocal parts, create doubles from single tracks, perform pitch correction on individual vocal tracks, and even create chorusing and slapback effects. It’s particularly useful for pop and R&B projects with multiple vocal tracks that need to be tightly aligned and tuned, and it’s also excellent with spoken word parts that need aligning. You can use it with instruments, as well. If you’re willing to put in the time to learn its rather challenging user interface, you can get excellent results.
Installation is easy. The program requires an iLok for authorization. Although some people find iLoks to be an annoyance, they do let you install a program or plug-in on multiple computers and just move your iLok around, which is convenient if you work on more than one computer.
How it works
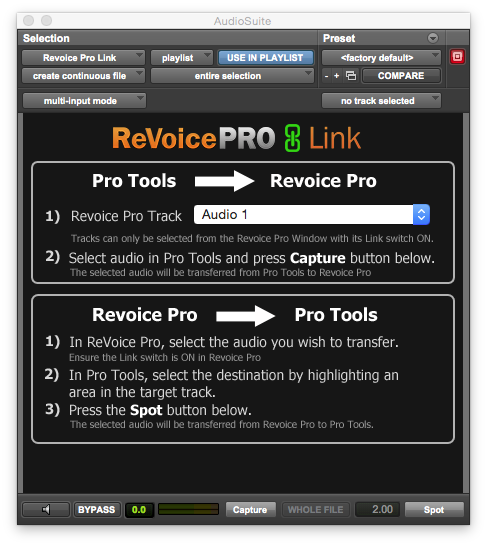
You do most of your work in Revoice Pro 3 in the interface of the standalone application (Mac/Windows). Also included with the installation is a Revoice Pro 3 Link plug-in, which allows you to capture audio from your DAW and send it to the standalone app for processing. The Link plug-in comes in three flavors: AAX for Pro Tools; AU for Mac DAWs other than Pro Tools; and VST3 for Cubase, Nuendo and other DAWs that support that format.
You can also drag and drop audio files into Revoice Pro 3, and when you do, you’ll typically get a dialog box asking if you want to place the track according to its time code. Doing so assures that your tracks will be perfectly aligned.
Getting the processed audio back in is a bit more involved. In Pro Tools, the Revoice Pro 3 Link plug-in not only lets you capture audio, but also Spot it back into your sequence at the correct location. The plug-ins for the other formats don’t offer spotting, but you have a couple options for getting the processed files back into your sequence: You can export them from Revoice Pro 3 and manually import them back into your sequence, or you can drag and drop them directly into your sequence, though you must first initiate the process with the option-shift (alt-shift on PC) key commend.
Prior to version 3, Revoice Pro could be ReWired to your DAW for exchanging files, but that feature has been dropped in version 3.
Exclusive to Pro Tools are two other plug-ins, Quick APT and Quick Doubler (accessed via AudioSuite). These allow fast workflows for Revoice Pro 3’s key processes. A Pro Tools Monitor plug-in is available as an insert, and allows you to monitor Revoice Pro 3 through your Pro Tools system.
 |
The Revoice Pro 3 interface defaults to three tracks, but you can add more if you need them. For its bread-and-butter process, APT (Audio Performance Transfer), which tightens up timing and/or pitch between two tracks, two of the three tracks would consist of audio tracks captured from your DAW.
One would be the track you use as the master timing and pitch reference, which in Revoice Pro 3 parlance is called the Guide Track. The Dub track is the one that needs to be processed to match it to the Guide track. The third Revoice track is called the Output Track, and is where the processed version of the Dub track shows up. It’s the one you send back to your DAW to replace the original Dub track.
Tracks in Revoice Pro 3 show up in a waveform-type track display with mixer controls on the far left for each track that include Mute, Solo, Pan, Volume and more. Once your tracks are imported, the next step is to initiate a New Process, which can be done from a menu selection or key command. (Revoice Pro 3 has an nice selection of key commands that really speed things up once you learn them.) You then get a New Process dialog box, which allows you to choose what type of process and which part — all or a portion — of the Guide and Dub tracks you’ll be using. You can also choose which tracks to designate as the Guide, Dub and Output. Finally, you can choose a preset to use. Revoice Pro 3 provides a nice selection of presets. For APT, your choices include Tight Timing Only, Vocal: Slightly Loose Time and Pitch, and Vocal: Tightest Time and Pitch.
In this “before and after” example, you’ll first hear two vocals that need tightening, and then the tightened version using Revoice Pro 3's APT process.

Especially when used on a single voice, as in the previous example, the tightest settings can sometimes produce almost too close a match. In that case, you can open up the settings parameters and loosen it up a little, or use one of the other presets until you get the sound you’re looking for.
Revoice Pro 3 has a deep set of auditioning features, including scrubbing, looping, setting playback ranges and more, as well as a variety of muting and soloing options.
Double up
Electronically doubled tracks don’t usually sound that realistic. Not so with Revoice Pro 3’s Doubler effect, which creates doubles with enough randomness in timing and modulation to sound and feel very close to a live double.
In this audio file, you’ll hear the same vocal file from the APT example, but this time doubled twice using the Doubler effect.

Here’s an example with a rhythm guitar track. You’ll hear it first in mono, and then doubled by Revoice Pro 3 and panned hard right and left.

Shifty
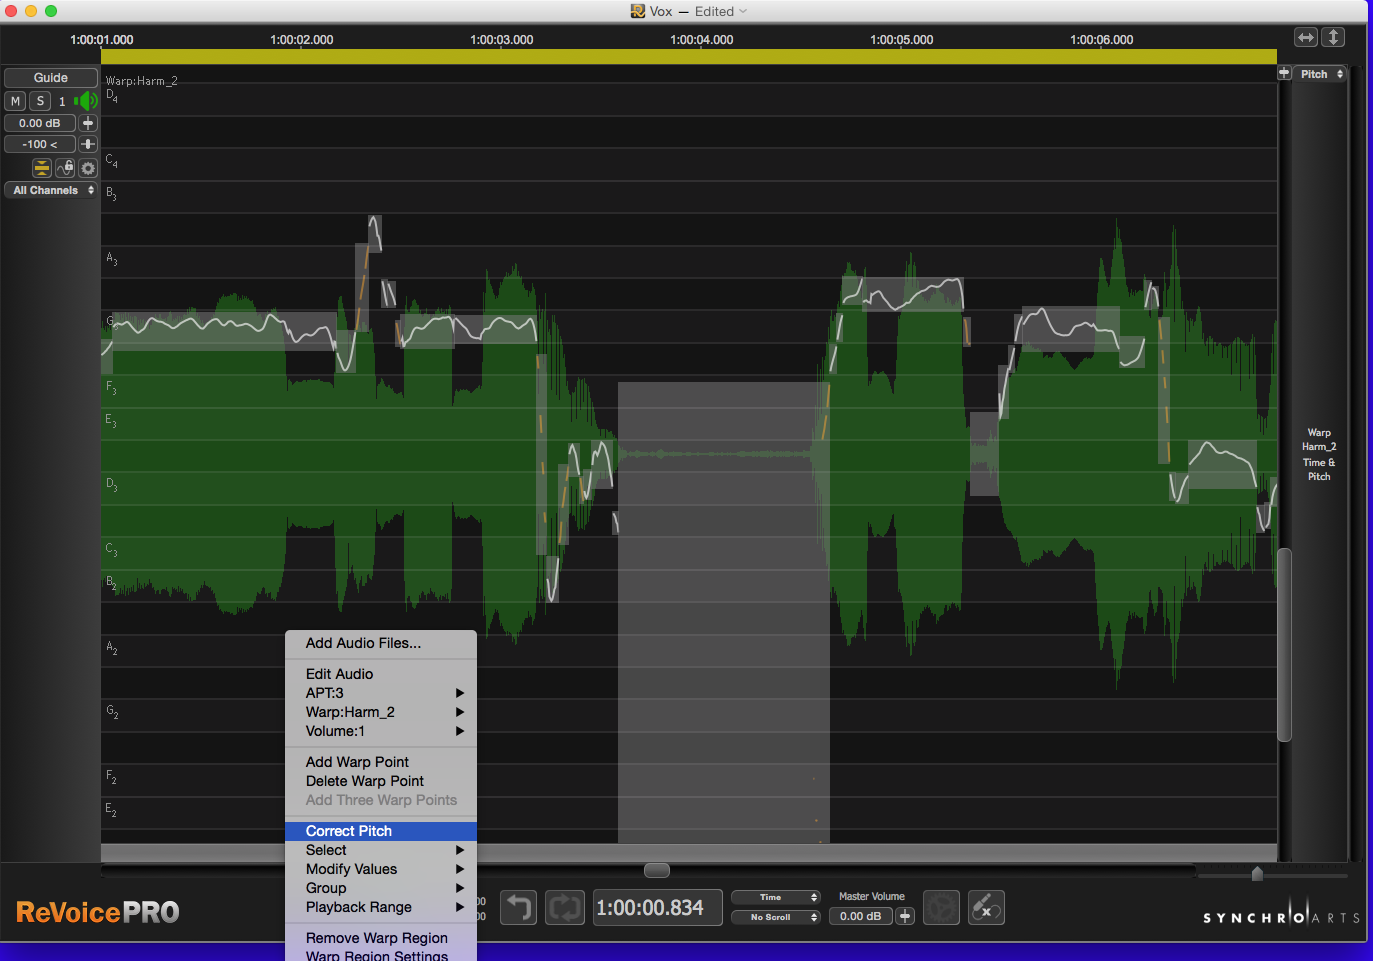
In addition to tightening the pitch of the Dub track based on that of the Guide track, as is done in the APT process, Revoice Pro 3 also lets you manually pitch- and time-correct individual notes in a track using the Warp process. If, for instance, the track you want to use as your Guide (reference track) needs some correction, it makes sense to apply that first, before you create doubles from it, or you’ll be compounding whatever the pitch problem is.
To make manual editing easier, a track can be expanded to take up the whole screen. Applying the Warp process lets you setup what are called Warp Regions, in which you can manually adjust via dragging, note information for pitch (vertical) or time (horizontal correction) or length. Synchro Arts refers to these editable notes as Pitch Contours. One very confusing aspect is that it often appears as if the Pitch Contours are not there when you make a Warp Region. After quite a bit of confusion, I finally found an entry in the manual that said that sometimes the Pitch Contours are not visible because they’re above or below the waveform display, out of sight. You need to scroll vertically to find them and line them up with the waveform display. Strange.
In any case, using the manual correction, you can edit one note at a time or select a range of notes and apply an automatic pitch correction algorithm. I was disappointed to discover, however, that when you click on a note to manually edit it, you don’t hear its pitch the way you do in Celemony’s Melodyne. When you’re manually adjusting a pitch, it helps to be able to hear it. The Synchro Arts folks said that the best way to hear the pitch while editing is to loop a region around the note, so that it repeats constantly as you’re adjusting. While not as elegant as the Melodyne method, it does work.
The upshot
 |
Revoice Pro 3 ($599, $180 upgrade from previous versions) is a potent piece of software that’s particularly aimed at the pro audio market. If you deal with the kinds of musical styles that feature multiple layered vocal parts, its ability to align them is a real boon. Its doubling capabilities are also very impressive, and are not for vocals only. For instance, rhythm guitar doubling sounds surprisingly realistic.
I like the automatic pitch adjustments and correction features, but was not as impressed with the workflow for manual pitch and time correction, which I found a little clunky. If you’re just looking for pitch correction, this is not the program for you. However, in the context of what Revoice Pro 3 does, having the pitch correction available is important, especially to prepare tracks for the doubling process.
I wished the software was designed in a more intuitive manner, and used more standard DAW terminology and workflows. More thorough documentation would help, too. What’s in the manual is well written and clear, but some of the features are not even mentioned. I had to use a third-party video tutorial series just to learn some of the functionality.
That said, there’s no doubt that Revoice Pro 3 is a very powerful software package that gives you editing capabilities that are hard to find elsewhere.