

The quantize function in your DAW lets you to clean up sloppy timing in MIDI recordings, and in many DAW’s, in audio tracks, too. It’s very powerful, but also very easy to overuse. Here, we’ll look at the standard quantize parameters, and explain how they work and how to apply them.
How it works
There are two main types of quantizing: Grid quantizing, which is based on the rhythmic grid in your DAW, so it’s only useful for songs recorded to a click. It works by moving a note’s starting point, and, if you want, its ending point, to the grid value you’ve specified — which corresponds to rhythmic values such as whole notes (a complete measure), quarter notes, eighth notes, sixteenth notes, etc. — to make them more rhythmically correct.
The other type of quantizing is called Groove Quantizing, which adjusts the notes in your MIDI track to match a predetermined groove template — either be one of the built-in standard “DNA” groove templates that most DAWs offer, or one that’s extracted from another track in your project. So, for instance, you could extract a groove from a drum track, and apply it to the bass track, to make the two lock together better.
 |
In this article, we’ll focus mainly on Grid Quantizing, which you’ll probably use most often, but we’ll also touch on Groove Quantizing at the end. It should be noted that in the DAWs that allow for audio quantizing (such as Pro Tools and Logic Pro), you will likely be offered similar parameter choices, so learning to quantize for MIDI will prepare you for audio quantizing, as well.
On the grid
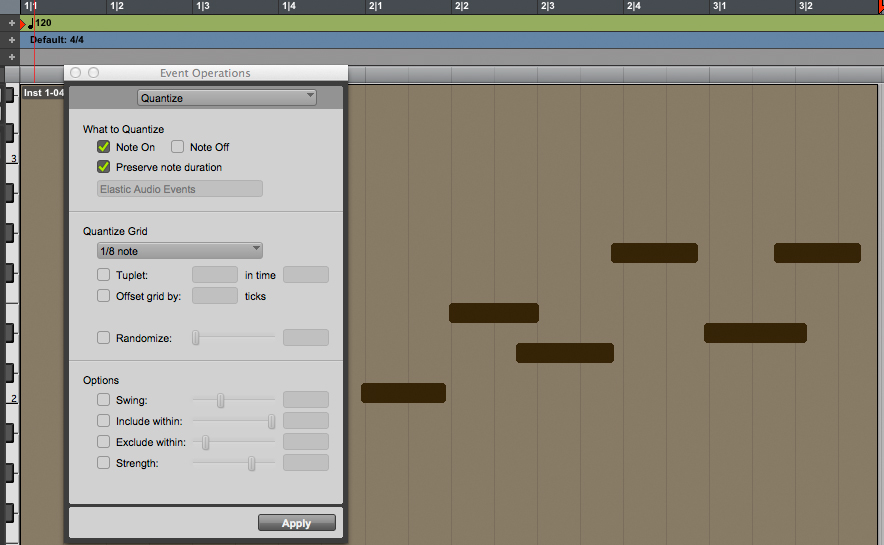
Let’s look at the basic parameters that you’ll find in the quantize window of most DAWs, and which apply to Grid Quantizing. You should see checkboxes for Note On, Note Off and Preserve Note Duration (or something to that effect).
The Note On and Note Off options determine whether you’re quantizing the beginning of the note (Note On) or where it ends (Note Off), or both. Most of the time, you’ll be quantizing the note ons only (see Fig. 1), which is usually the default setting, and you’ll want the note durations preserved (see Fig. 2). If you wanted to keep the basic performance intact, while fixing some notes that were a little early or late, that’s how you’d configure it. If you set note offs to be quantized as well, the ends of the notes will also be moved to the nearest grid line, which will change the duration of the note as a result. The Preserve Note Duration command will be disabled if you select both note ons and note offs to be quantized).
|
|
Grid values
Usually you have a pull-down menu that lets you select the grid value to which you want the notes quantized to. If you say, chose eighth notes as your value, the notes in your sequence would move to the nearest eighth note in the grid.
This brings up a very important point: you have to be super careful not to quantize to a duration that’s longer than the shortest note in your track or selection. So if you have sixteenth notes in the part, don’t quantize it to eighth notes, or your DAW will move those sixteenths to eighth notes on the grid, and totally change the rhythm. Sometimes you’ll have to quantize one section at a time, because the note values change too much to quantize the entire track with one setting.
In addition to basic rhythmic values like quarter note, eighth note, sixteenth note etc., you can select Tuplet for a note value, which lets you quantize based on a subdivision of the beat that you enter in. So, for example, if you selected eighth note, and Tuplet, and put in “3 in the time of 2”, you’d get a triplet feel (which is basically like a swing feel, which I’ll describe below).
Randomize: Most quantize windows give you some sort of randomize or “humanize” feature. These are designed to let you add in a random factor to the quantization. You probably won’t use this too often, but it can be useful at low settings, to keep the quantization you’re applying from feeling unnatural. It’s probably better, however, to use some of the other quantize parameters (described in the next section) if you want to keep your parts feeling like they were played by a human.
Other options
One such parameter is called Strength. It governs the intensity of the quantize effect. At 100 percent (which is the default if you don’t check it and set it to a lower percentage), the notes will be moved exactly to the selected grid value. But if you, say, dial in only 50% strength, the notes will be quantized only half way to the grid line. So you can use the strength control to quantize without moving everything exactly on the grid (see Fig 3).
 |
Another way to accomplish preservation of feel when quantizing is what some DAWs refer to as “Sensitivity” and what Pro Tools divides into two parameters: Exclude Within and Include Within. The former tells your DAW not to quantize notes that are within a certain percentage of the grid. This lets you quantize only notes that were very inaccurately played, while leaving the close ones alone, thus preserving the “feel” of the performance. Include Within only corrects notes within a certain percentage of the grid, so that you don’t affect notes that might be further off the beat for a reason (for example they were swung). On some DAWs, these settings are accomplished with negative and positive Sensitivity values.
Swing, which lets you add a swing feel (aka shuffle feel) to the part your quantizing. If the song you’re working on has a swing feel, quantizing without swing will move the notes to the wrong place on the grid. For those unfamiliar, in music played with a swing feel, eighth note pairs are not even, but instead are based on an eighth note triplet, with the first eighth note of the pair holding for two beats of the triplet and the second for one.
The Swing parameter in your DAW is usually represented as a percentage. Like most quantize parameters, you may have to experiment a little to come up with the feel you want. Use the Undo command if you don’t like what you hear, and make sure you have a safety copy of the song somewhere that you can revert to, in case you decide later that you don’t like the way you edited the MIDI data.
Feeling groovy
For groove quantizing, you usually select one of the DNA grooves that most sequencers offer, and you’ll see choices like MPC Style Grooves, Logic Style Grooves, and Cubase style grooves, which include standard templates designed to inject a human feel into a MIDI sequence. In Pro Tools, and other DAWs, when you select one of these DNA grooves (which are usually for straight or swung eighth or sixteenth notes) your list of quantize parameters changes to percentage sliders for Timing, Duration, and Velocity (see Fig. 4)
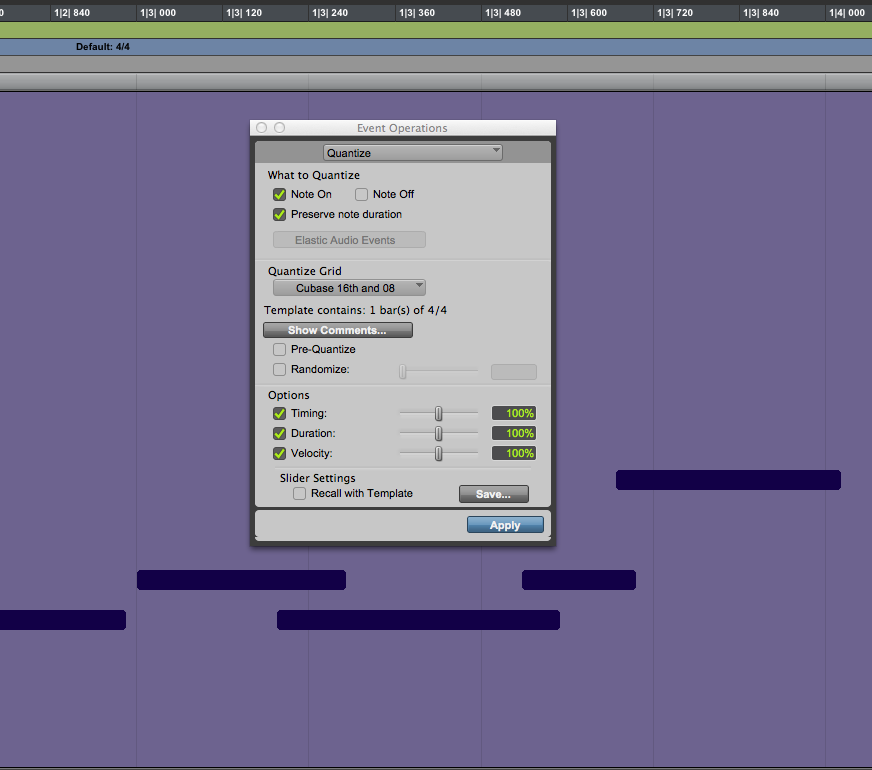 Fig. 4: In Pro Tools and many other DAWs, the parameters for groove quantizing are somewhat different than those for grid quantizing. |
If you leave them all at 100%, you’ll notice some pretty hefty changes when you apply the groove. Not only will it affect the timing, but the dynamics, too (via the Velocity parameter, which impacts how hard a note is played). If you’re just looking for timing correction, you can deselect Velocity.
Some DAWs allow you to extract a groove from one track and apply it as a groove template to another track. This can be very cool for matching the feel of, say, a MIDI bass line to the groove in a drum loop.