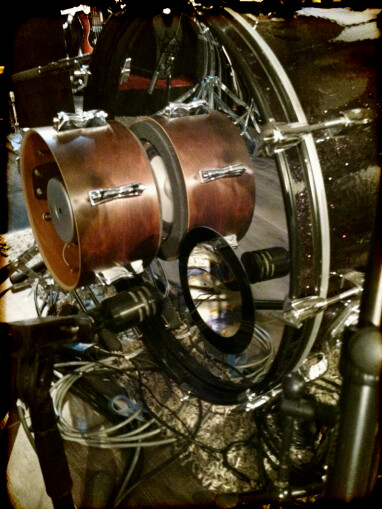
After having looked at the snare drum, we will focus today on how to close mic a kick drum.
Balance
Let’s begin by considering all the ins and outs of recording a bass drum up close. I hate to repeat myself, but remember that the overheads will take care of the wideness of your drum kit’s sound, while the close mics are in charge of getting the details of the attack. This obviously also applies to tracking a bass drum. However, trying to accurately capture the complexity of the attack of such an imposing instrument, while at the same time keeping intact its breadth with the help of a single microphone is a mission not even Ethan Hunt would succeed at. Hence, despite all the phase issues it might entail, it’s better to go for a strategy that involves several mics in order to find a balance between the definition of the attack and the “fatness” of the drum
Alive and Kick In
To capture the attack it seems logical to try to get as close as possible to the point where the beater hits the drumhead. The bass drum we recorded had a resonant drumhead with a hole, so we were able to place the mic inside the drum itself. We used a Shure 819, which is a PZM (Pressure Zone Microphone). It’s certainly not the most common choice, but you don’t bump into an 819 everyday so when we did, we jumped at the opportunity! We placed it comfortably on a cushion to favor the attack, rather than the resonance, and the omni polar pattern of this condenser mic is just perfect: the attack has a nice and precise “click” while at the same time providing some “roundness.”

- 01 Kick In Verse 00:14
- 02 Kick In Chorus 00:28
To complement this track and give it some fullness and thickness, we used an Audix D6 dynamic mic placed outside the drum, about 4 inches (10 cm) from the resonant head. The cardioid polar pattern of the D6 allows us to avoid an excess of bleed and its ability to handle high pressure levels (>144 dB SPL according to the manufacturer) provides a pretty decent leeway.

- 03 Kick Out Verse 00:14
- 04 Kick Out Chorus 00:28
Alone with these two mics you have plenty to entertain yourself. However, certain genres require a kick drum with a much more generous low end. In such cases, you might want to resort to an old studio trick: a small (less than 8") reverse wired speaker placed as close as possible to the resonant head. It’s pretty easy to get this done and there are plenty of tutorials online to help you out. However, if you are not much into DIY, there are some commercial turnkey solutions available, like the DW Drums Moon Mic or the Yamaha SubKick. We used the latter for the following clips:

- 05 Kick Sub Verse 00:14
- 06 Kick Sub Chorus 00:28
With these three tracks you ought to be prepared to deal with any situation. Just go ahead and play with all three of them, so you can realize first-hand how varied are the options at you disposal, and without the need of an EQ. But be careful! There are some traps you need to be aware of…
Keep tuned until next time when we will continue discussing the highs and lows of close miking a kick drum.
Download the audio clips (in FLAC format)


