Audio apps for iPhone, iPad and iPod Touch are more powerful than ever, but imagine what you could do if you could use your apps together in the same session?
There are several solutions to do exactly that, including the new Inter-App Audio feature in iOS 7, an app called Jack, and Audiobus, the app we’ll focus on here.
Bus Route
|
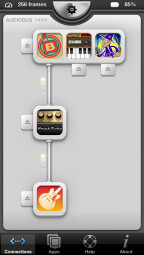
An Audiobus session with three Input apps open, one Effects app in the middle, and GarageBand in the bottom slot as the Output. The interface clearly shows the signal flow.
|
When you launch Audiobus, it creates a mini audio environment, where you can open multiple apps, and route audio from one app to another, multiplying your creative options substantially. For example, you could run a synth into a multi-effects app into a DAW app, or play your guitar into an amp modeler app, through a delay app and then into a looper app — the possibilities are almost endless.
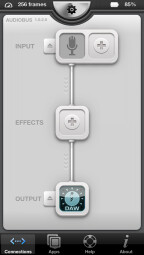
Once you’ve purchased Audiobus on the App Store and loaded it onto your iOS device, open it up and you’ll see it’s got three boxes, all connected to each other in its main screen. These are the Audiobus “slots”: Input, Effects, and Output. Apps will only open in slots they’re compatible with. Inputs are generally instrument apps, Effects are effects apps, and Outputs are apps that record like a DAW or looper. When you click on a slot to open an app in it, you’ll see a list of the apps on your iOS device that are compatible with that slot. Some apps can run in all three slots, whereas others are limited to only one. You can also open the microphone of your device as an Input and the device’s speaker as the Output.
The Input slot can have up to 3 simultaneous apps open in it, each feeding the rest of the Audiobus signal chain, but independent of each other. If you want, you can leave the Effects slot empty, and the audio will just pass through to the app in the Output slot.
Remote Control
|
In this Audiobus setup, which features Bebot as the Input and Loopy HD as the Output, opening Bebot reveals the Audiobus control bar on the left, featuring transport controls for Loopy HD, so you can record or playback without having to leave the Bebot screen.
|
After you’ve loaded the apps you want into Audiobus, you’ll notice that when you open one of them, which you can do from the main Audiobus screen by tapping on the icon of the app, you’ll see a little control bar on the side of the screen which is part of the Audiobus interface. It has icons for the other apps you have open in your setup, and when you tap one, it switches you to that app.
Typically, when you’ve selected an Instrument or Effects app, tapping the Output icon of the app in the Audiobus control bar reveals transport controls for the Output app, which conveniently allow you to record or play back while still in the Input or Effects app. If the Audiobus control bar ever gets in your way, which can happen, give it a little flick towards the side of your screen, and it will disappear. You can bring it back out by touching on the side of the screen.
Audiobus is easy to use, well designed, and can help you take your iOS music production to the next level.
|
Audiobus lets you designate your mobile device microphone as an Input. Here’s it’s recording into the Multitrack DAW app.
|


