
As an engineer/producer, one of my biggest early challenges was getting my mixes to sound as polished and balanced as the mixes of songs on my favorite albums. Living in Nashville, I knew the problem wasn’t the players (some of whom had even played on those same favorite albums). I also knew that I was happy enough with the sounds I was recording because when I’d solo a particular track, I liked what I heard. The problem, in a nutshell, was getting all the parts of my mix to fit nicely together. What I’ve learned over time and will describe below are a few simple compression and EQ techniques for vocals and the acoustic guitar in your mixes. These techniques, when used properly, will go a long way towards allowing the vocals and acoustic guitars in your mixes to effectively share the sonic space.
Compression
When I first started reading about compressors I was hopelessly lost. The terminology was technical in an almost mean-spirited way and I couldn’t make heads or tails of what was being written. To keep things simple, I think of compression as a way of evening out the loud and soft parts of any vocal or instrument so that its behavior is a bit more predictable. In other words, compression brings up the really soft spots and tames the really loud spots so that you’re not constantly reaching for the volume fader on your mixing board (or virtual mixing board on your DAW). In its simplest form, a compressor, whether a hardware unit or a plug-in, will squeeze the audio so that its highs and lows are less pronounced. This allows you to do things like bring down the volume level of the compressed track without fear that its softer parts will get lost, or bring up the volume level without fear that the loud parts will jump out. It might help to think of all compression settings (attack, release, ratio and threshold) as ways to squeeze your audio more or less aggressively. Not enough compression will leave tracks that jump out of a mix at inappropriate times or get lost in the sound of the other instruments; however, too much compression can make a track sound lifeless or uninspired. My rule of thumb is to be less aggressive compressing audio on the way into your DAW (because you’re stuck with whatever you do) and more aggressive with my plug-in compression (because you can always dial it back).
EQ
While a wonderful (and essential) tool, EQ is also quite possibly the quickest way to royally mess up the sound of a mix. Overuse of EQ ranks second only to overuse of reverb as the hallmark of an inexperienced mix engineer. EQ should be used to subtly (or not so subtly) color the sound of the particular track you’re working on so that it relates well to and leaves space for the other tracks in a mix. My experience has been that it’s what you pull out and not what you put in that makes EQ work best. For example, even when you’re looking for a boost in the high frequencies of a track, it’s often more effective to pull a few dB from a lower frequency which, in turn, brightens the sound.
Vocals
Vocal Compression on the Way In
Since the vocal (despite what your guitar-playing pals might tell you) is the most important element of any popular music mix, let’s start here. Getting a vocal to sit well in a mix is a combination of compression, EQ and often volume fader automation. It’s a fairly common practice to compress a vocal a little on its way into your DAW. This shouldn’t be an aggressive type of compression but rather just enough to tame some of the loudest spots of a vocal so that your overall recording volume can be hotter.
An approach to the vocal chain in my studio runs as follows: microphone into hardware preamp/compressor and then directly into my DAW. To get into the nitty gritty, I generally set my hardware compressor’s attack settings at around 30ms and release settings at about 1 second and my compression ratio to 3:1. Then, I play with the threshold making sure that at the hottest parts of the vocal, the gain reduction is at a maximum of –3dB. This leaves me room in the mix to compress further using a software compression plug-in. The danger of compressing too aggressively on the way in is that you’ll end up stuck with the sound of the overly compressed vocal with no way of changing it later.
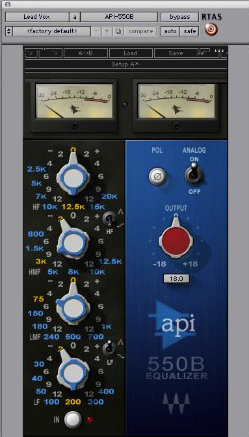
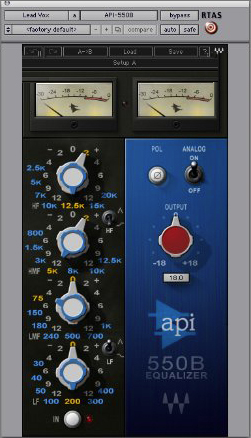
Vocal Compression in the Mix
 C4 Multiband Parametric Processor
|
Once the vocal is in the mix, I go to a plug-in compressor to further help keep the vocal present in the mix without jumping out too much in the loud spots. My recommendation would be to find a compressor that has a smooth, transparent sound that allows you to squeeze the vocal just a little more (approximately –3dB of gain reduction at the loudest spots) so that the vocal maintains it’s presence. I set my attack at 26ms and my release at around 300ms. For more detail, take a peek at my general vocal settings in the screen shots on the right. If the mix is a particularly full one where the voice needs to cut through a bit more and show a little more sparkle, I’ll use a frequency-specific compressor (like the Waves C4 on its “pop vocal” setting) which is a little more specific in terms of which frequencies it chooses to compress. In this case, 40hz, 500hz, 6khz and 16khz. To see exactly how the attack and release settings are set up for each frequency, take a look at the screen shot here below.

Vocal EQ
I rarely, if ever, EQ my vocals on the way in. I prefer to get a good uncolored vocal sound so that when it comes time to mix with the final instrumentation, I have the flexibility to work with the un-EQed vocal audio. This is particularly useful when you start by tracking a vocal against a single instrument like the acoustic guitar but end up mixing it in with a full band. EQ decisions shouldn’t be made in a vacuum. Ultimately it’s the relationship of the voice with all of the other elements in the mix that determines the EQ approach. Often, a vocal EQ that works in a mix won’t sound particularly good when the vocal is soloed. As I mentioned earlier, my preference is to cut the EQ in certain frequencies as opposed to boosting it.
 EQ Cut Settings
|
Here are a couple of instances where cutting frequencies can solve common vocal problems:
-
Muddy or Boomy Vocal – In this situation, I tend to pull a dB or two at around 200hz. This also has the effect of making the vocal cut through a mix better or sound brighter.
-
Piercing or Painful Vocal – Here, I’ll pull a few dB at around 3 khz. This tends to take the edge off of the vocal without removing any of the clarity.
 EQ Boost Settings
|
Here are a couple of instances where the tasteful boosting of frequencies is useful:
-
Bringing out the low end in a vocal – add 1 or 2db of gain at between 80hz and 100hz
-
Adding Brightness – Occasionally if a vocal sound is just a bit too dark or undefined, I’ll add a few dB of gain at 5khz
-
Adding Air or Breath – Here I’ll use a shelving EQ which boosts all frequencies above 12.5khz
|
Shelving In a shelving EQ, a band of frequencies, in either the high or low frequency end of the spectrum, is increased or attenuated by a fixed amount. The term shelving doesn’t usually apply to a mid-range boost or cut. |
Acoustic Guitars
While working as an engineer in Nashville, I spent a lot of time miking and recording acoustic guitars. Despite the steadily improving pickup systems being installed in acoustic guitars, I still believe that there is no substitute for a well-placed condenser microphone (or microphones) when it comes to capturing the warmth, body and air of an acoustic guitar. However, as with all acoustic instruments, it’s a challenge to properly sit one in a mix and preserve its texture and character while also blending it with the other instruments. There are a couple of approaches to compression and EQ that will go a long way towards solving this problem.
Acoustic Guitar Compression on the Way In
|
Ratio A compressor reduces an audio signal’s gain (level) if its amplitude exceeds a certain threshold. The amount of gain reduction is determined by a ratio. For example, with a ratio of 4:1, when the input level is 4dB higher than the threshold, the the compressor will process the signal so that the output signal level will be 1dB over the threshold. So the gain (level) has been reduced by 3 dB. |
When compressing acoustic guitar on the way into my DAW, I find it’s better to be a bit more aggressive with attack and release settings than you would with a lead vocal. I’ll use the more of a medium fast attack (approximately 22ms) and release (approximately 500ms) on a hardware compressor with a ratio of 3:1 and then play with the threshold knob until, again, the gain is attenuated by about –3dB.
Acoustic Guitar Compression in the Mix
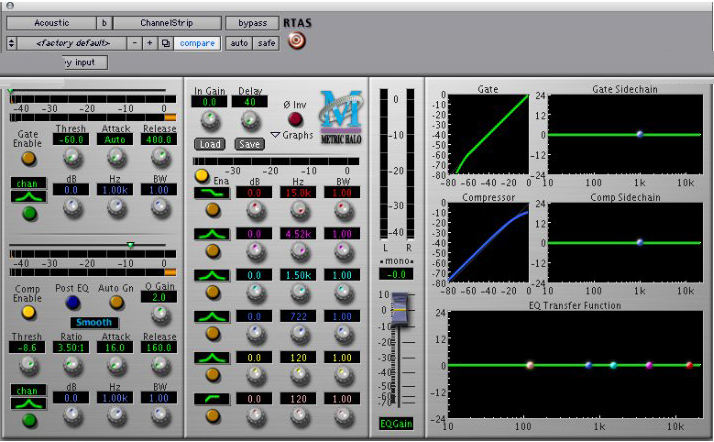
At this point, it’s a good idea to base your compression settings on the kind of a mix you’re doing. If it’s a simple acoustic guitar and vocal recording, it’s entirely possible to leave off all compression on the acoustic. However, if it’s a full band mix and I want to make sure you can hear the acoustic strumming or finger picking clearly among the other instruments, I’ll use a compression plug-in (like Metric Halo’s Channel Strip) and compress a bit more aggressively: 16ms attack and 160ms release with a ration of 3.5:1. Take a peek at my settings.
Acoustic Guitar EQ
Very much like vocals, I don’t believe in EQing acoustic guitar while I’m recording it, only because I rarely know what the other elements of the mix will be. However, there are a two very specific approaches I use to EQing an acoustic guitar depending on whether or not it’s accompanying a vocal performance or a part of a bigger mix. In general terms, the EQ approach is more subtle in the simple guitar/vocal to preserve the fuller tone of the acoustic and more aggressive in the full-band mix to make room for other instruments while still preserving the essential elements of the acoustic’s sound.
Here are some EQ settings for a simple acoustic guitar and vocal recording:
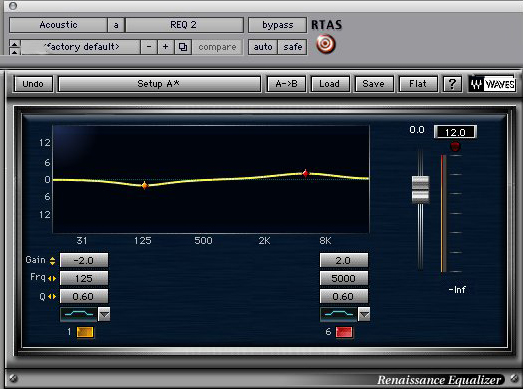 Solo Guitar Settings
|
-
Removing Boominess – I like to pull 1 or 2 dB at 125hz to remove the boominess that often accompanies miking an acoustic too close to the sound hole.
-
Adding Sparkle – If after removing some of the boominess, I’m still looking for more sparkle in the acoustic, I’ll boost a dB or two at 5khz.
Below are some EQ settings for an acoustic in a full band recording:
-
Adding Clarity – I’ve found that a high-pass filter at 120hz leaves room for the kick drum and bass guitar in a mix while allowing the acoustic to shine at the higher frequencies. Leaving in the low parts of the acoustic’s frequency will often muddy the mix and obscure the kick drum and bass.
-
Still muddy? – don’t be afraid to take your high-pass filter up to 200hz or even 300hz if the guitar still isn’t cutting through the mix. It may sound terrible soloed but perfect in the mix and that’s the key.
-
Adding Sparkle – As above, if cutting out the low frequencies isn’t enough to get the acoustic to cut through a mix, adding two or three dB at 5k will do a lot to bring out the strummed or finger picked strings of the acoustic.
 Full Band Guitar Settings
|
Conclusion
Good luck!