
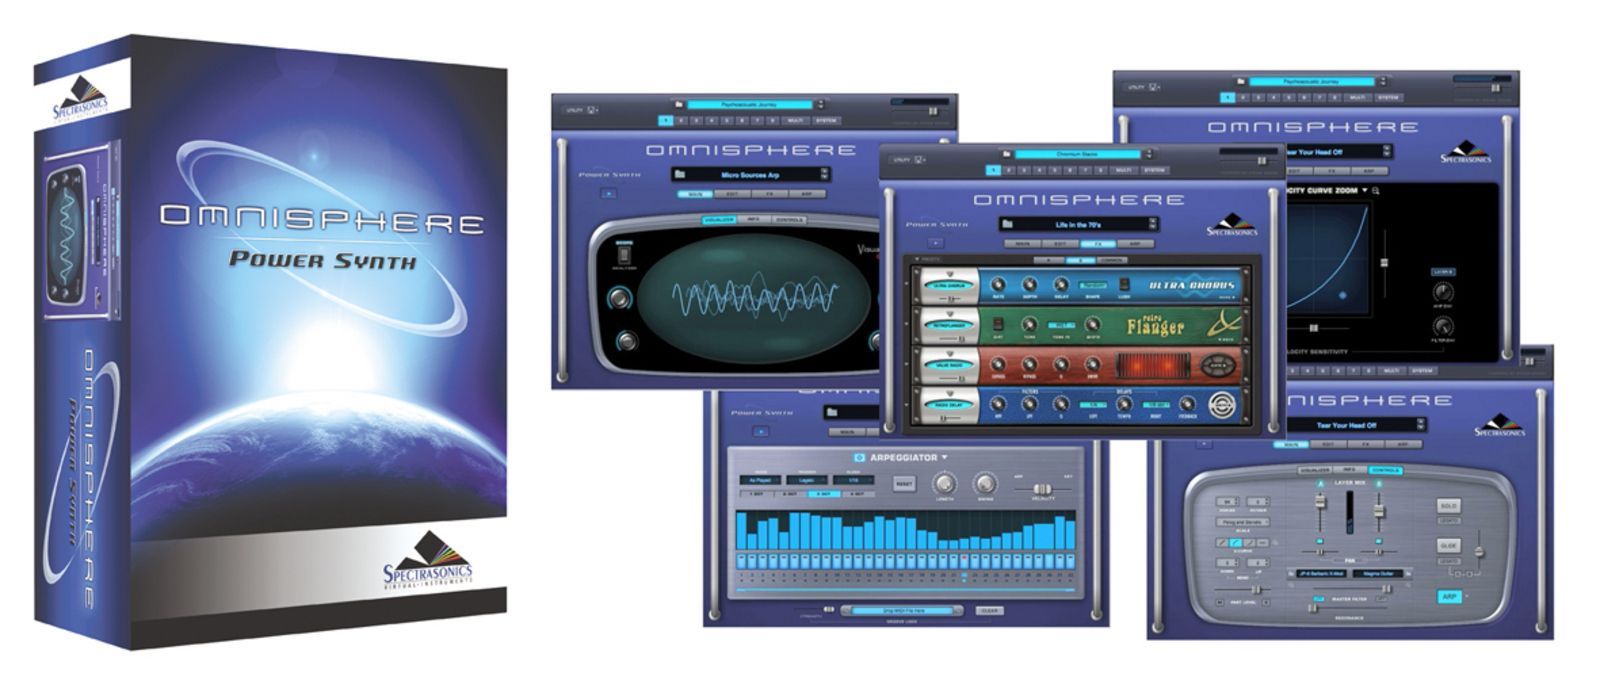
After many years of development, Spectrasonics has released their new flagship virtual instrument, Omnisphere, which has been heralded as a completely new ground-breaking hybrid virtual instrument incorporating a myriad of realtime synthesis techniques, an epic library featuring ‘psychoacoustic’ sounds, and many other innovative features. It's also the first instrument to be built upon their newly developed STEAM Engine. So, when Spectrasonics, who has always been a heavy-weight in the world of VSTIs and Sample libraries, makes a claim like this, many of us stop to listen. What have we heard.....
|
Give me some STEAM
One of the most important features of Omnisphere is Spectrasonics’ own STEAM engine, as opposed to the UVI engine found in Atmosphere. The Steam engine was created by their own in-house development team and will, they say, be used as the basis of all of their future performance instruments. As well as providing development possibilities into a variety of hybrid synthesis and control capabilities (high resolution streaming, Sample playback, Integrated FX, Timbre Shifting, etc.), Spectrasonics says that it will also make future technological transitions easier. An additional advantage of having their own engine is that their own software can be more flexible and open, allowing patches to be shared across hosts and computer platforms as well as allowing all instruments based on their engines (S.A.G.E. & STEAM) to better interact, which is already evident in the interaction between Stylus RMX and Omnisphere (more on this later). |
Nowhere is the contrast between Atmosphere and Omnisphere more obvious than with the difference in library sizes. Atmosphere fit on 6 CDs and took around an hour to install. Omnisphere has a core library of 40-plus gigas and comes on 6 DVDS! Installation can take anywhere from 15 to 45 minutes per DVD (depending on the speed of your drive) which means that it could take up to 4 and a half hours to install! In my case, each DVD took around 35–40 minutes which meant the whole thing took about 4 hours. Fortunately you can interrupt installation and resume where you left off (starting at the beginning of the next DVD), even if you turn off the computer. Once everything’s installed, it’s time to go to Spectrasonic’s site to register and get the latest versions of the driver and the patch & soundsource libraries. Registration and updating are pretty quick and painless and you should take the opportunity to start downloading the truly excellent video tutorials on their site.
Multi-timbral
One of the main differences between Atmosphere and Omnisphere is that the latter is Multi-Timbral while the former was not. This means that while you needed to open multiple instances of Atmosphere when you wanted it to play more than one part or sound, one instance of Omnisphere can play up to eight different parts at the same time (cpu willing) thanks to the new STEAM engine.
Turbo Browser
Having so many sounds is a double-edged sword, because while you’re glad to have so many sound sources and possibilities, you can easily feel overwhelmed by their sheer numbers. The people at Spectrasonics have therefore tried to come up with a browser that is designed to help the user get easy and quick access to specific sounds, or types of sounds, within their enormous library. And they’ve succeeded in doing just this without confusing the user with too many options. Obviously work-flow was a major priority here. By clicking only a few times you can go from a huge list to a very reduced, and specific one.
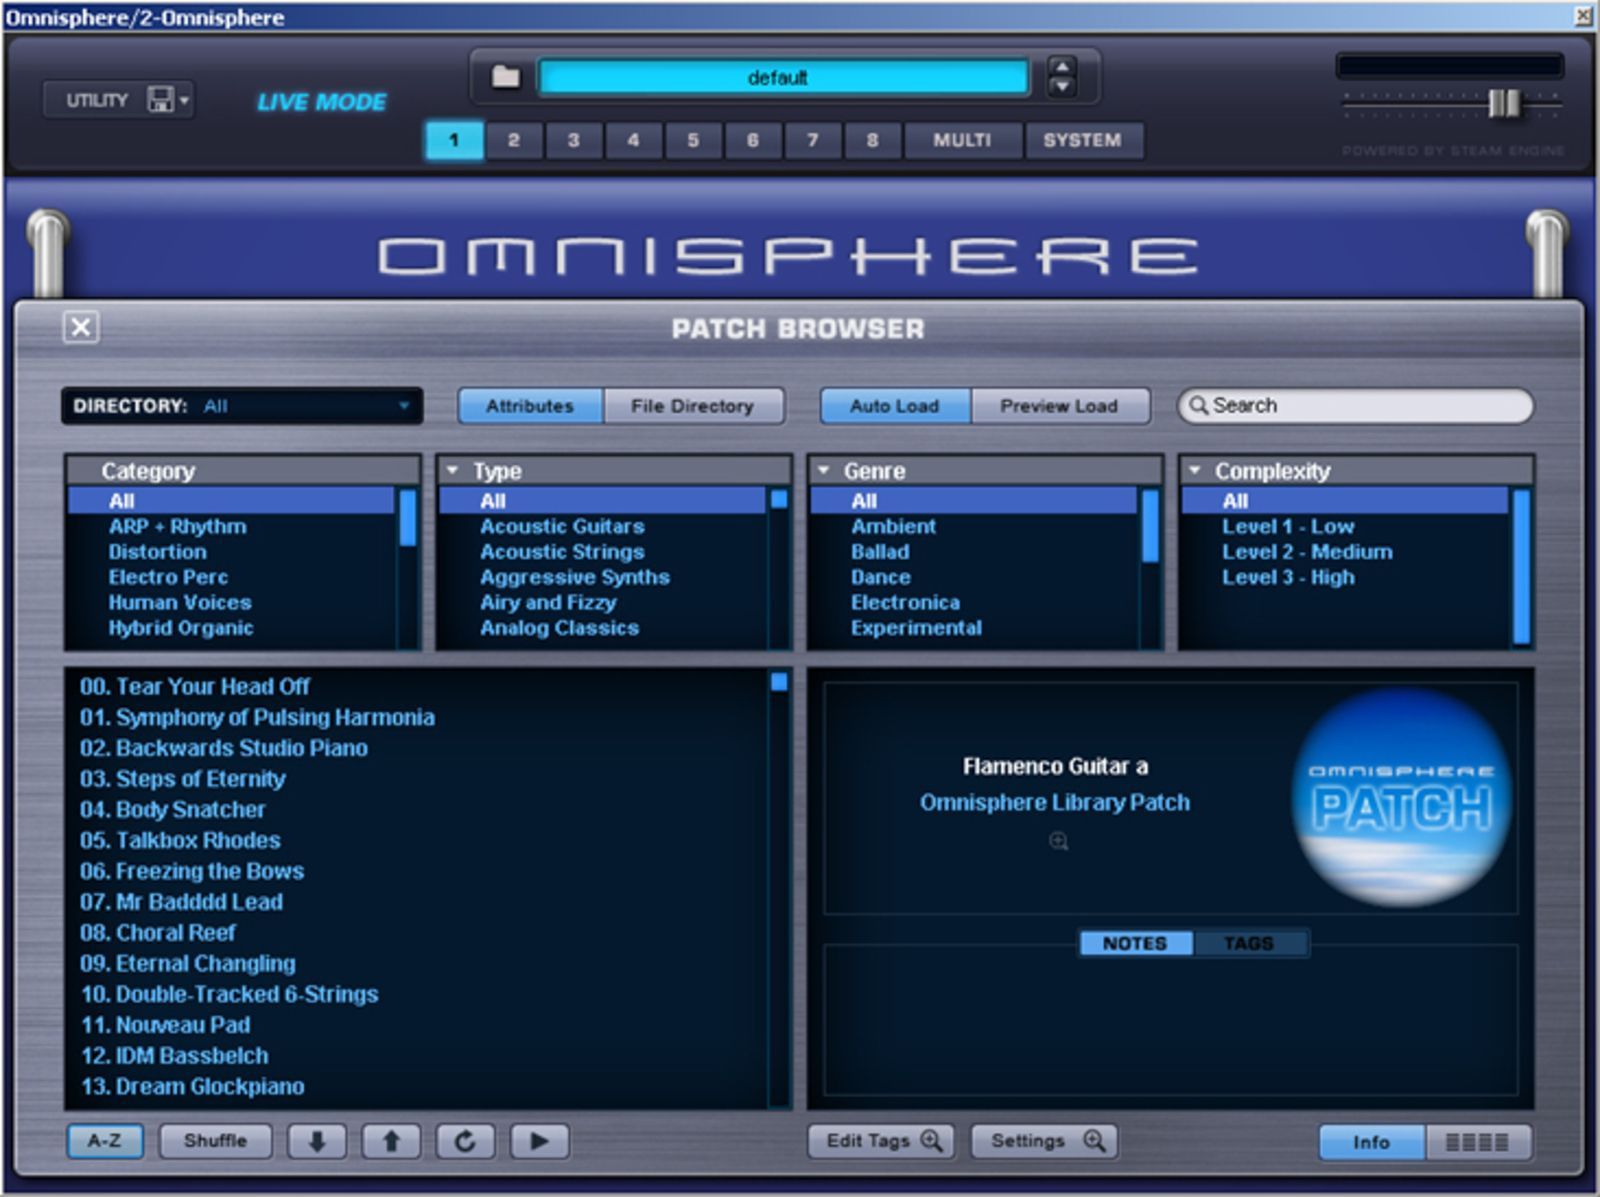 Multi > Patch > Soundsource
Omnisphere has 3 browser types: Multi, Patch, and Soundsource. The hierarchy is as follows: Multis are made up of up to 8 Patches, while Patches are made up of one or two Soundsources (or samples, more on that later). It’s easy to confuse these three elements in the beginning, so it’s a good idea to try and understand the differences. It will no doubt save you time in the long run. There were a few times that I spent many frustrating minutes looking in the “Soundsource” browser for a “Patch” I had just been using! But don’t dismiss the Soundsources as just simple building blocks of Patches, because nothing could be further from the truth. Each Soundsource is unique and compelling in its own right and could easily be the sound you need or have been looking for. In fact, Soundsources can range from complex multi-samples with many velocities to a single sample stretched across the keyboard.
Seek, and ye shall find
The browsers have their own dedicated windows, which is a nice improvement on Atmosphere which had drop-down menus. Within each browser there’s the very handy and simple Search field where you can search by either name, Tag, Keyword, and even Notes text (more on this below). To further simply your search Spectrasonics has implemented an easy yet powerful 'Attributes’ filter. This lets you select categories and Attributes (like with an I-POD) that match the kind of sound you’re looking for. There are 4 'Attributes’ windows, so the more selections you add the more filtered and precise the results are. A great thing about these Attributes filters is that they are context sensitive, so that when you choose a category, only relative attributes will be shown. There’s also a classic File Directory Mode that displays a traditional file folder hierarchy that matches how they’re stored on your hard drive.
Tag, you’re it!
A very nice feature in Omnisphere is the customizable tagging system which allows sounds to have Tags assigned to them, which in turn categorizes these sounds and makes them searchable and filterable. These Tags of course make sounds easier to find when browsing since all of Omnisphere’s factory sounds have from three to eight Attribute Types assigned to them, with each 'Attribute Type’ able to contain multiple Attributes. As stated above, this Tagging system is customizable so you can create and edit your own Tags to match your way of working. There’s also a Keyword function to complement the Attributes. Keywords are descriptive words and/or phrases that are outside of the scope of Attributes, but which are still useful when searching and browsing . In addition there’s a Notes field that can contain notes about how the sound was created, playing tips, and mod suggestions. Once again, the text in the Notes field will be checked during searches in the Browser! By using this features you can search for “Mod”, for example, to get a list of sounds that will most likely have the mod wheel mentioned in the notes as giving especially nice results which I found quite convenient.
Main Controls Page
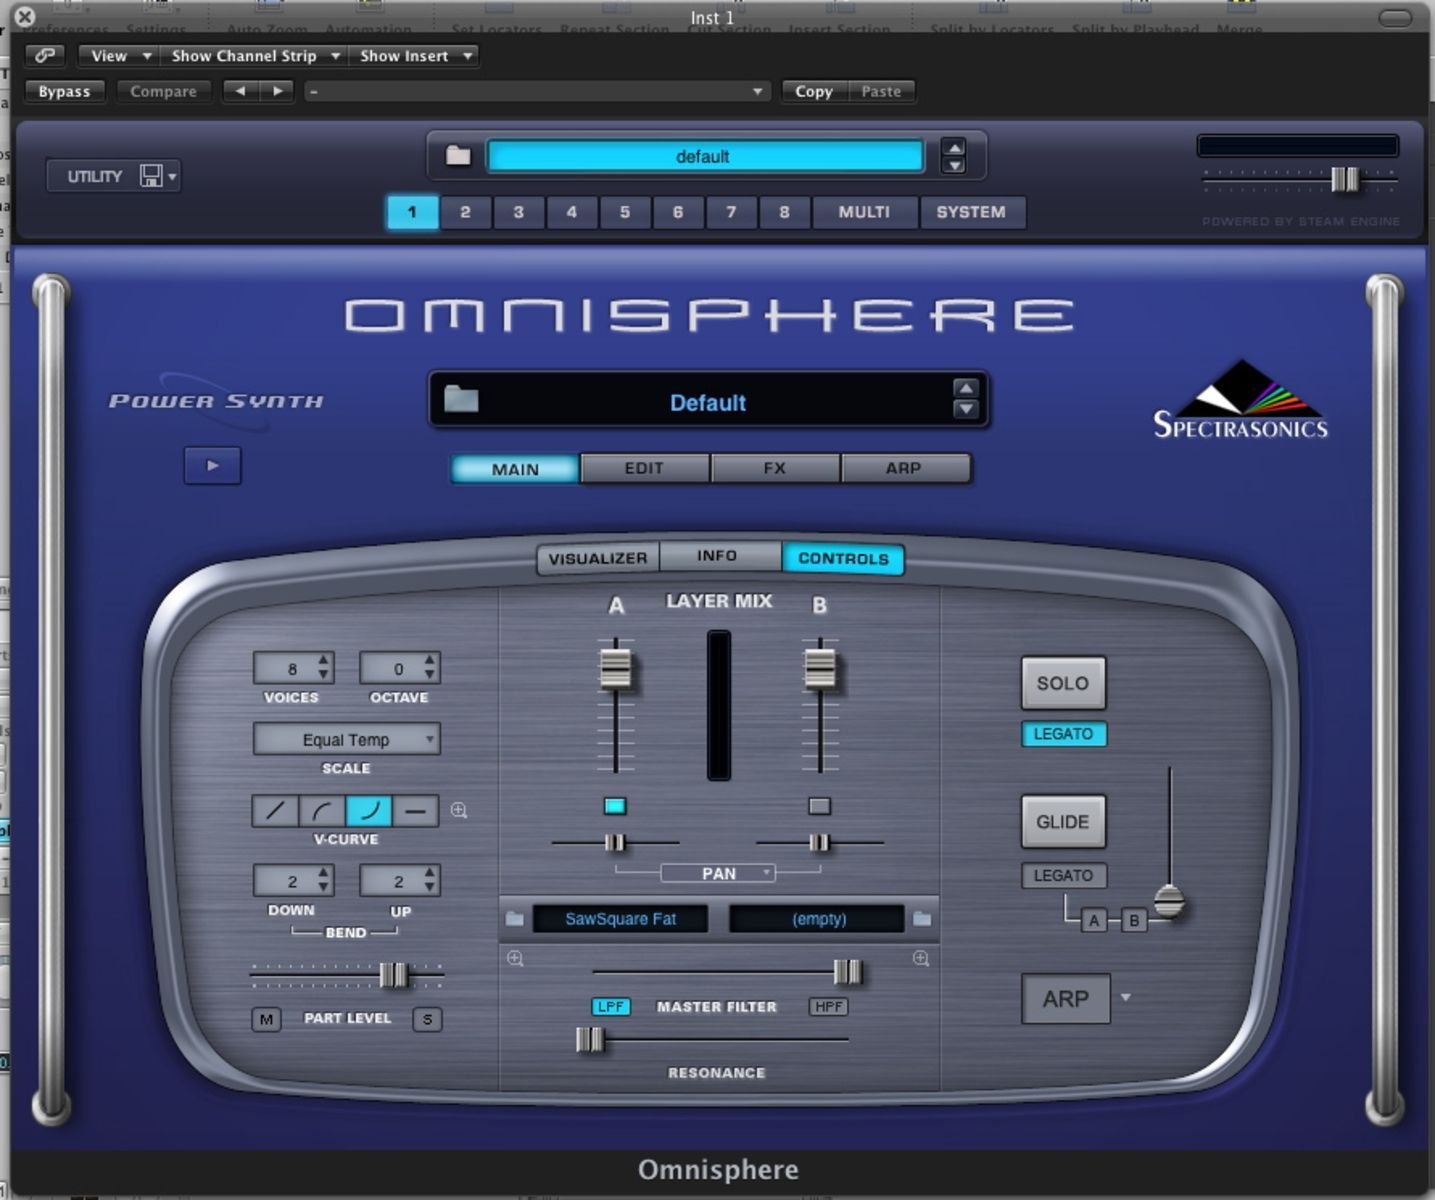 Spectrasonics likens this main control page to a car dashboard, and I think the comparison is apt. All the main controls are on this page, and though it’s as streamlined as possible you can still alter sounds quite a bit with just these few main parameters. It’s divided into three main sections with the left and right sections affecting the whole patch and the center section affecting individual layers. The global parameters (affecting the whole patch) on the left and right sections include basic settings such as number of voices (important for your cpu), octave, scale (which is nice for altering the tuning of the instrument), velocity curve, pitch-bend range, part (patch) level (with mute and solo buttons), as well as solo, glide, and the arpeggiator buttons. The middle section has the layer mix with independent faders, on/off buttons, a VU meter, pans, soundsources in the patch (which leads to the soundsource browser if you click on them) for each layer in the part (patch), plus the master filter and resonance sliders. The latter two affect the whole patch quite significantly and therefore were my first choices for midi learn (see below). I found that a lot of nice tweaking could be done with just these two settings midi learned to a controller, plus the mod wheel. If you’re not really interested in digging deep into Omnisphere, then most of your tweaking will be done on this page, especially since the pan-controls toggle to become attack and release controls as well. Add to that the fact that the master filter can toggle between a low-pass or high-pass filter and sound modification possibilities are further increased without having to brave the edit page.
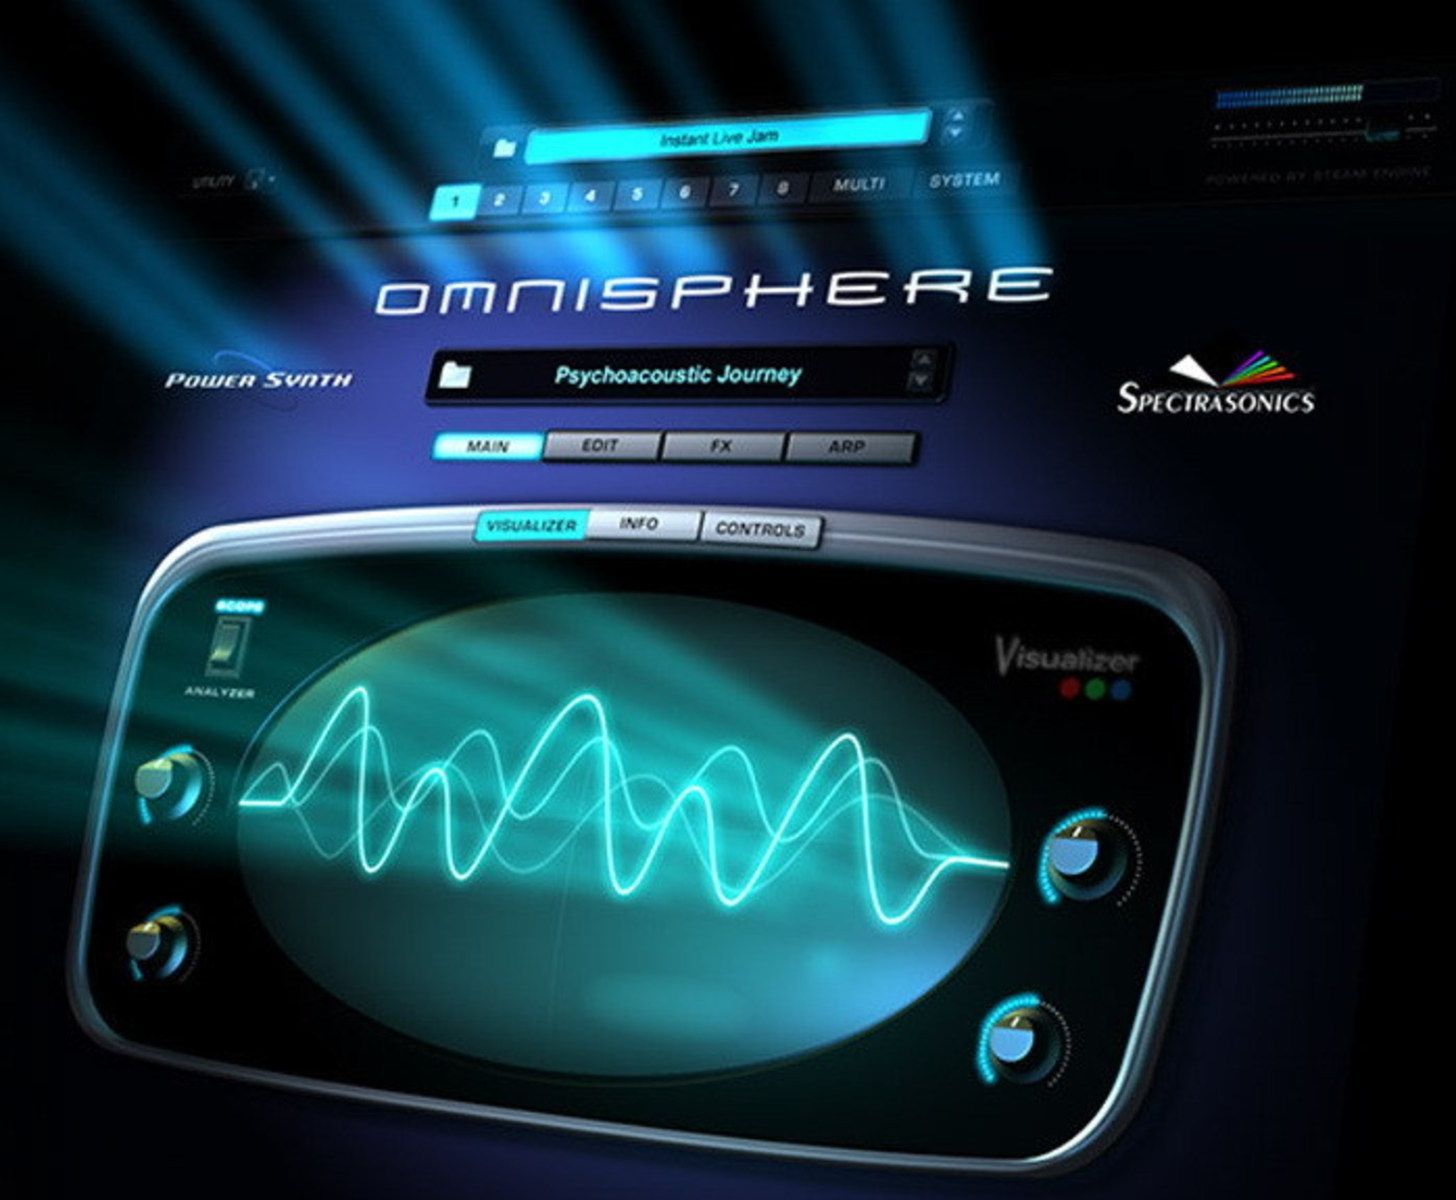
 The main controls page is divided into three parts: controls, info, and visualizer. The visualizer gives you a visual representation of the sounds you hear, either in what they call scope or analyzer modes. It’s basically just an interesting thing to look at for a couple of seconds but definitely not something you’ll be spending a lot of time with unless you’re Vjing and you decide to project this window. But I wasn’t able to use this page with my configuration without there being pops and artifacts, so you’ll need a powerful computer to be able to use it in such a way. The Info page is a bit more interesting as it shows you nice and telling images of each of the layers making up the part you’re on, complete with notes and tags as well as having on/off buttons for each layer and shortcuts to the browser. I like this page when scrolling through sounds as it’s much nicer to look at than the browser but for some reason my midi learned controls for changing patches (which work in the browser) don’t work in this window, which reduced somewhat my desire to stay in this page (see below). So it’s back to the browser, which is a shame. Maybe there will be a fix for this in the near future. This brings me to …
Midi Learn & Automation
One of the real strong points of Omnisphere is that most of its parameters can be easily midi learned and/or automated (modulated as well, more on that later). The ease in which this can be done caught me off guard. All you need to do is right click a parameter and choose either MIDI CC or MIDI note learn (or enable host modulation in the case of modulation) and then move the controller or play the note. And since most parameters are MIDI assignable, you can create some very handy Midi learn templates. Spectrasonics’ idea to save these templates within each “multi” is a very good idea too. This means that you can have a different template for each multi, and therefore create different multis for specific purposes, such as for live situations or in the studio. This way, when you’re playing live you can use a certain multi, and the saved MIDI learn template associated with it, that you specifically designed and adapted for live situations, while having other multis and midi learn templates for studio use. Automation, which also depends on the host, was also a breeze in my case (Sonar). Unlearning and/or showing existing learns is also extremely easy and requires no more than two clicks. Some very nice features here include the ability to control multiple parameters with a single physical control and the opposite, a single parameter controlled by multiple physical controls (this is convenient for making different group combinations).
My only issue here is that some useful parameters aren’t midi learnable, such as the next/previous buttons next to patch/multi/soundsource name displays. And because, as mentioned above, you can’t change sounds remotely when you’re not in a browser page and you can’t midi learn these next/previous buttons which are on just about every page, you need to always go back back to a browser (using a mouse) to be able to remotely change a sound with your controller which kind of defeats the whole purpose. This may or may not be a problem live, but in my studio, where my midi controller isn’t near my mouse, it can get pretty annoying when I want to browse through hundreds of sounds…
.
Edit Page
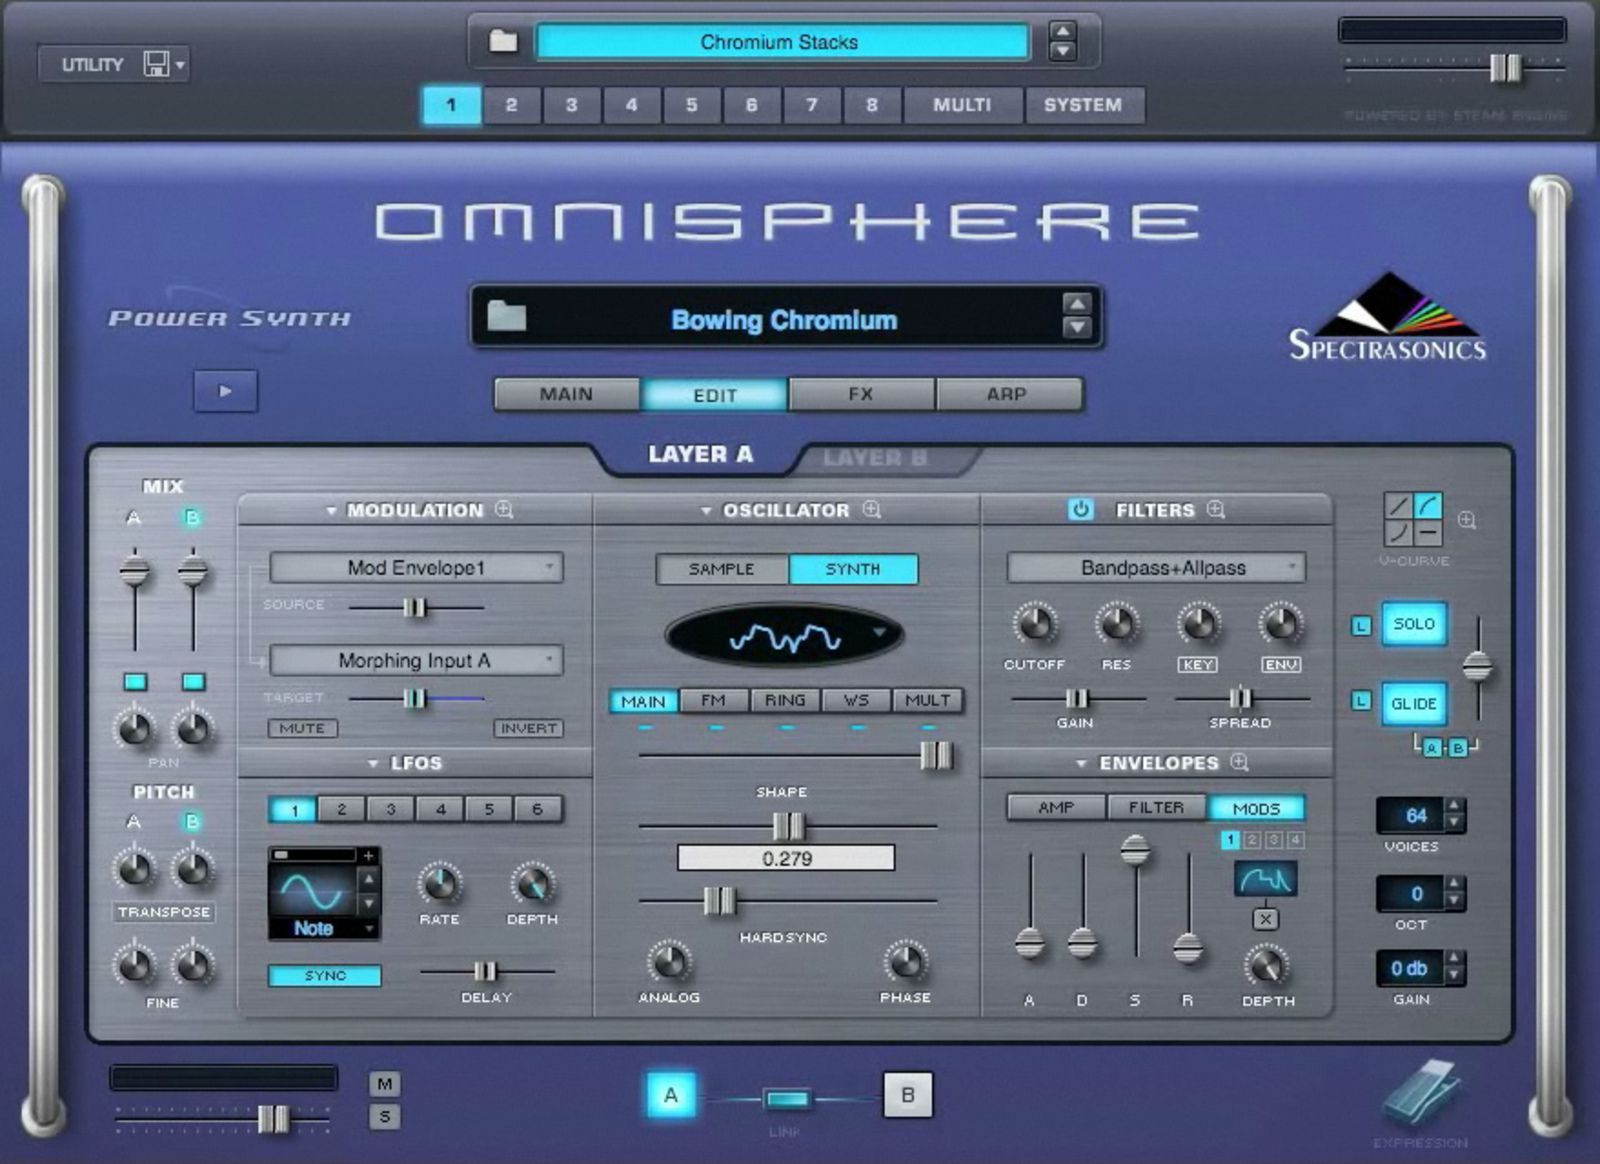 The edit page is the real horsepower behind this VSTI, and where all synthesis happens. The possibilities and flexibility that the Edit section offers are impressive. It’s designed to provide a useful set of controls for just about every aspect of Omnisphere’s sound but also lets the user go in deeper into more advanced parameters. The Edit page is divided into two main sections: common parameters (for both layers at the same time) and layer specific parameters (unique to a specific layer), like with the Main controls page.
Oscillator
The oscillator section is itself also divided into two sections. Each layer’s oscillator can have sample streaming or DSP-generated waveforms, so the oscillator’s synthesis capabilities vary depending on if Sample mode or Synth mode is used. Synth mode doesn’t use samples at all so Omnisphere can operate like a classic synth without using any of the core library at all. The combination of both of these types of sound generation make Omnisphere a real hybrid instrument and are responsible for many of its unique sounds. The oscillator section includes hard-sync, FM, ring modulation, and a really nice voice multiplier section.
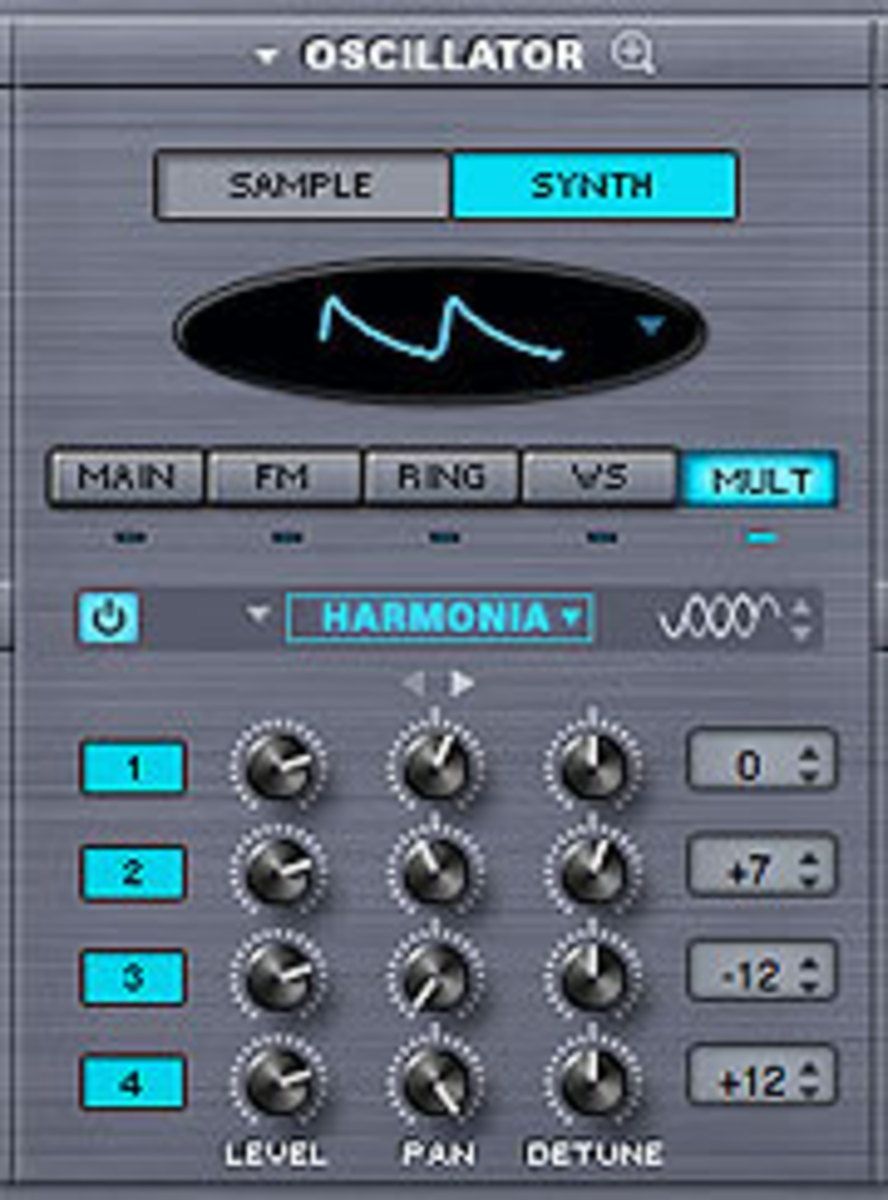 There are some really nice sound sculpting parameters. I particularly like the timbre parameter (both crush & shift) which alters the attack and “timbre” of a sound. This is a nice one to midi learn and tweak while playing. The FM, Ring Modulation, and Wave Shaper are also great for altering sounds and midi learning (if you have enough controller knobs). The voice multiplier sections adds some nice features to the oscillator section: unison, granular, and the harmonia feature. They all work by multiplying the number of oscillator voices to get richer sounds. Harmonia works like a classic harmonizer but it’s also built into the oscillator as a polyphonic synthesis component, and not just as an audio effect (so this means that Omnisphere can have up to 10 independent oscillators per patch!). There are some nice presets for the harmonia feature which show some of its possibilities.
Modulation and flex mod
The modulation section in Omnisphere is quite powerful and complex but steps have been made to make it more user-friendly. There are numerous sources and targets which means that the number of potential modulations is pretty impressive, to say the least. Thankfully there is an easy way (as well as more in-depth methods) to set up modulations: by just right-clicking on a parameter and choosing a source. This method has been simplified even more thanks to the 'Flex-Mod’ feature which saves time and aggravation. The way it works is that Omnisphere automatically selects the first available source when you choose a given type. For example, if LFO 1 is being used already and you tell Omnisphere to create a new LFO modulation, it will automatically route it to the next available LFO; effortless! As stated before, the majority of controls on this VSTI are modulatable, so having an easy but effective way of doing things is a boon.
Enter the Matrix
 As with numerous other features in Omnisphere, there’s a more 'in-depth’ modulation section aptly named the 'Mod Matrix’. This page gives a precise view of modulation controls and routings. It’s definitely not for the faint-hearted, but it does have the advantage of displaying numerous routings simultaneously for editing. And for the more intrepid, there’s the 'Morphing Modulation’ feature which lets you morph and crossfade between two different source outputs that are modulating the same target! Kudos to Spectrasonics for this powerful yet easy to use modulation system. Those who don’t want to get their hands dirty can just use the simple right-click method of setting up modulations without having to worry, while brave and intrepid 'mod warriors” can go into the dragon’s cave and discover all the riches that lie within.
Edit Page Pt.II
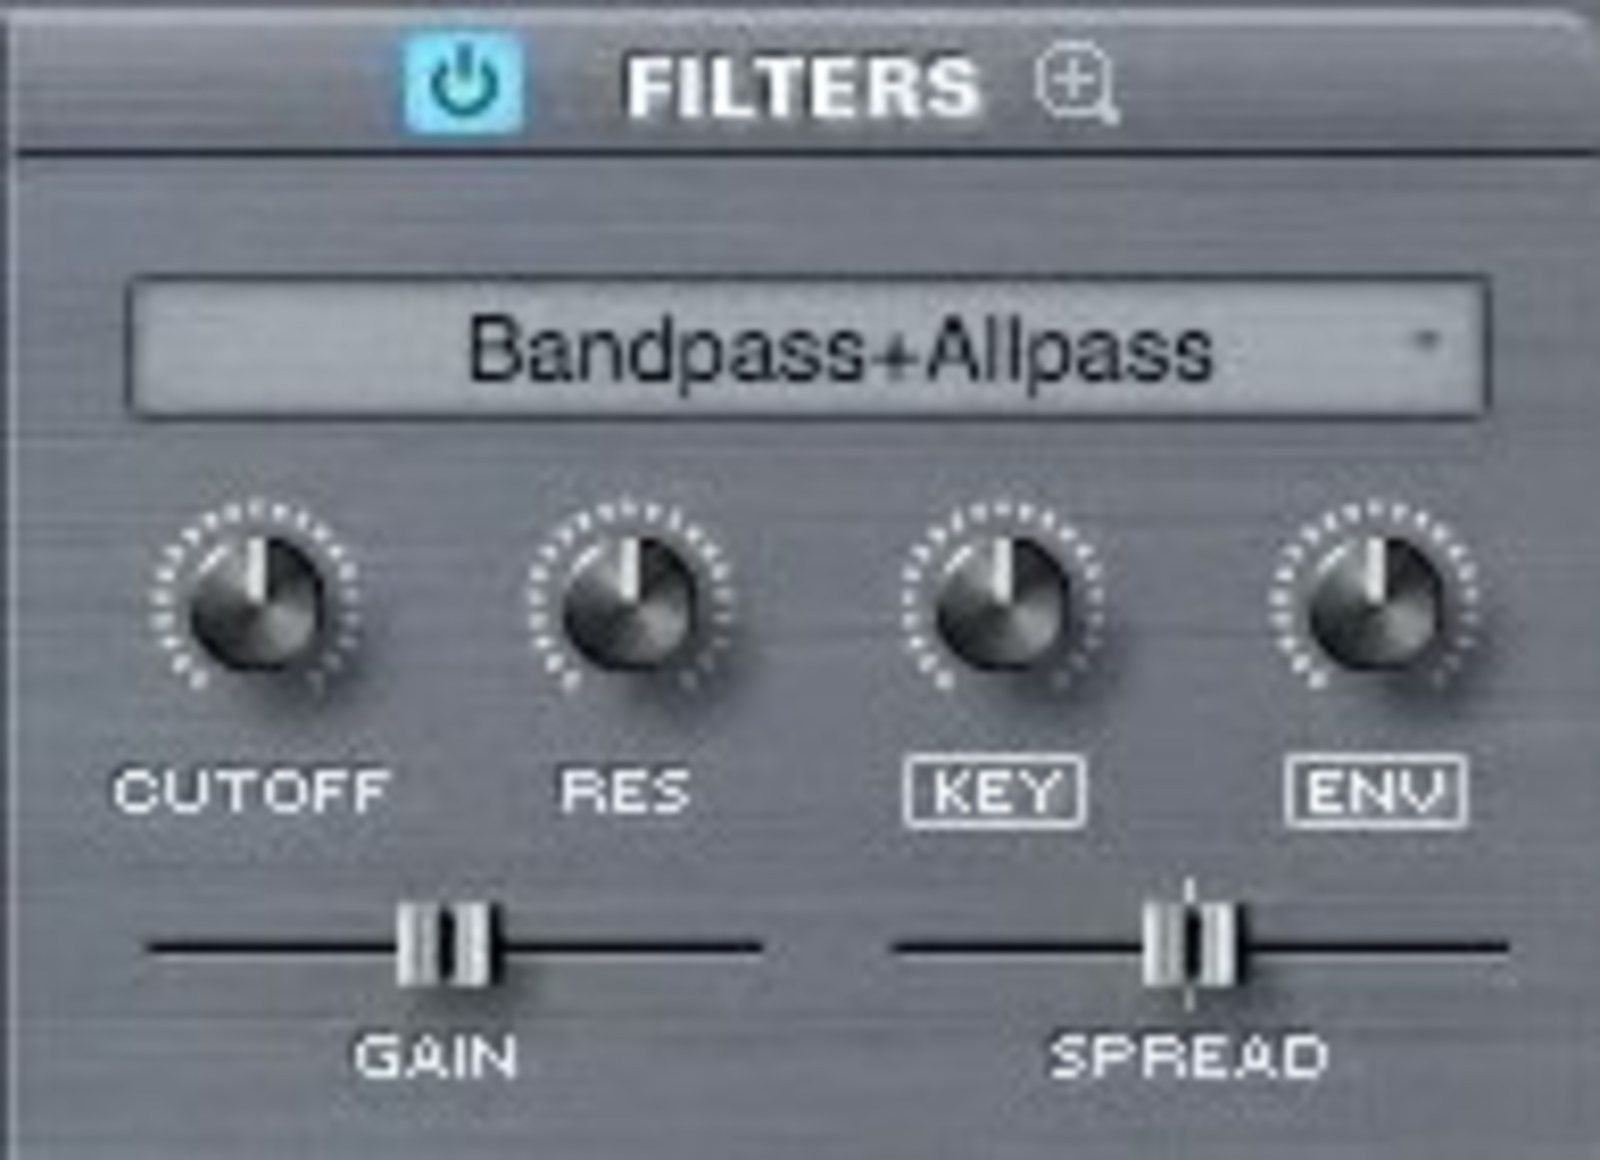 A filter section is traditionally pretty fun since it usually gives the user an immediate and noticeable result, and the one in Omnisphere is no exception. As with many other sections, there exists a simplified version which has the usual parameters, and an “in depth”, more complex zoom section with advanced parameters. If your looking for simple yet effective filter results, then you need look no further than the simplified (main) filter section which offers the usual parameters you need to get some classic filter effects and more. These classic parameters are especially nice and effective when midi-learned. Between the Mod wheel, the main master filter & resonance (on the main page), and these parameters on the simplified filter section, there are already quite a few parameters to tweak. One interesting and slight deviation from the standard filter fare is the spread control. This is a nice touch and also gives noticeable results when tweaked and therefore also a good candidate for midi-learning (running out of knobs?).
 If all that wasn’t enough, the filter section has a more in depth section that lets the user control both filters, in this dual filter architecture, independently. This means you can setup different filters for each part in series or parallel. I found all this complexity could be confusing at first, but thanks to the backlit power knobs for each part’s filter I was able to find my way. The fact that modulated controls are also highlighted make things clearer as well. The filter section also comes complete with a healthy preset selection that features the 17 different filter types which include lowpass, hi-pass, bandpass, plus other specialized types. All in all I found it to be a nicely working and effective section that’s fun to use and gives great results. This filter section can, of course, like many other aspects of Omnisphere, be modulated.
Envelopes
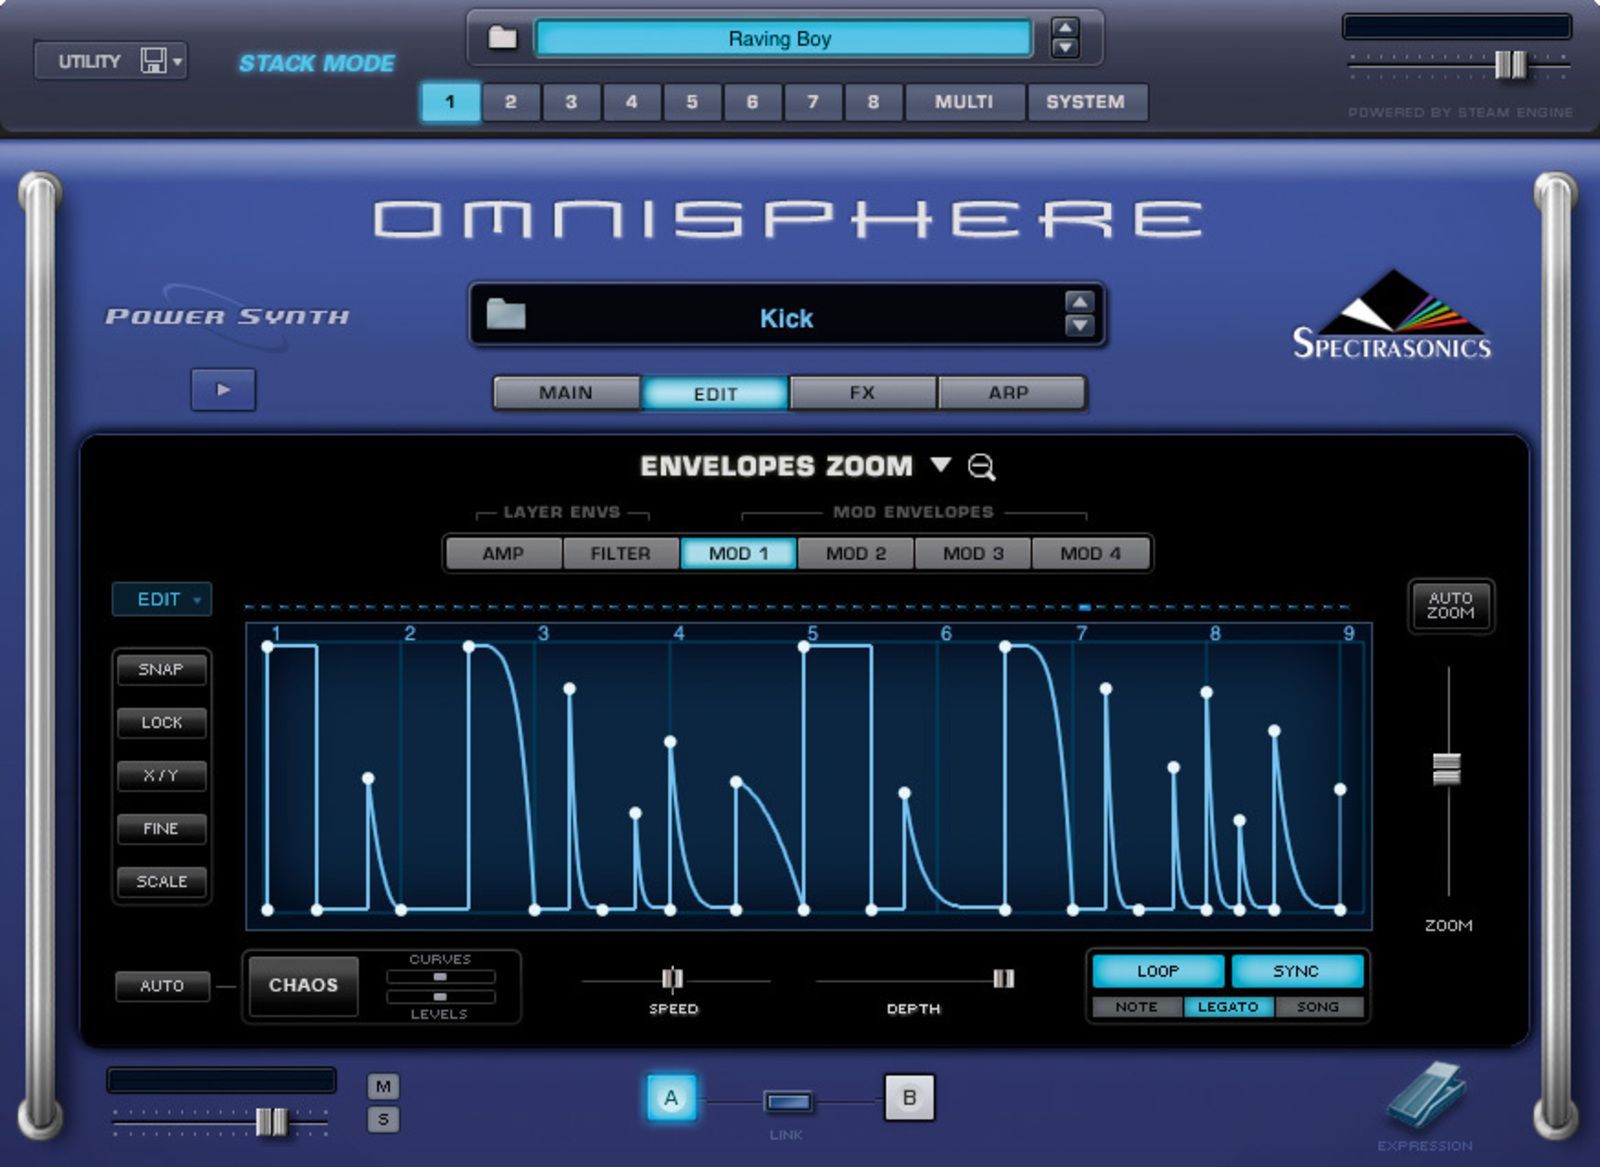 The envelope section has two interfaces: a classic ADSR and a complex envelope interface. This way everybody’s happy! In Omnisphere both concepts are combined into one. In addition to that, each layer has an amp and a filter envelope, and four modulation envelopes common to both layers in a part. The ADSR envelope works the way you’d expect it and quite nicely at that, but where Omnisphere’s envelope section really shines is in the complex envelope section. This section allows much more control in shaping the sound since you can have many more control points than the traditional 4-point ADSR. Interesting features in the complex envelope section include: envelope looping and syncing to the host, chaos (which randomizes the envelope contour), auto chaos (automatically randomizes the envelope every cycle, very nice!). I really liked using the auto chaos on looped envelopes that were synced to my project, especially when the mod envelope was assigned to modulate amplitude. It gave me some very nice rhythmic patterns.
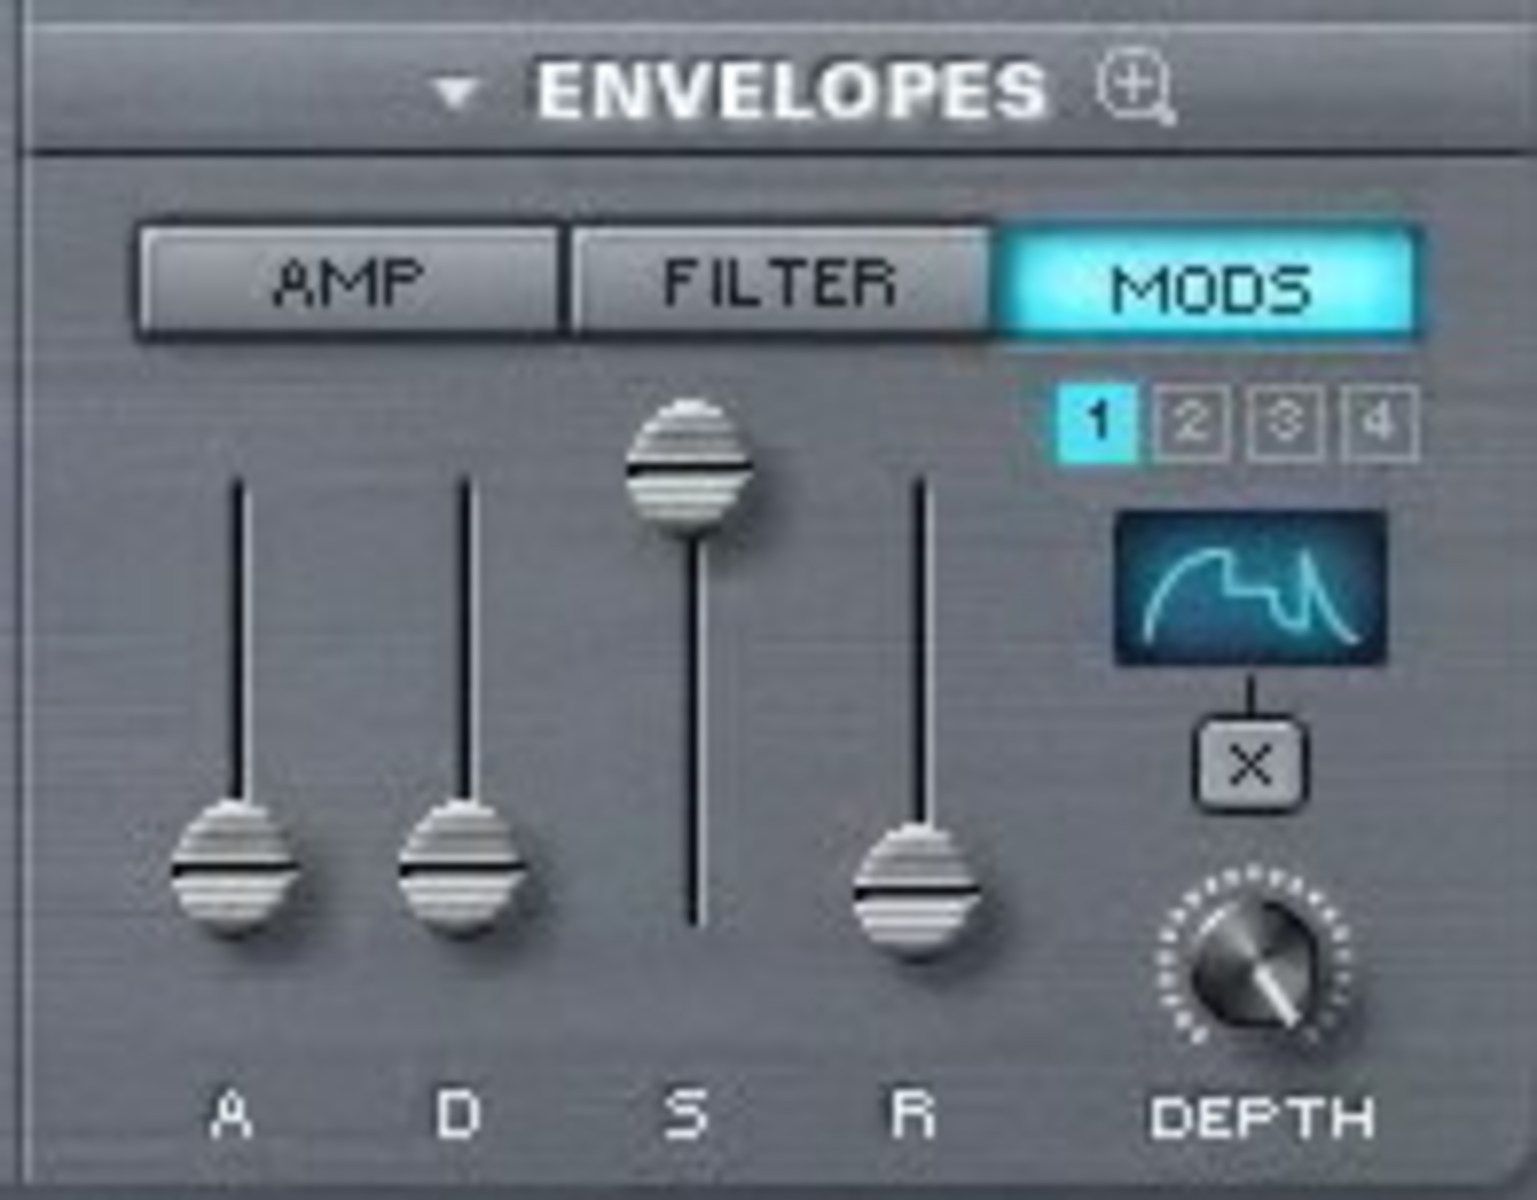 The envelope section has many creative and interesting presets as well. Many interesting ideas can be had by just going through each one. Basically this envelope section is very effective and lets you quickly create sounds that are constantly evolving. Just like with so many other aspects in this VSTI, you can just tweak the basic section or go in much deeper with the complex section; the best of both worlds.
LFOs
This section has 6 independent LFOs per part and 9 waveforms (including classic forms as well as less common ones). In addition each waveform can be varied with a phase slider that lets you change at which point the waveform begins its cycle and therefore you can trigger the LFO to any position in the waveform. This LFO section is great for creating effects like vibrato, tremolo, filter sweeps, auto-pan, or any other cyclical modulation effects. I found it to be pretty flexible as well as relatively easy to use for modulating other parameters thanks especially to the flex-mod system which really takes a lot of potential confusion out of the equation.
FX Galore
 As can be expected, Spectrasonics has endowed Omnisphere with a generous FX section. Those familiar with Stylus RMX will feel right at home with Omnisphere’s FX section, as it’s more or less the same with a few differences in architecture. Omnisphere’s FX section contains no less than 33 different FX units (same as those in RMX) and 29 FX “racks” (each able to take 4 different FX units! That’s potentially 4 × 29 FX units running at the same time, if your cpu can handle it! ). There are inserts for effects on Patches (4 for each layer and 4 more for the patch as a whole, which means 12 FX units per patch), and aux sends for adding effects to the parts in a Multi. Inserted effects will only affect the Patch they’re inserted to, either pre or post fader, while multiple parts can share any of the aux sends effects. In addition to that, there’s a final Master FX stage that all parts can go through as well. As with just about everything else on this instrument, all FX parameters can be MIDI learned and/or host automated as well as modulated with any modulation source.
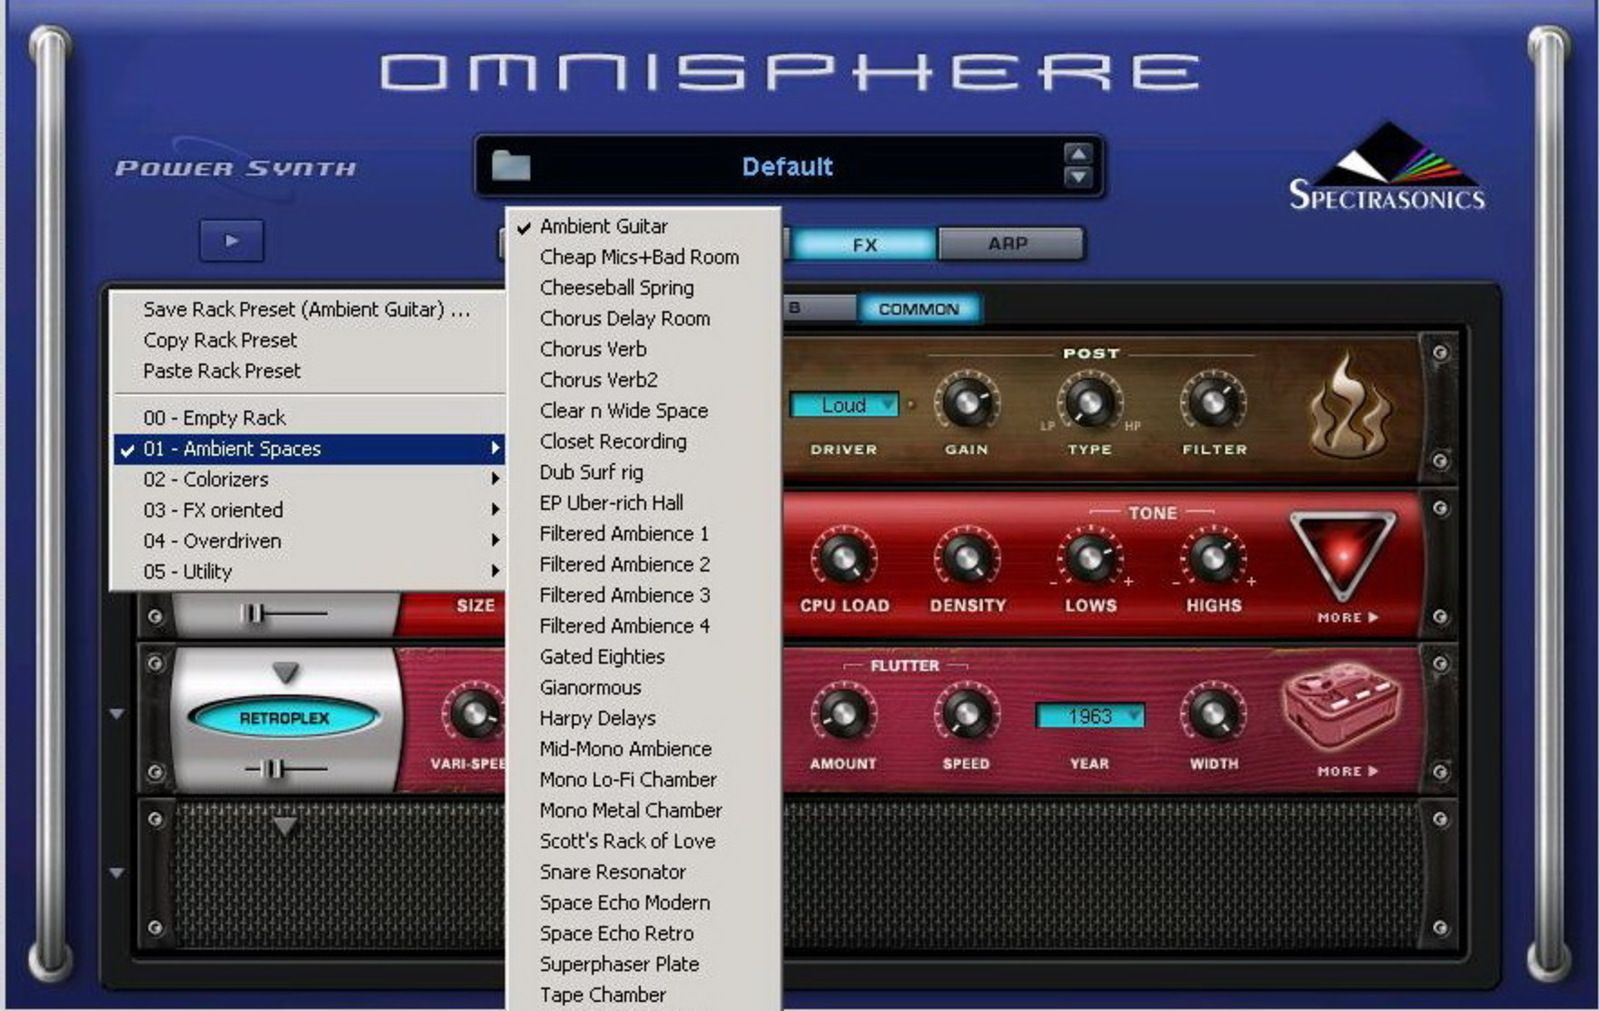 The FX section also includes a wealth of very useful presets for both individual units and FX racks which I found to be very helpful and indicative of the numerous textural possibilities, especially the FX rack presets. Presets can be shared with others across any platform or host, and a really nice feature is the possibility of copying and pasting a 'unit’ preset from Stylus RMX and paste it into Omnisphere and vice versa. FX rack presets can’t be copied and pasted between the two in the same way since RMX racks have three slots while Omnisphere’s has four.
 The assortment of effects is excellent and covers the usual areas one would expect: reverbs, delays, EQs, filters, chorus, flangers, phasers, compressors, limiters, etc. plus a few surprises like the 'flame distortion’ and the ''smoke amp simulator’ that has a set of amp controls, speaker combinations, and modeled versions of some classic amps. It’s a nice touch and adds a bit of warmth and a 'vintage’ aspect to patches.
Though it’s hard to find fault with this FX section, I think it would have been nice to have a global Bypass button on each patch and/or multi as opposed to having to bypass each one individually (it’s a bit annoying when you have to bypass 12 different effects on three different pages just to hear a patch in its dry form, not to mention the possible scenario of manually bypassing 116 effects in a multi one by one!). Also, because there are so many different FX pages/tabs it would be nice if there were some kind of back-lighting or hi-lighting system to let you know which FX rack has an FX unit on it. It can take some time to find the default reverb on a patch when you want to turn it off and have to look through many different FX rack pages. Plus this can become even more confusing when you consider that some soundsources were recorded with natural ambiances (like reverb) on them, so you can be looking to turn of a reverb unit that’s not even there! All the more reason for a signalization system. And since I’m nitpicking, what about being able to drag and drop effects units to change their order in the effects chain. Of course these are very small details in an otherwise very impressive, flexible, and well thought out FX section that works very smoothly and sounds great!
Arpeggiator
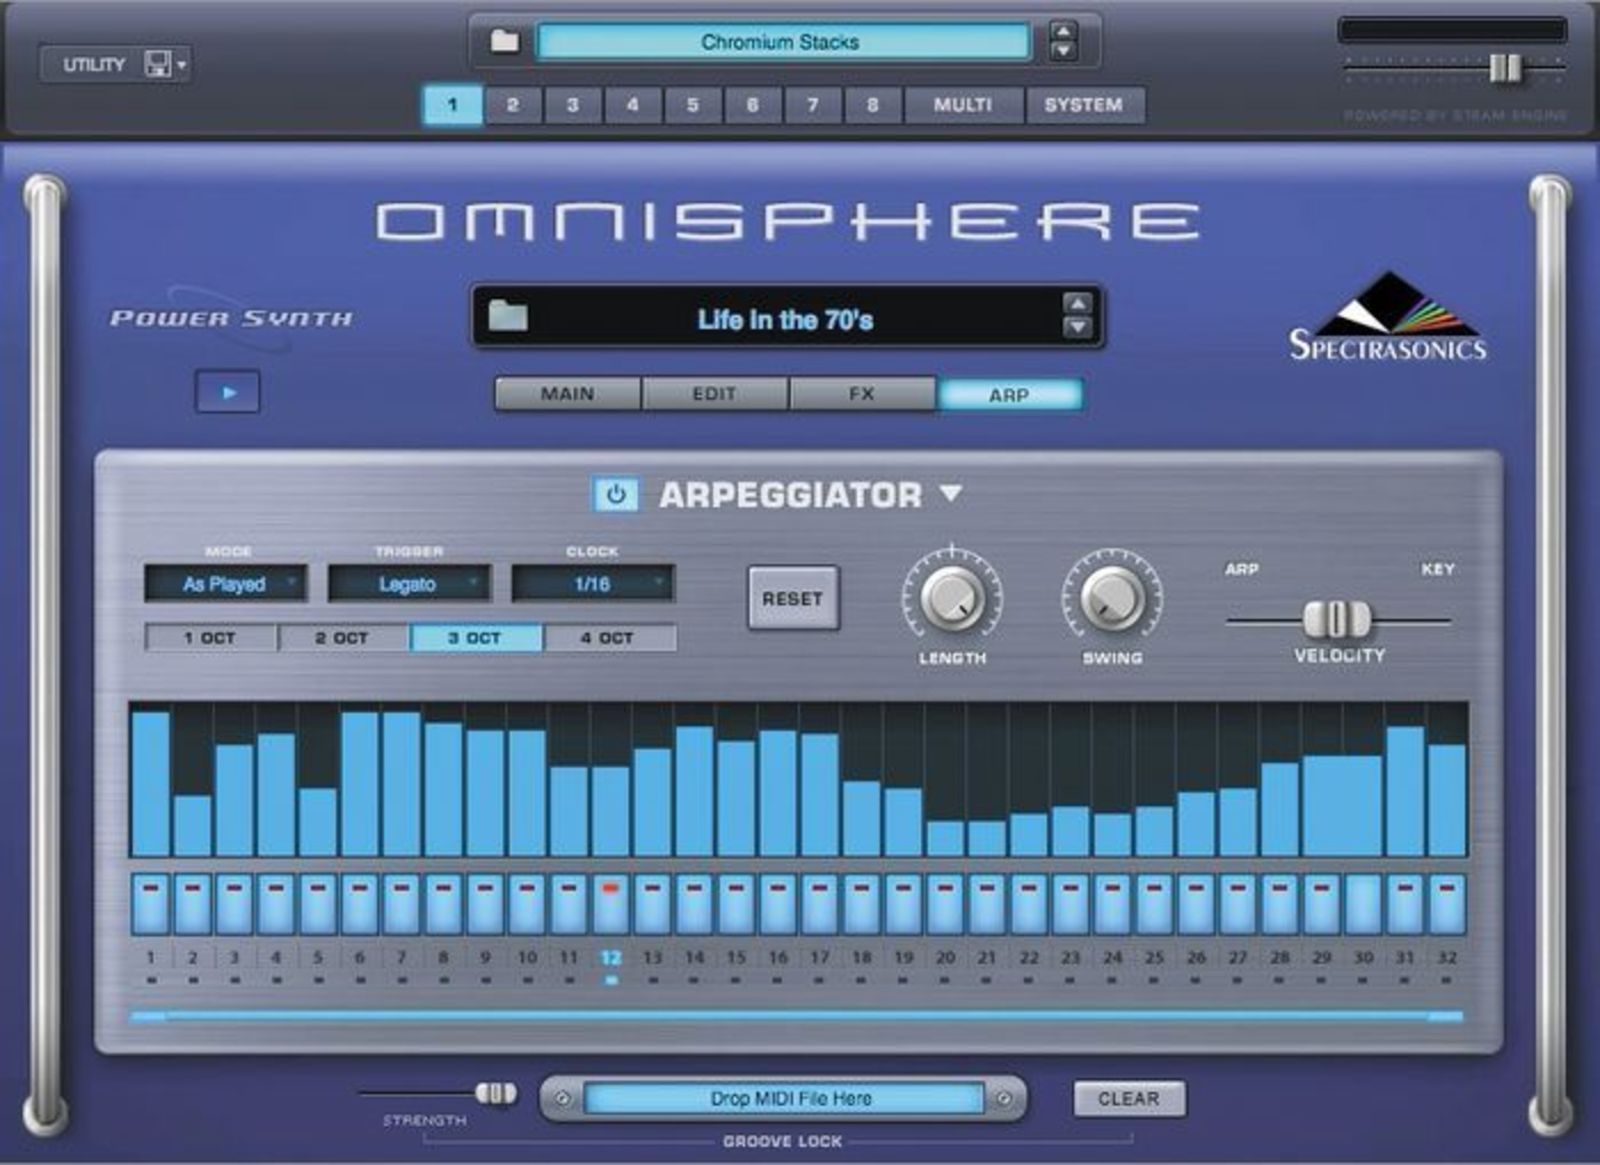 When you open the arpeggiator’s dedicated window, the first thing you’ll notice is the “rhythm programmer” that looks very much like a step sequencer (32-steps). It also more or less works like a classic sequencer. You click on one of the bars to add a note as well as adjust its velocity. There’s a bar at the bottom which controls the length of the pattern (all you need to do it click on it and drag it to the desired length: very intuitive). Creating ties and altering note lengths is slightly less obvious, but once you understand how to do it (which basically just involves either double clicking or holding down shift) it also is very quick and easy to do. I do however find that it’s a shame that you need to use 'shift’ to change the duration of a note. It would have been nice to be able to do everything with just a mouse (maybe they could have included a button on the interface for that) but this is of course a very small and personal quibble. Apart from that, everything else is extremely intuitive and user-friendly. All buttons and drop down menus are self explanatory for people familiar with arpeggiators (and probably even for those who are not). The one thing I found missing was the ability to have the arpeggios play in triplet rhythms. In fact the clock section goes from whole notes to thirty-second notes, but it’s not possible to play any triplet rhythms. I found this particularly disappointing in Live mode where I often wanted a triplet feel arpeggiation. It is possible, however, to get triplets using Groove Lock with a triplet MIDI file (more on this below) but this requires the extra steps of looking for and loading an appropriate midi file. But fortunately Spectrasonics says that triplets will be added into the clock menu in a future update.
Groove Lock
I’m not such a big fan of arpeggiators in general since I like to play my own arpeggios, but this one is so easy and fun to use that I found myself playing around with it more than I expected to. The real interesting thing here is that, unlike many other arpeggiators which have fixed timing (and therefore won’t fit over many types of grooves), Spectrasonics has developed a nice feature for their arpeggiator called “groove lock”. The arpeggiator will “lock” onto a specific groove when you drag and drop “any” standard midi file onto the midi bar at the bottom of the window (or through a dedicated browser). This opens up a whole new dimension when working with Stylus RMX (for those of you who have it). You just drag and drop the midi file from one interface to the other to lock the groove of the arpeggiator; it’s as simple as that. In addition to all this, every part can have its own arpeggiator so there’s not just one arpeggiator, but eight! This means that up to eight arpeggiators can be running simultaneously all with their own specific pattern. All in all it’s a very impressive but fun to use arpeggiator, just make sure you have enough processing power when piling up arpeggiated parts.
Mixer
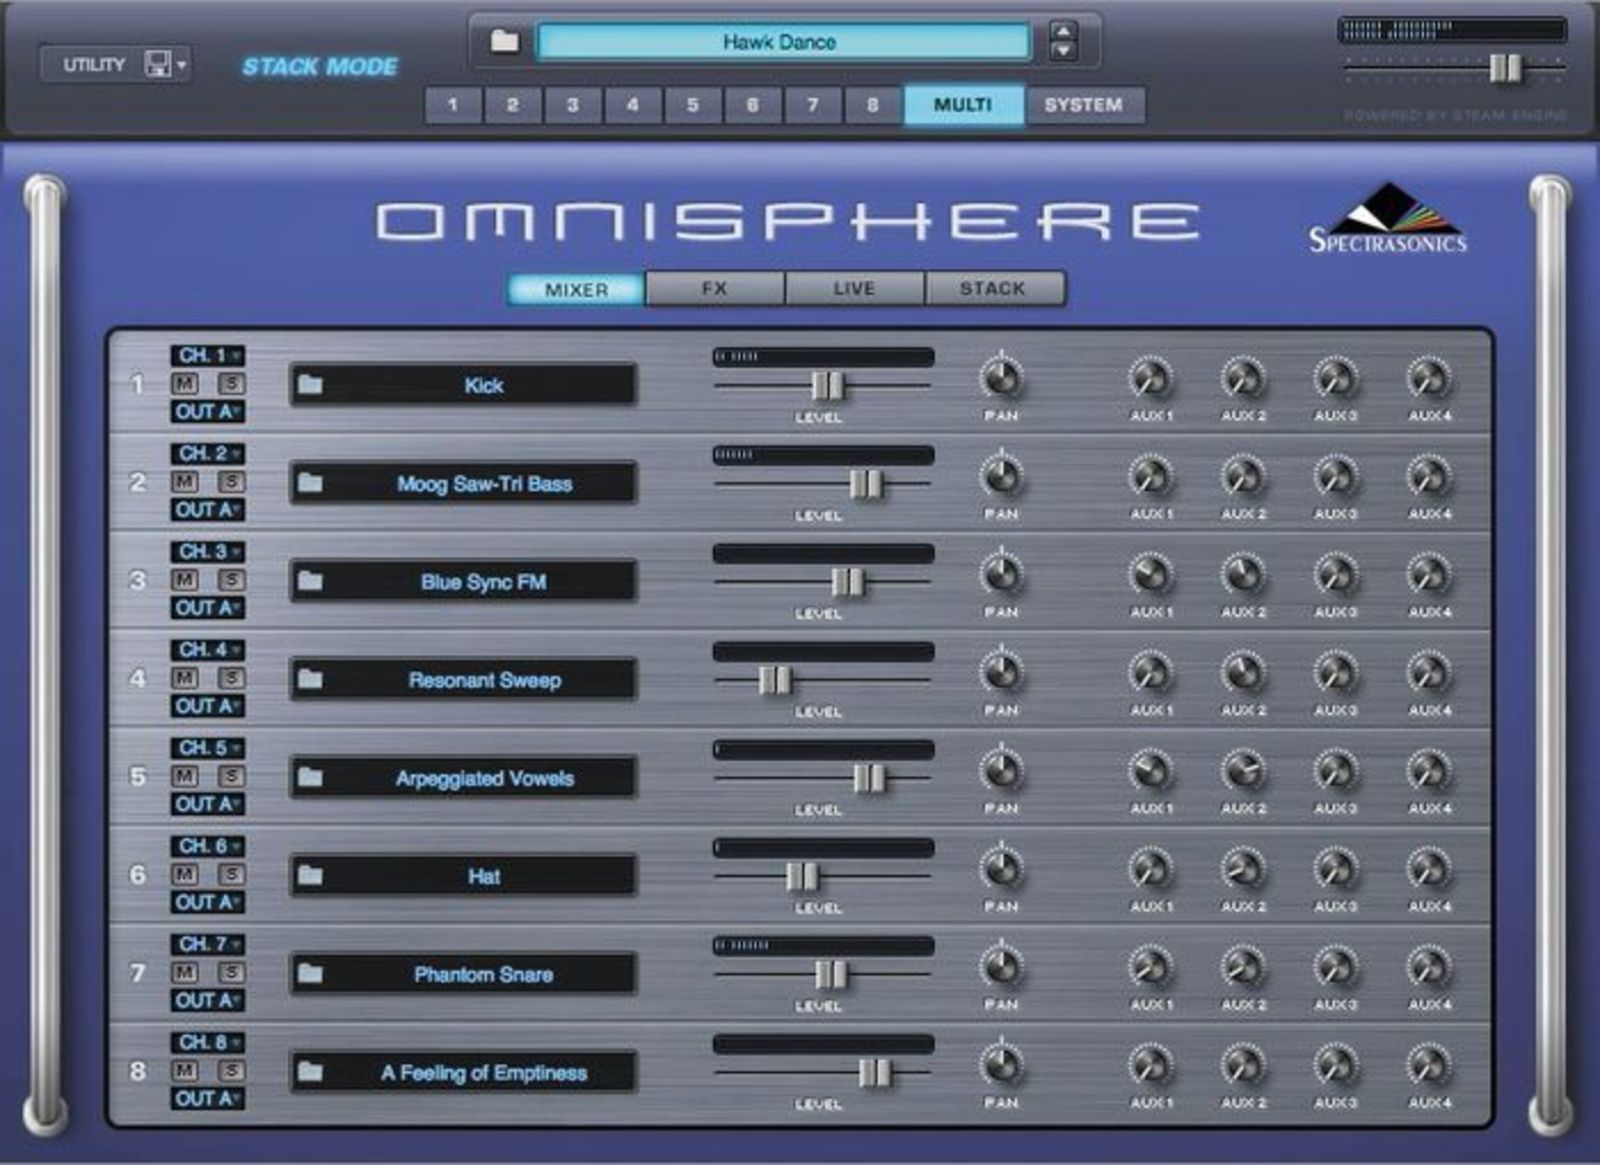 The mixer in Omnisphere is more or less the same as the one in Stylus RMX, which is re-assuring since the latter works quite well. The main difference between the two is that there’s now a midi channel selection which lets you select any of the 16 midi channels for any of the 8 parts. The rest is very similar to RMX with its 8 part layout with each part having controls for pan, level, 4 independent aux sends, mute, solo as well as a output assignment selector. The latter lets you route each part in a 'multi’ to any one of the 8 output channels; a feature that is very handy and easy to use (make sure you create audio tracks for any output channel you use). As stated in the FX section, the 4 aux send knobs for each part are for adding effects to each part, each effect having its own FX rack. If all 32 aux knobs are in the zero position, all aux sends will be internally bypassed, which will save cpu power, but if any one of the knobs isn’t set to zero, then all aux sends will be enabled. So it’s a good idea, if you’ve got a lot of aux send effects loaded but not being used, to make sure all knobs are set to zero, especially if you’re hurting for cpu power. Once again, it would have been nice to have a global bypassing or enable/disable button for effects (or at least aux sends). Nevertheless, the mixer works perfectly and is a model of ergonomics and efficiency. Everything on this page can be MIDI learned/host-automated, including the mute and solo buttons.
Live and Stack Modes
 Get your hands off my Stack!
The Stack mode does just that: it lets you stack (layer or split) the individual parts of a multi and play them together, or put them into specific regions of the keyboard, in many different and flexible ways. It’s not just a question of splitting your keyboard, you can have parts overlap, crossfade, respond to velocity, etc. You can even assign parts to specific velocity ranges as well as crossfade between parts using MIDI CC (continuous controllers). And the interface, which is really simple and intuitive, is a winner. Moving parts to different regions as well as fading, crossfading, and resizing regions are a breeze (just clicking and dragging)! Setting up split points has never been this easy. These regions not only respond to keys, they also respond to velocity and CC messages. It’s a good idea to check out the multi presets to see what’s possible and to get some interesting ideas.
This feature can take up a whole lot of cpu resources (due to using multiple parts and FX simultaneously) so you have to be careful. There were a few factory multi presets that my computer just couldn’t handle and I had to deactivate effects and tweak parameters to get a usable result. Nevertheless, I use this feature quite a bit because it’s very easy to use and you can come up with stunning sound combinations and ideas. It’s also great for preparing mapping configurations for live use. The velocity and CC modes are particularly rich in possibilities.
Coming to you Live…
 As opposed to Stack mode, where you play layered parts at the same time, Live mode lets you move easily between parts in a multi without the sound being interrupted, all while playing on a single midi channel. The interface is divided into 8 big rectangles each showing the part number and the patch for that part of the multi (from 1 to 8). You change parts (patches) by clicking on any part with a mouse or by midi learning either the previous/next arrows (they can be midi learned in this page), key switches, Midi CC, or program changes. A nice feature is that you can change the configuration/order of the patches (which means that they don’t have to be in numerical order) by just drag n drop! This is handy when you’re using the previous/next arrows to change patches.
It’s obvious that Spectrasonics has put a lot of thought into their Live mode, seeing that there are numerous configuration possibilities. For example, when the parts are midi learned to key switches or CC, you can choose between different modes such as touch, latch, or switch, each changing the way Omnisphere reacts to key switches or CC. This provides a lot of flexibility and I found myself marveling at the conception and ergonomics of it all. There’s even access to basic mixer controls (level, mute, and solo) without leaving the Live mode page, when clicking on the dedicated button. Same thing for the browser: there’s a dedicated button that takes you to the browser but without leaving Live mode, nice! And if that wasn’t enough, there’s also a 'Dual Live’ mode feature that lets you control parts 1–4 from one keyboard and parts 5–8 on another. Spectrasonics seems to have thought of it all when it comes to Live mode, there doesn’t seem to be anything to nitpick or criticize, only to praise.
The Sound
As one would expect with a Spectrasonics product, this thing sounds incredible. It’s even more stunning than I expected. Check out their website for audio/video demos plus our own videos of trade shows they’ve done.
Multis:
- Multi Lap
- Multi Chorale Menagerie
- Multi Whaless
- Multi Tuvan
- Multi Fingerstyle
- Multi Stack Pad
- Fugue (Bells)
Others:
Conclusion
 I’ve been a big Spectrasonics fan ever since I first came across their products. So does that mean I’m not objective and automatically like everything they do? Not really. It’s more like a long time fan who becomes more and more difficult to please and who has high standards for the object of his adulation (I’m a big Sting & Stevie Wonder fan but that doesn’t make me less critical of their latest releases; rather the opposite is true). But somehow Spectrasonics just keeps getting better and better at what they do. Of course one can always find negative things to say about anything, even Omnisphere. So some might say that the sounds are too big and won’t easily fit into a mix, or that Spectrasonics’ sounds are too easily recognizable and ubiquitous. Or that its sounds are too geared at certain styles of music. But these arguments, which I disagree with, would only be valid on the surface (if that!). The complexity and versatility of the instrument and its massive sound library make these points irrelevant.
 |
- The Sound, the sound, the sound
- User friendly
- Flexibility, and the possibility to go in deeper
- Arpeggiator
- Live and Stack Modes
- The sound library (and the inclusion of a “best of” compilation of Spectrasonics older libraries)
- Midi learn, Automation, and Modulation (the majority of parameters can be controlled & it’s easy to do!)
- Interconnectivity of all it’s aspects and features
- Interface (both simple & complex sections)
- Excellent Video Tutorials and Presentations
- STEAM engine: present and future interaction with other instruments built on their engines (like RMX)
- Resource Heavy
- No Stand alone