How to rip DVD movie on Mac OS X?
- 3 replies
- 3 participants
- 14,671 views
- 2 followers
zengc059
3

New AFfiliate
Member 17 years ago
31 May 2009 to 17:51How to rip DVD movie on Mac OS X?
#1
How to rip DVD movie on Mac OS X?
Want to rip DVD to any video format with original quality on Mac OS X (tiger and leopard)? If that so, Pavtube DVD Ripper for Mac will be a good choice. With it, you can edit and rip DVD to many kinds of MP4, AVI, MOV, 3GP, 3G2, VOB, DV, FLV, MPG etc. as well as converting DVD audio to MP3, M4A, AAC, and AC3 etc. on Mac with few easy steps. Especially, its intuitive blue interface will guide you to enjoy a happy DVD ripping experience. Below are the detailed steps about how to rip DVD easily with the popular [URL=http://www.pavtube.com/dvd-ripper-mac/]DVD Ripper for Mac[/URL].
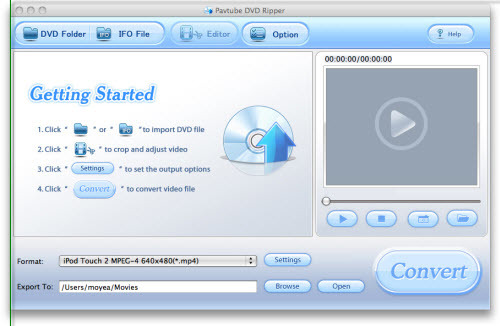
[B]1) Run and import DVD.[/B]
Let’s download the program and run it, import the DVD. An interface like below will pop up into your eyes.
[IMG]http://www.pavtube.com/images/promotion/Pavtube_dvd_ripper_mac_maininterface_090526.jpg[/IMG]
[B]Tips:[/B]
[B]DVD Folder[/B]: Add DVD video though locating DVD folder which contains all the data.
IFO File: Directly add the IFO files to the list of the program.
[B]Editor[/B]: Trim and crop DVD to meet your special need.
[B]Option[/B]: Set the snapshot images’ saved place and their file formats.
[B]Help[/B]: Click the Help button, you can read the PDF help document file.
[B]Settings[/B]: Do the advanced setting for the checked DVD title or chapter.
[B]Open[/B]: Open the output file folder
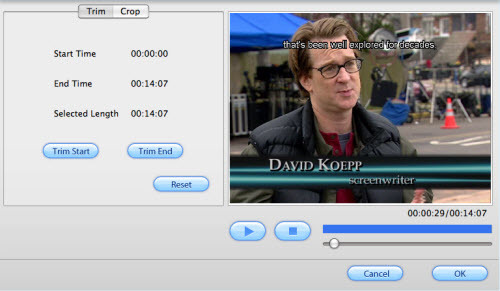
[B]2) Customize Settings[/B]
After you import the DVD, you can click Editor to customize the video before the DVD conversion. Two sections are available: Trim and Crop.
[B]Trim[/B] section allows you to select the starting time and the ending time to choose your favorite duration.
[IMG]http://www.pavtube.com/images/promotion/Pavtube_dvd_ripper_mac_editor_090526.jpg[/IMG]
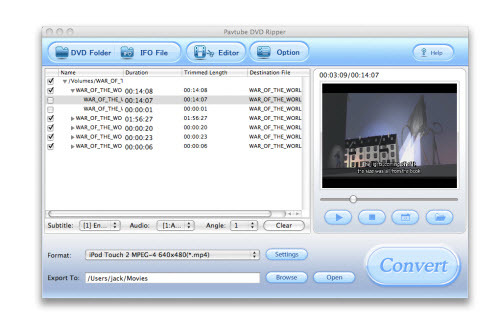
[B]Crop[/B] section allows you to cut off the black edges of the image and set the aspect ratio so as to give you the favorite part of the image by the crop function.
[IMG]http://www.pavtube.com/images/promotion/Pavtube_dvd_ripper_mac_import_090526.jpg[/IMG]
After you choose the proper cropped file, click button OK to save your customization.
[B]3) Set Output Settings[/B]
The program allows you set the output file format and the saving position. Choose the output files format under the list of Format of the main interface. At the same time, you can click the button Browse to specify an output folder on your Mac OS X. The section under Settings button is designed for the experienced users to do the advanced settings like set video Codec Name, Bit Rate, Video Size, and Frame Rate to optimize the quality of the video, as well as setting audio Codec Name, Bit Rate, Sample Rate, and Channels to make the quality of audio better.
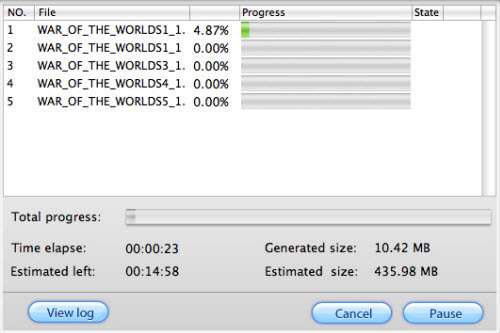
[B]4) Convert Movie[/B]
After every thing necessary was selected, you can click the button Convert to start the conversion. Soon you will see the window below:
[IMG]http://www.pavtube.com/images/promotion/Pavtube_dvd_ripper_mac_convert_090526.jpg[/IMG]
Few minutes later, you will get the ripped DVD files with high quality on your Mac OS.
Hope you have a great fun.
zengc059
3
New AFfiliate
Member 17 years ago
31 May 2009 to 19:20
#2
Want to rip DVD to any video format with original quality on Mac OS X (tiger and leopard)? If that so, Pavtube DVD Ripper for Mac will be a good choice. With it, you can edit and rip DVD to many kinds of MP4, AVI, MOV, 3GP, 3G2, VOB, DV, FLV, MPG etc. as well as converting DVD audio to MP3, M4A, AAC, and AC3 etc. on Mac with few easy steps. Especially, its intuitive blue interface will guide you to enjoy a happy DVD ripping experience. Below are the detailed steps about how to rip DVD easily with the popular DVD Ripper for Mac.
1) Run and import DVD.
Let’s download the program and run it, import the DVD. An interface like below will pop up into your eyes.
 Tips:
DVD Folder: Add DVD video though locating DVD folder which contains all the data.
IFO File: Directly add the IFO files to the list of the program.
Editor: Trim and crop DVD to meet your special need.
Option: Set the snapshot images’ saved place and their file formats.
Help: Click the Help button, you can read the PDF help document file.
Settings: Do the advanced setting for the checked DVD title or chapter.
Open: Open the output file folder
2) Customize Settings
After you import the DVD, you can click Editor to customize the video before the DVD conversion. Two sections are available: Trim and Crop.
Trim section allows you to select the starting time and the ending time to choose your favorite duration.
Tips:
DVD Folder: Add DVD video though locating DVD folder which contains all the data.
IFO File: Directly add the IFO files to the list of the program.
Editor: Trim and crop DVD to meet your special need.
Option: Set the snapshot images’ saved place and their file formats.
Help: Click the Help button, you can read the PDF help document file.
Settings: Do the advanced setting for the checked DVD title or chapter.
Open: Open the output file folder
2) Customize Settings
After you import the DVD, you can click Editor to customize the video before the DVD conversion. Two sections are available: Trim and Crop.
Trim section allows you to select the starting time and the ending time to choose your favorite duration.
 Crop section allows you to cut off the black edges of the image and set the aspect ratio so as to give you the favorite part of the image by the crop function.
 After you choose the proper cropped file, click button OK to save your customization.
3) Set Output Settings
The program allows you set the output file format and the saving position. Choose the output files format under the list of Format of the main interface. At the same time, you can click the button Browse to specify an output folder on your Mac OS X. The section under Settings button is designed for the experienced users to do the advanced settings like set video Codec Name, Bit Rate, Video Size, and Frame Rate to optimize the quality of the video, as well as setting audio Codec Name, Bit Rate, Sample Rate, and Channels to make the quality of audio better.
4) Convert Movie
After every thing necessary was selected, you can click the button Convert to start the conversion. Soon you will see the window below:
After you choose the proper cropped file, click button OK to save your customization.
3) Set Output Settings
The program allows you set the output file format and the saving position. Choose the output files format under the list of Format of the main interface. At the same time, you can click the button Browse to specify an output folder on your Mac OS X. The section under Settings button is designed for the experienced users to do the advanced settings like set video Codec Name, Bit Rate, Video Size, and Frame Rate to optimize the quality of the video, as well as setting audio Codec Name, Bit Rate, Sample Rate, and Channels to make the quality of audio better.
4) Convert Movie
After every thing necessary was selected, you can click the button Convert to start the conversion. Soon you will see the window below:
 Few minutes later, you will get the ripped DVD files with high quality on your Mac OS.
Hope you have a great fun.
Few minutes later, you will get the ripped DVD files with high quality on your Mac OS.
Hope you have a great fun.
Tips:
DVD Folder: Add DVD video though locating DVD folder which contains all the data.
IFO File: Directly add the IFO files to the list of the program.
Editor: Trim and crop DVD to meet your special need.
Option: Set the snapshot images’ saved place and their file formats.
Help: Click the Help button, you can read the PDF help document file.
Settings: Do the advanced setting for the checked DVD title or chapter.
Open: Open the output file folder
2) Customize Settings
After you import the DVD, you can click Editor to customize the video before the DVD conversion. Two sections are available: Trim and Crop.
Trim section allows you to select the starting time and the ending time to choose your favorite duration.
Crop section allows you to cut off the black edges of the image and set the aspect ratio so as to give you the favorite part of the image by the crop function.
After you choose the proper cropped file, click button OK to save your customization.
3) Set Output Settings
The program allows you set the output file format and the saving position. Choose the output files format under the list of Format of the main interface. At the same time, you can click the button Browse to specify an output folder on your Mac OS X. The section under Settings button is designed for the experienced users to do the advanced settings like set video Codec Name, Bit Rate, Video Size, and Frame Rate to optimize the quality of the video, as well as setting audio Codec Name, Bit Rate, Sample Rate, and Channels to make the quality of audio better.
4) Convert Movie
After every thing necessary was selected, you can click the button Convert to start the conversion. Soon you will see the window below:
Few minutes later, you will get the ripped DVD files with high quality on your Mac OS.
Hope you have a great fun. kesermarin
2
New AFfiliate
Member 16 years ago
07 May 2010 to 01:07
#3
Tanbee Video Editor for Mac V2.3.06
Overview: Create great home video without video editing experience, as a professional video editing software, Tanbee Video Editor for Mac provides quite many functions to help you edit the video on Mac OS X.
Tanbee Video Editor for Mac can edit and convert standard video formats like MOV, AVI, MP4, DivX, XviD, ASF, VOB, DV, 3GP, 3GPP, MKV, RM/RMVB, WMV, MPG/MPEG, FLV, M4V, etc. and HD video like AVCHD(MTS/M2TS), MOD, TOD, HD WMV, HD MOV, HD MKV, etc. Optimized Settings for Apple iPod, Apple iPhone/3G/3GS, BlackBerry Smartphone, Microsoft Zune, Creative Zen, Apple TV, Sony PSP, Goole Phone, Nokia, iRiver PMP, Archos, PS3, iMovie, etc.
Key Functions:
Trim Video or Audio: Trim video or Audio freely by setting the start time and end time, set segment length flexibly by just inputting duration time. You can trim audio clips from videos and save them to your phone as ringtones.
Crop Video: Video Editor for Mac allows you to remove black edge of your movie and get any playing area of the video by using its “Crop” function. Set the Screen Size by Keeping original, Full screen, 16:9, 4:3, etc.
Adjust Video Effect: Adjust the brightness, saturation and contrast of the video, or add some artistic effects like old film , Gray, Emboss, etc. to personalize your video. You can preview the changes when settings are done.
More information: http://www.video.editor-for-mac.com
http://www.video.editor-for-mac.com/images/apple-mac-video-editor.png
Overview: Create great home video without video editing experience, as a professional video editing software, Tanbee Video Editor for Mac provides quite many functions to help you edit the video on Mac OS X.
Tanbee Video Editor for Mac can edit and convert standard video formats like MOV, AVI, MP4, DivX, XviD, ASF, VOB, DV, 3GP, 3GPP, MKV, RM/RMVB, WMV, MPG/MPEG, FLV, M4V, etc. and HD video like AVCHD(MTS/M2TS), MOD, TOD, HD WMV, HD MOV, HD MKV, etc. Optimized Settings for Apple iPod, Apple iPhone/3G/3GS, BlackBerry Smartphone, Microsoft Zune, Creative Zen, Apple TV, Sony PSP, Goole Phone, Nokia, iRiver PMP, Archos, PS3, iMovie, etc.
Key Functions:
Trim Video or Audio: Trim video or Audio freely by setting the start time and end time, set segment length flexibly by just inputting duration time. You can trim audio clips from videos and save them to your phone as ringtones.
Crop Video: Video Editor for Mac allows you to remove black edge of your movie and get any playing area of the video by using its “Crop” function. Set the Screen Size by Keeping original, Full screen, 16:9, 4:3, etc.
Adjust Video Effect: Adjust the brightness, saturation and contrast of the video, or add some artistic effects like old film , Gray, Emboss, etc. to personalize your video. You can preview the changes when settings are done.
More information: http://www.video.editor-for-mac.com
illen
2
New AFfiliate
Member 16 years ago
18 May 2010 to 01:48
#4
AVI stands for. AVI is known as one of the most popular video formats nowadays. In fact, AVI was first introduced to the world by Microsoft in November 1992 as a multimedia format, part of Microsoft Video for Windows technology. AVI files can contain audio data and video data, which are interleaved for the playback. The resolution of AVI video varies from 640*480 to 160*120, keeping a 4:3 ratio.
AVI is a common fomat which compatible with quicktime for mac .so DVD fans demand to rip dvd to avi mac. The quality of avi is usually better .In that case,we can use the dvd to avi mac converter to rip dvd to avi mac .Just with several steps ,I can convert dvd to avi on mac with this software.The tool is so convenient and with dvd files in hand,yon need not worry how to import dvd to quicktime for mac .Either rip dvd to .avi mac or rip dvd to mov mac ,you can play avi on quicktime on mac well.
In fact ,I has applied this mac dvd ripper to rip dvd mac for one year,it is easy to use.
- < Thread list
- Rules