You gotta love plug-ins, but they’ve changed the rules of mixing. In the hardware days, the issue was whether you had enough hardware to deal with all your tracks. Now that you can insert the same plug-in into multiple tracks, the question is whether your processor can handle all of them.
Does it matter? After all, mixing is about music, balance, and emotional impact—not processing. But it’s also about fidelity, because you want good sound. And that’s where Mr. Practical gets into a fight with Mr. Power.
The Plug-in Problem
Plug-ins require CPU power. CPUs can’t supply infinite amounts of power. Get the picture? Run too many plug-ins, and your CPU will act like an overdrawn bank account. You’ll hear the results: Audio gapping, stuttering, and maybe even a complete audio engine nervous breakdown.
And in a cruel irony, the best-sounding plug-ins often drain the most CPU power. This isn’t an ironclad rule; some poorly-written plug-ins are so inefficient they draw huge amounts of power, while some designers have developed ultra-efficient algorithms that sound great and don’t place too many demands on your CPU. But in general, it holds true.
Bottom line: If you need to use processing in your mix, you want as much available power as possible. Here are the Top Ten tips that’ll help you make it happen.
1. Upgrade Your CPU
Let’s get the most expensive option out of the way first. Because plug-ins eat CPU cycles, the faster your processor can execute commands, the more plug-ins it can handle. Although there are a few other variables, as a rule of thumb higher clock speeds = more power for plug-ins. Still running in the sub-GigaHertz range? Time for an upgrade. Cool bonus: Pretty much everything else will happen faster, too.
2. Increase Latency
Fig. 1: Click for full image and description.
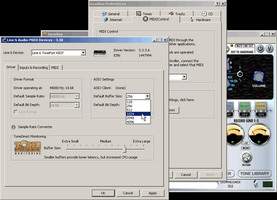
And in the spirit of equal time, here’s the least expensive option: Increase your system latency. When you’re recording, especially if you’re doing real-time processing (e.g., playing guitar through a guitar amp simulation plug-in) or playing soft synths via keyboard, low latency is essential so that there’s minimal delay between playing a note and hearing it. However, that forces your CPU to work a lot harder. Mixing is a different deal: You’ll never really notice 10 or even 25ms of latency. The higher the latency, the more plug-ins you’ll be able to run. Some apps let you adjust latency from a slider, found under something like “Preferences.” Or, you may need to adjust it in an applet that comes with your sound card or audio interface (Fig. 1).
3. Use Hardware-Based Plug-ins
Fig. 2: Click for full image and description.
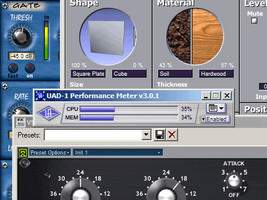
Several companies make high-performance audio DSP cards (TC Electronic PowerCore, Universal Audio UAD-1, Focusrite Liquid Mix, etc.) or make interfaces with built-in DSP (E-Mu, SonicCore, Lexicon, and the like). These either insert into your computer, or connect to it via a fast interface, like FireWire. The cards run their own proprietary plug-ins (although they often enjoy third-party support), so the plugs don’t load down the host CPU—the boards do the heavy lifting (Fig. 2).
Although these boards will eventually say no mas! as well, one advantage compared to CPU-based processing is you have a finite, known amount of power so you can “red-line” the DSP without fear. With your CPU, sometimes running too close to the edge will cause a meltdown when the CPU has to perform that one extra function. Cool bonus: Hardware-based plug-ins are often platform-independent.
4. Aux Bus Beats Inserts
Fig. 3: Click for full image and description.
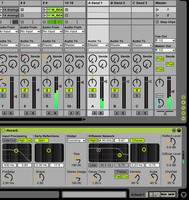
Inserting one effect in an aux bus is much more efficient than inserting multiple instances of an effect in multiple tracks (Fig. 3). Of course, there are some cases where an effect must be limited to a single track. But for something like reverb, which tends to draw a lot of juice, see if it isn’t possible to do the aux bus option instead. Sometimes, even EQ can work as a bus effect. For example, suppose you miked a bunch of acoustic percussion, and feel all the percussion tracks need to be brightened up a bit. Send them to a stereo bus, and insert a single EQ into that bus.
5. Turn Off Stuff That’s Not Needed
Fig. 4: Click for full image and description.
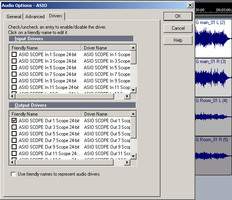
Anything that’s active is making demands on your CPU. Using only one band of a four-band EQ? See if you can turn off the others. Even input and output drivers drain your CPU. When you’re mixing, you probably don’t need any of your sound card’s input drivers to be active (with an exception we’ll cover next) — go ahead and disable them (Fig. 4).
6. Get Hardware Into the Act
Fig. 5: Click for full image and description.
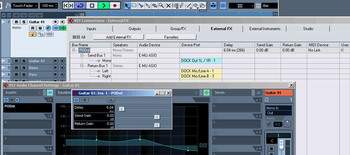
Reverb is one of the most CPU-intensive effects, period. A native reverb that sounds good will show no mercy to your CPU, which is why some of the best reverbs come from hardware-based plug-ins. But you can also use an external hardware processor. Dedicate one of your sound card output buses to feeding the reverb, and bring it back into an input. But, you say, there will be some latency going through the reverb. Well, you’re right. Think of it as free pre-delay, or record the reverb to a track and shift it ahead in time if you’re really picky. Cool bonus: Cubase 4 and Sonar 7 make using external hardware pretty painless (Fig. 5), and compensate for latency.
7. Send “Stems” to a Mixer
A digital mixer remains an important part of my setup, not only because it’s useful while tracking, but because I really like the EQ in my particular model (Panasonic DA7). If I need more high-quality EQ than the computer can handle, I’ll send out individual tracks or premixes to my mixer via the audio interface’s ADAT I/O (nicknamed “ADAT light pipe”). Then it’s time to use the mixer EQ. Either I’ll return the mixer out back to the host, or with some projects, do my mixing in the DA7 itself, using that old school “move the faders” technique. Cool bonus: The outboard mixer’s aux bus is an ideal place for putting a reverb. And, you get to mix with real faders.
8. Freeze Your Tracks
Soft synths, especially ones that sound good, suck power like there’s no tomorrow. “Mastering quality” signal processing plug-ins also like to drink at the CPU power bar. So, use your host’s “freeze” function to convert tracks that use real-time plug-ins into hard disk tracks, which are far more efficient.
9. Use Snapshot Automation
Plug-ins aren’t the only things that stress out your CPU: Complex, real-time automation also chows down on CPU cycles. So, simplifying your automation curves will leave more power available for the CPU to run plugs. Your host may have a “thinning” algorithm; use it, as you generally don’t need that much automation data to do the job (particularly if you did real-time automation with fader moves). But the ultimate CPU saver is using snapshot automation (which in many cases is all you really need anyway) instead of continuous curves. This process basically takes a “snapshot” of all the settings at a particular point on the DAW’s timeline, and when the DAW passes through that time, the settings are recalled and applied.
10. Check Your Plug-in’s Automation Protocol
Our last tip doesn’t relate to saving CPU power, but to preserving sound quality. Many plug-ins and soft synths offer multiple ways to automate: By recording the motion of on-screen controls, driving with MIDI controller data, using host automation (like VST or DXi), etc. However, not all automation methods are created equal. For example, moving panel controls may give higher internal resolution than driving via MIDI, which may be quantized into 128 steps. Bottom line: Using the right automation will make for smoother filter sweeps, less stair-stepping, and other benefits.
Okay . . . there are your Top Ten tips, but here’s a bonus one: Any time you go to insert a plug-in, ask yourself if you really need to use it. A lot of people start their mix a track at a time, and optimize the sound for that track by adding EQ, reverb, etc. Then they bring in other tracks and optimize those. Eventually, you end up with an overprocessed, overdone sound that’s just plain annoying. Instead, try setting up a mix first with your instruments more or less “naked.” Only then, start analyzing where any problems might lie, then go about fixing them. Often tracks that may not sound that great in isolation mesh well when played together.
Originally published on Harmony Central. Reprinted with permission.


