No matter the genre, a lead vocal track is always the focal point of a song. As a result, you should approach recording vocals with forethought and planning. If you want the best results, you need to do more than just set up a microphone and hit "record."

Whether you’re the producer, engineer, or singer — or all three — you want to do everything you can to ensure the vocal session is as productive as possible. In this article, we’ll look at critical aspects of the vocal recording process and offer advice on maximizing the results.
1. Vibe is Important
One way to help coax an outstanding performance out of a singer is to make the studio environment as comfortable as possible. If you can, turn the lights low, and have some tea and water available. Make sure it’s not too hot or cold in your studio.
2. Choose the Right Mic
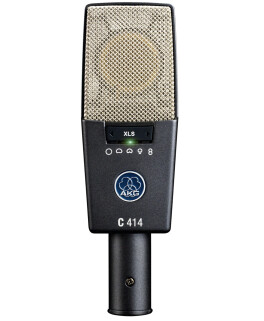
Use the best quality large-diaphragm condenser microphone you can get your hands on for recording vocals. A dynamic mic like the kind typically used for live performance can work but doesn’t reproduce the frequencies of the vocal as accurately. Also, it won’t give you as much gain as a condenser mic, so you’ll have to raise your mic preamp, which can add more noise to the recording.
There are countless mics you can use for vocal recording, but here are some suggestions in different price ranges.
Telefunken TF29: $1355
AKG C414 XLS: $666
Lauten Audio LA320: $633
Warm Audio WA87 R2: $549
Austrian Audio OC16: $313
Røde NT1-A: $133
To check out more microphones, go to the Audiofanzine Microphone Category Page. Read more about different microphone types in this article.
3. Experiment with Placement
Most microphones feature a cardioid polar pattern, which means they pick up mostly from directly in front (on-axis). You always want a lead singer to be on-axis.
The other variable besides angle is distance. Cardioid mics exhibit what’s called the proximity effect. The closer the mic is to the source, the more low-end gets captured. Radio DJs and voiceover artists regularly use the proximity effect to make their voices sound bigger, and you can do the same with the vocalist. Try different mic distances to see what works best for a particular song and vocalist.
4. Use a Pop Filter
One of the disadvantages of positioning a singer right up on the mic is that it will pick up more plosives — popped consonant sounds — particularly “p” and “b.” Although you can edit them out later, they can sometimes cause distortion, and it’s best to try to minimize how many get recorded.
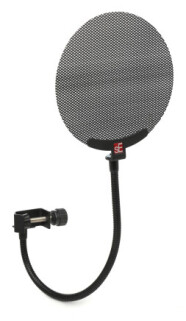
Your best defense against plosives is a pop filter. Some microphones come with built-in ones, but for most mics, you need to buy one made by a third party. Pop filters are relatively inexpensive and consist of a mesh or metal screen tightly attached to a plastic ring that you can mount to a mic stand. Typically, you position it so it’s just about touching the mic so the singer can still get close. Some examples include the Shure Ps-6 ($33), which has a mesh screen and the metal-screened SE Electronics Studio Mic Pop Screen($27). 
5. Create a Helpful Monitor Mix
A critical variable is the headphone monitor mix. Adjust it to make the singer comfortable. Turning up chordal instruments and bass can help if the vocalist has pitch issues. Making the drums or percussion louder can help invigorate a singer whose performance lacks energy.
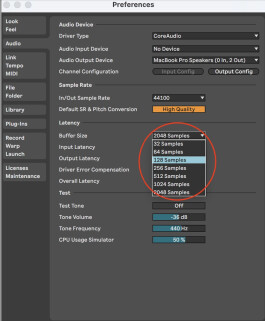
Latency (the delay between the audio as it’s recorded and the tracks coming back from a DAW) can be highly distracting when singing. You can minimize it by turning your DAW’s audio buffer down as low as possible. In addition, if your interface uses a mix control to adjust the ratio of direct hardware signal (in this case, the live singing) to audio returning from the DAW, move it closer to the direct signal.
If you can’t get the buffer down low enough without running out of DSP or losing audio quality, freeze the rest of the tracks in the session — assuming your DAW supports it. That will free up a ton of processor resources.
If that’s not doable, you could make a rough mix of the tracks (minus any scratch vocals) and import it into a new session that you use strictly for recording the vocals. Without the plug-ins and higher track count of the original session, the CPU load on your computer should be reduced enough to allow you to lower the buffer quite substantially. Then bounce the finished vocal track (or tracks) back to the original session for comping and mixing.
6. What’s the Plan?
It helps to have a strategy for your vocal recording session. Generally, it makes sense to have the vocalist sing several complete performances of the song. After that, have the singer take a break and listen to what you’ve got.
It helps to have a lyric sheet that you can write on. Listen to each song section and compare the takes. Make notes about which lines or phrases are best from each. Make sure you have enough to work with before sending the singer home. If not, try punching in areas that are lacking.
7. Wait Before Comping
If you can, wait until at least the next day to start comping the takes into a single one. Why? Because after a long vocal recording session, you’ll likely lose perspective. It’s better to make your final decisions about which lines and phrases to use when you have fresh ears. (Learn more about vocal comping.)
8. Section by Section?
Another aspect to consider is whether to record the different song parts (verses, choruses, bridge) separately rather than doing takes of the whole song. If there are big dynamic swings between sections, you might do better having the singer do all the chorus takes first, while their voice is strongest, and then do the verses.
9. Record All Takes
Make it a habit to record all vocal takes. Some singers do their best work when they think they’re just warming up or helping you set levels and are more relaxed. Then when you say, “OK, let’s record this one for real, ” they tighten up, and their performance suffers. If you record all takes, you won’t miss out on any potentially good ones.
10. Save Your Settings
Make sure you write down any settings in your vocal chain and use your phone’s camera to snap a shot of the singer at the mic. On the off chance that you decide after the session that you need to have the singer correct a section or word or phrase from the song, you’ll be able to recreate your setup so the tone of the punch-ins will sound as close to that of the original session as possible.
11. Don’t Overwork the Singer
For any singer, recording the same song repeatedly will eventually lead to a point of diminishing returns. How long that takes depends on the singer.
If you notice the quality level dropping as you go along, it might be time to end the session and reconvene another day or at least take a significant break. Alternatively, if it’s a multi-song project, you could try switching to another song if the singer hits a wall.
12. Be Encouraging
During a vocal recording session, the singer can feel vulnerable and “on the spot.” Everyone is watching and expecting an outstanding performance. The studio can be intimidating even for singers who are comfortable on stage in front of crowds. Every note out of their mouth is under a microscope, which can cause nervousness and negatively affect their performance. (Read more about vocal performance in the studio here.)
To make a lead singer feel more comfortable, it helps to limit the number of people attending the session to the engineer, producer, and the singer. The more people attending, the more self-conscious and distracted the vocalist may get.
If you sense that a singer is anxious, try to keep your comments as positive as possible. Be encouraging. Instead of saying, “That wasn’t good, ” or “I don’t think so, try again, ” stay upbeat. Say something like, “Cool. Let’s try for another one so we’ll have some choices, ” or “Now you’re getting in the groove. Give me an even better take.”
Whatever you do, tread carefully when pointing out pitch mistakes. Once a singer starts doubting their ability to hit their pitches and starts focusing on it excessively, the problem will probably worsen.
Remember, with pitch correction software like Melodyne and Auto-Tune available, you can accept a take with a few pitch issues if the performance aspects (the energy or the power or the emotion) are strong. You’ll be able to fix most pitch problems with a plug-in before mixing.


