Hard disk recording techniques have affected every aspect of recording, including vocals. Although overdubbing vocals has been a common technique for years, today's programs let you do multiple tracks of vocals, and make a "composite" with all the best bits. We'll cover how to do that, then talk a bit about compression and reverb.
Composite Vocal Tracks
Cutting and pasting has benefited vocals, as you can do multiple takes, and splice the best parts together to make the perfect “composite” vocal. Some producers feel that stitching together vocals doesn’t produce as natural a “feel” as a take that goes all the way through from beginning to end, while others believe that being able to choose from multiple takes allows creating a vocal with more range than might occur with a single take. If you want to try composite vocals, here are the basic steps.
Record the Takes
Record enough takes so there’s plenty of material to piece together a good performance (loop recording is particularly handy for doing vocals). While you’re in a recording mood, record a little bit of the track without any input signal. This can be handy to have around, for reasons described later.
Audition the Takes
Audition each take, and isolate the good parts (by cutting out unwanted sections). I recommend setting loop points around very short phrases.
Solo each take, one after the other. If you’re not going to use a take, cut the phrase. If a take is a candidate for the final mix, keep it.
Pick the top 3 or 4 candidates, and remove the equivalent sections from the rest of the tracks. Now repeat this procedure, phrase by phrase, until you’ve gone over the entire performance and found the best bits
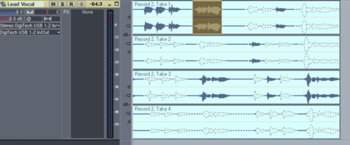
In Sonar, several takes of vocals have been recorded. A mute tool has muted portions of each track (the waveforms are shown as shaded), with the remaining parts making up the final vocal.
Next, listen to combinations of the various different phrases. Balance technical and artistic considerations; choose parts that flow well together as well as sound technically correct. Sometimes you might deliberately choose a less expressive rendition of a line if it comes just before an emotional high point, thus heightening the contrast.
Once you have the segments needed for a cohesive performance, erase the unused parts. If you want to archive everything “just in case, ” go for it. But if after putting the part together you think it could be better, you might be better off re-cutting it than putting more hours into editing.

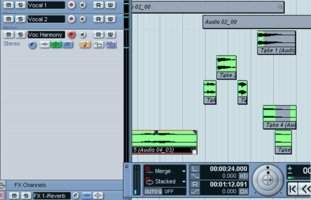
Several takes of vocals were recorded into Cubase SX, and edited to create one final vocal. The program shows the elements that make up the final vocal by highlighting them in green.
Bounce the Takes
This isn’t absolutely necessary, but converting all the bits into a single track simplifies subsequent editing and processing.
Before bouncing, play the tune through from start to finish and match the segment levels as closely as possible. Also check the meters for any send bus or master bus the tracks are feeding, and adjust levels (if needed) so there’s no distortion. Generally, the bounced track will be derived from a bus or master; if there’s distortion, the bounced track will have distortion too.
This is also where the recorded noise might come in handy. Sometimes I’ve had to do a quick fade on the end of one segment, and a fade in on the beginning of another, leaving a dead silent gap between phrases. Layering in a bit of the noise signal gives better continuity, and keeps the part from sounding too “assembled.”
After everything’s set, implement the program’s bounce or mix to hard disk function. You can typically bounce to an empty track, or “render” the audio to disk and bring it back into the project.
Edit the Composite Track
At this point, I bring the composite track into a digital audio editor for clean-up. Here are some typical processes:
- Phrase-by-phrase gain adjustments. If a phrase has mismatched levels, use the program’s level change DSP or mix automation to fix the problem.
- Fix breath noises and inhales. There might be “flammed” inhales from combining two different takes, so cut one. However, don’t eliminate all inhales and breath noises—they keep things “human.”
- Add overall dynamics control, reverb, EQ, echo, etc. if needed. Do not add these while cutting individual takes; it will be much harder to match the effect, and in the case of reverb, tails might get cut off. Adding processing after optimizing the entire track will give the best results.
Tidy Up Your Hard Disk
After the vocals are done, check how your program deals with deleting unused segments, as this can reclaim significant space from your hard drive.
Using Compression with Vocals
Dynamics control is an essential part of recording vocals. The best dynamics control is someone who knows good mic technique, and plays the mic like a slide trombone—getting closer for more intimate sections, and moving further away when singing more forcefully. Unfortunately, few vocalists are accomplished at mic technique, so you may need to use electronic dynamics control (compression) instead.
Compression has other uses, like giving a vocal a more intimate feel by bringing up lower-level sounds. No matter what your application, though, don’t squeeze the dynamics so much that you also squeeze the life out of the vocals. Here are some tips on optimum compression settings.
- Watch the gain reduction meter, which shows how much the input signal’s level is being reduced at any given moment. You generally don’t want more than 6dB of reduction, and even that’s stretching it. To reduce the amount of gain reduction, either raise the threshold parameter, or reduce the compression ratio.
- Adjust the gain control so that the output meter indicator comes as close to 0dB as possible, but never hits or exceeds it.
- The most important controls are threshold and ratio. To clamp down on peaks while leaving the rest of the vocal dynamics more or less intact, choose a high ratio (10:1 or greater) and a relatively high threshold (around –1 to –6 dB).
- Lower compression ratios (1.5:1 to 3:1) give a more natural sound than higher ones.
- Zero attack time clamps peaks instantly, producing the most drastic compression action. If it’s crucial that the signal never hit 0 yet you want high average levels, use zero attack time. But I think it’s probably better to use an attack time of 5 – 20 ms to let through some peaks, even if it means a somewhat lower average signal level.
- Decay is not as critical as attack. Start in the 100 – 250 ms range.
- The Knee parameter controls how rapidly any compression kicks in. With soft knee, when the input exceeds the threshold, the compression ratio is less at first, then increases up to the specified ratio as the input increases. With hard knee response, as soon as the input signal crosses the thresh¬old, it’s subject to the full amount of compression. Use hard knee settings when controlling peaks is a priority, and soft knee curves for a less colored sound.
- Some compressors include a function that automatically adjusts attack and decay times according to the signal passing through the system. This is often the best choice if you’re new to compression.
Reverb Tips for Vocals
Nothing “gift wraps” a vocal better than some tasty reverb. My favorite reverb for voice is a natural acoustic space, but as reverb rooms are an endangered species, you’ll likely use a digital reverb. Reverb settings are a matter of taste, but two parameters are particularly important.
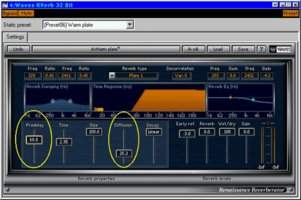
A reverb’s Predelay and Diffusion parameters are crucial to getting good vocal sounds. This reverb, the RVerb plug-in from WAVES, offers an exceptional amount of control.
Diffusion: With vocals, I prefer low diffusion, where each reflection is more “separated.” Low diffusion settings often sound terrible with percussion, as the individual echoes can have an effect like marbles bouncing on a steel plate. But with vocals, the sparser amount of reflections prevent the voice from being overwhelmed by too “lush” a reverb sound.
Predelay: This works well in the 50–100 ms range. The delay allows the first part of the vocal to punch through without reverb, while the more sustained parts get the full benefit of the reverberated sound.
Originally published on Harmony Central. Reprinted with permission.


