The Ozone mastering suite from iZotope has gotten better with each major update. The latest, Ozone 7, adds vintage modules to its processing arsenal, which allow you to add warm, analog-like sounds. All but one of the new modules are exclusive to Ozone 7 Advanced, which is more costly than the standard version of Ozone 7. Both versions have seen a number of additional improvements, as well.
Basics
Like earlier versions of Ozone, version 7 runs standalone or as a plug-in. Either way, you get the same processors and GUI except that the standalone version hosts audio files and has transport controls, whereas those functions are handled by your DAW when you use the plug-in. Ozone lets you open up to six simultaneous modules, which can be dragged to change their order in the signal chain. Modules include Equalizer, Exciter, Dynamics, Dynamic EQ, Imager, Post Equalizer, Maximizer, and Vintage Limiter. In Ozone 7 Advanced you also get Vintage EQ, Vintage Compressor, and Vintage Tape.
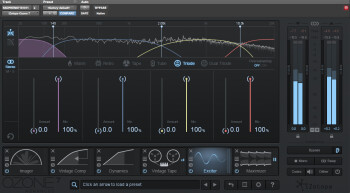
Once you’ve put a module in the signal chain, double-clicking on it makes it show up in the Processor Module Display, which is the large area in the center of the GUI. There you can adjust the parameters and settings for the module. Click on a different module and it becomes editable. The modules all offer quite a bit of parameter control, that’s generally pretty intuitive. If not, the manual and contextual help are very good.
On the right side of the display is the Master Input/Output section, containing level meters, which feature both Peak and RMS numerical readouts at the top and adjustable resolution for the graphical meter.
Just below it is a master bypass button with a smaller button to its right with a little ear icon on it. This is the incredibly handy Auto-Match Gain button, which was added in Ozone 6. When it’s activated, Ozone keeps the monitoring level the same between the bypassed and un-bypassed signal. This makes it possible to really check the affect of your processing. Why? Because the processed version is usually louder (thanks to peak limiting) and it’s easy to fall for the “louder-is-better” effect. You’ll be surprised when you engage the Auto-Match Gain that the processing you’ve been doing is more subtle than you thought. It’s an excellent reality check.
Just below it are buttons for two other useful monitoring modes: Mono and Swap. The former lets you check mono compatibility, and the latter swaps the left and right. I don’t use Swap nearly as much as Mono, but it can be good for changing the perspective on what you’re hearing, and checking that your monitors are giving you even reproduction.
The Dither button below toggles Ozone’s dither section on and off, and gives you access to a large selection of dither algorithms and controls. Dither helps preserve audio quality when exporting at a lower bit depth, such as from a 24-bit master to a 16-bit file (check out this article for more about bit-depth reduction and dithering).
One of the coolest new features in Ozone 7 Advanced is the Codec Preview section, which sits just to the left of the Dither button. Codec Preview lets you change the monitoring so that you can hear what a song would sound like as an MP3 or AAC with kbps settings raining from 96 through 320. If you want to tailor your mastering for, say, MP3 listeners, it’s useful to be able to check your mix that way. There’s even a button called Solo Codec Artifacts, which lets you hear what’s being removed from the signal by the codec. It’s kind of shocking to hear how much is being taken out.
Returning modules
For those unfamiliar with previous versions of Ozone, Here’s a quick rundown of the modules that are returning from Ozone 6, after which I’ll look at the new ones. If you’re already an Ozone user, feel free to skip to the “New Modules” section.
All the modules offer both graphic and numeric parameter adjustment, and many let you switch between stereo and m/s operation.
The Equalizer offers up to eight bands of EQ, each of which can be switched between Highpass, Low Shelf, Bell, High Shelf and Lowpass filters, each with three or four filter shapes. Depending on the filter selected, these can include Analog, Vintage, Baxandall, Resonant, Brickwall and Flat.
In addition, a global Analog/Digital button lets you switch between analog-style EQ response that can add coloration and Digital, which allows for more precision. A spectrum analyzer in the main display makes it easier to see what’s going on in the audio. Overall, it’s an incredibly flexible EQ. You can even open a second instance of the EQ, called the Post Equalizer, in another part of the signal chain,
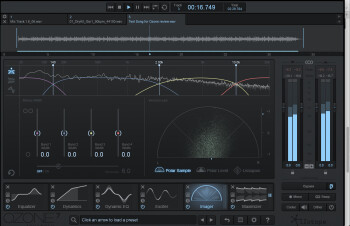
The Dynamics module is a multiband compressor/limiter that features four adjustable bands whose controls can be viewed individually or together. You can switch bands on and off and solo them. Three different different displays can be shown above the parameter controls: the adjustable frequency bands; a Gain Reduction Trace, which shows, in real time where gain reduction is occurring; and Detection Filter mode, where you can choose from different detection options that change the response of the module. You also get Auto gain and Adaptive Release features.
The Maximizer is a digital peak limiter, which you use to make your mixes louder. It works exceptionally well, thanks to iZotope’s IRC (Intelligent Release Technology) algorithms, each of which work a little differently on the audio and give you subtly different results. In Ozone 7 (both versions) a fourth one, IRC IV has been added. According to iZotope, it lets you add even more limiting to the audio without as much pumping and distortion. IRC IV can be switched between three different modes: Classic, Modern and Transient. The Maximizer, which was already an excellent performer, has gotten even better.
The Exciter is a multi-band processor that lets you emphasize different frequencies to add sheen or boost. Like the Dynamics module, you can set four frequency ranges and add Excitation to each. You can adjust both the amount and the mix of the effect for each band, as well as select from different global modes including Warm, Retro, Tape, Tube, Triode and Dual Triode, which all offer a different character. Like with any exciter, you have to be careful about how much you use. Subtle settings can add nice sparkle or boost low end or midrange, but extreme settings can create distortion. Used judiciously, the Exciter can be very effective in a mastering situation.
The Imager is yet another multiband processor, and it’s designed to control the width of the mix. You get width controls for each band, as well as a slider called Stereoize that globally adds width to the mix. Several different displays, Polar Sample, Polar Level, and Lissajous are provided for reference. This is not the easiest module to set, but one that can be very effective.
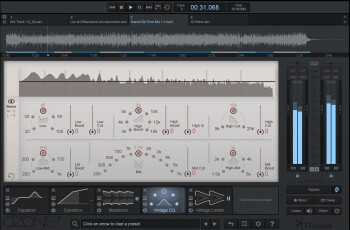
The Dynamic EQ module, was exclusive to Ozone 6 Advanced, but in Ozone 7 it’s included in both versions. Dynamic EQ combines the functionality of an EQ with the detection of a dynamics processor, allowing you to create EQ settings that only happen when a specified frequency gets to a specified level. So, for instance, if you have a snare drum that’s pretty loud in the mix, you could setup the EQ to kick in only when the amplitude reaches the level it does on the snare hits. Dynamic EQ gives you another way to adjust individual elements within a mixed track.
New modules
The new “vintage” modules add additional flavors to the Ozone arsenal. Vintage EQ (Advanced version only) is a hybrid modeled EQ, based on two classic Pultec units, the EQP-1A and the MEQ-5. Like all the new “vintage” modules, it has a light colored background and much more of an old-school vibe that the very modern-looking non-vintage modules. Basically setup like an EQP-1A with an MEQ-5 on top of it, the GUI takes some getting used to.
Once you’ve gotten acclimated to its control set, though, you can use it to dial in everything from subtle brightening to increased transient response and more. I would suggest trying out the module presets iZotope has included to get an idea of its capabilities. A very useful spectrum-analyzer display overlays the EQ curve you’re applying, which helps you see what’s going on. The original hardware units had no such display, so I was glad to see iZotope go beyond the control sets of the actual hardware units. But that willingness to expand on the original units — which is one of the advantages of digitally modeled hardware processors — was not in evidence for the frequency selectors, which are limited to fixed settings, just like the original Pultec units. It would have been useful to make the frequency selectors continuous. You could still have stops for the frequencies that were on the original unit, but allow for going “in between, ” as well. Why not have the sound of the vintage unit with more modern controls?
Overall, iZotope did a good job of modeling, as far as I can tell (sadly, I don’t have an original Pultec for comparisons), and the sound certainly has an analog vibe to it. In a mastering situation, where subtle flavoring is important, it could be quite useful.
Here’s an example featuring a three-measure segment from a mix, which repeats twice. The second time it has the Vintage EQ on it, with the General Enhancements preset, which features a small boost at 300 Hz, a cut around 400 Hz, and boosts at 10 kHz and 12 kHz. Listen to the snare in particular, which gets snappier with the processing:

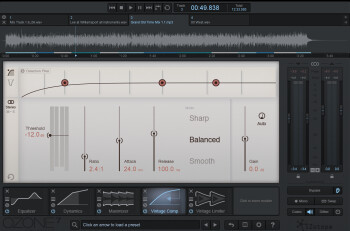
The Vintage Compressor module (Advanced version only) is not an emulation of specific hardware. It’s described in the excellent manual as “an accurate analog emulation of a compressor that’s never existed before.” According to iZotope, it contains the best features from a number of classic compressors. Unlike the Vintage EQ, its control set is very simple, and includes Threshold, Ratio, Attack, Release, Gain (makeup gain) and Auto (automatic gain compensation). At the top is a display called the Detection Filter View, featuring three adjustable nodes: High Pass, Mid Peak and High Shelf, which allow you to tailor the detection circuit’s frequency response. If for example, you have a mix with a lot of low-end energy, you might want to adjust the detection circuit to be less responsive to low frequencies, to avoid over compression. The display can also be set to a Gain Reduction Trace.
The compressor has three modes, Sharp, Balanced, and Smooth, which all change the response. The more compression you dial in, the more variation you hear between the settings.
The presets offer some nice, subtle textural changes. I particularly liked one called Mixing Desk, which to me, really captured the vibe of a large-format console. Maybe it was just the power of suggestion, but it seemed to do what it promised.
Here’s an example using that preset. The first time through it’s bypassed and it’s on when the segment repeats:

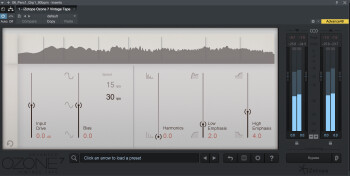
Vintage Tape (Advanced version only) is an analog-tape emulation that allows you to dial in varying degrees of tape saturation. Key parameters include Input Drive and Bias, which both add additional saturation. You can also adjust the virtual speed of the tape between 15 and 30 ips, with the latter giving a tad more brightness and clarity, like on a real tape machine. You also get Harmonics, Low Emphasis and High Emphasis sliders. The former adds even harmonics into the saturated sound, and the latter two tailor the frequency response. This module’s controls seem to be particularly interdependent. Vintage Tape sounds really good, and is useful not only for adding a little saturation in a mastering session, but also as a mixing effect on various instruments, particularly drums.
Here it is on a drum kit. You’ll hear the tape effect kick in in the middle of the example:

This brings up an important point. Ozone 7 is not just for mastering. You can bring its processors to bear on individual mix tracks and get excellent results. In Ozone 7 Advanced you get individual plug-ins for each of the modules, in addition to the full Ozone plug-in. While you only get the full plug-in in the standard version, it’s easy enough to open it up on individual tracks, and only turn on the modules you want to use. Yes, it’s more CPU intensive, but the hit to your processor isn’t as bad as you might expect.
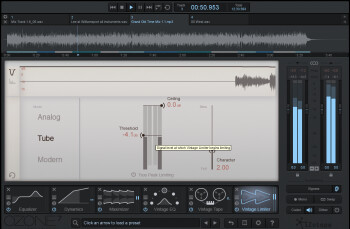
The Vintage Limiter plug-in comes on both the Advanced and standard versions (yay!), and can be used in lieu of, or in addition to the Maximizer. The module is roughly based on the classic Fairchild 670, and it sounds great. I used it to add level, and a sort of round warmness to mixes. It also sounds great on individual instruments when mixing. I tried it on drums, bass, electric guitar and piano, and was able to find settings that improved the sound of all of them, just by stepping through the presets. For mastering, I liked the Analog Glue setting, which had that bus-compressor kind of effect.
In this example, which features the Vintage Limiter in Tube mode, the effect is bypassed the first time through and on in the repeat.

More new stuff
In Ozone 6, you could only export your audio as WAV files. Ozone 7 has added export for AIFF as well as MP3 and AAC. You can even add Metadata easily for the compressed formats in a screen that pops up after you click on the Export button.
Another improvement is in the handling of presets. Module specific presets are now available from a button within the module. In Ozone 6, you had to find them in a folder in the main preset window. This makes it easier and faster to access the presets, which are excellent overall.
The global presets are also extremely useful, and have been completely revised for version 7. In addition, you get a bank of 10 presets from Greg Calbi, one of the preeminent mastering engineers in the world. These were originally offered as a free download for Ozone 6 owners in the early part of 2015, but this is the first Ozone version they’ve been bundled with. I found these presets to be extremely good, and they made excellent starting points for mastering. Obviously, you have to tweak settings to match your source material, but the Calbi presets got me most of the way there in a lot of instances.
Conclusion
Ozone 7 Advanced ($499) offers plenty of new functionality. Of particular note in the Advanced version are the new Vintage plug-ins and the very cool Codec Preview feature. The upgrade is not nearly as exciting for the standard Ozone 7 ($249), however, although it does get the Vintage Limiter and now features the Dynamic EQ that was introduced last year in Ozone 6 Advanced. Both versions add the new IRC IV algorithm in the Maximizer, expanded export format options and the new presets and preset-management features.
If you’re already an Ozone owner, and thinking of upgrading, I would say the Advanced version is well worth the $199 upgrade cost. I’m not sure I’d say the same for the standard version, however, which costs $99 to upgrade. If you’re a standard version owner, it might be worth it to spend the $250 it costs to upgraded to Ozone 7 Advanced, or otherwise stay with Ozone 6 until the next upgrade.
Overall, I think either version of Ozone 7 gives you a great deal of mastering power, with a large array of extremely useful processors and features. Ozone is not a complete solution, however, because it’s not capable of rendering a DDP file, burning a CD or even listening to transitions between songs. That means you need additional software to do a complete mastering job. I’d love to see those features added for version 8. That aside, either version of Ozone 7 gives you a comprehensive mastering toolset, and even lets you host outside plug-ins if you need additional flavors of processing.
[A note about the 4-star rating I gave in this review. It was a little tricky to decide how many stars to give for a couple of reasons. First, because it was a dual review that included both Ozone 7 Advanced and Ozone 7 standard. Then there was the question of whether I was rating the upgrades or the products as a whole? If it were just the upgrades, and I could give separate ratings for the versions, I’d give Ozone 7 Advanced a 4 and Ozone 7 a 3 or maybe a 2.5. However, since I was also rating the products as a whole, and had to boil it down to one rating, I couldn’t see giving anything lower than a 4. Yes, Ozone 7 standard didn’t get as many new features, but it is less expensive, and at the end of the day, both versions are excellent products.]
