Regardless of whether you're mixing in a studio you don't know, just bought a new monitoring system or moved into a new flat, it's crucial for you to get used to your listening environment before starting to work. This essential step will take only a few minutes if you follow the strict but effective workflow explained below!
Why?
Your ability to make a good mix depends on your knowledge of the weaknesses of your monitoring system. For example, let’s imagine that the speakers+room combination emphasizes the highs without you being aware of it: most probably your mixes will sound “dull” in a different listening environment. But if you’re aware of this problem, it will be much easier to compensate the acoustic disparities of your working environment.
How?
You don’t need a whip to control a monitoring system. A compilation CD, USB key or MP3 player will be enough. They should include what we will call your “reference tracks, ” which you should choose considering how they reveal specific aspects of the perceived sound. For example, choose a track to check the dynamic of the monitoring system, another to check the stereo imaging, etc. Just play your compilation to quickly understand the acoustic limitations of your working environment and keep them in mind while mixing.
Your choice
Read the following tips in order to select the best reference tracks for you. The audio quality of your reference tracks must be excellent. Avoid MP3 files and all other compressed formats: we want only WAV files with a resolution of at least 16 bit/44.1 kHz.
Moreover, since you want to appraise the dynamic response of your working environment, avoid mastered tracks because of their lack of dynamics.
Choose your reference tracks without taking your tastes into consideration. Your goal is to find out what are the advantages and disadvantages of your working environment rather than to enjoy your ears with a great production you love. Personally, I’m not a reggae fan but I chose a “roots” tune as a reference for 3D sound imaging.
And you don’t need the entire songs. If you chose each reference track for only one single aspect of the sound, one minute of each song ought to be enough for you to get an idea of your monitoring environment.
You also don’t need to use too many examples, which could prove confusing. Six or seven tracks are enough — 10 tracks max. And once again, each track should give you information on one specific aspect of the sound. I personally use only six tracks: one for stereo imaging, one for the low frequency range, one for the high frequency range, one for the dynamic response, one for 3D imaging, and one for the overall sound color.
And I can’t stress enough the fact that you must know this compilation by heart. You must absolutely know how each track is supposed to sound in an ideal situation, so that you can gather as much information as possible about the listening environment you’ll be working in. Don’t hesitate to use your own mixes as reference tracks: you most likely know them much better than you do other songs. Since you worked many hours on them, you ought to know every single detail, as well as their advantages and disadvantages. It would be silly not to profit from it, wouldn’t it?
Going further…
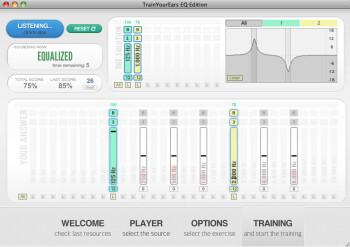
The first thing you have to do in order to get used to a new listening environment is to take at least 10 minutes to listen to your reference tracks. Do this systematically. It’s simple and quick. And if you have 15 additional minutes to appraise your new listening environment, I have another very valuable tip for you. I’ve been using a software tool for frequency recognition training called TrainYourEars EQ Edition for some time now. I don’t use it conventionally: most of the time, when I arrive at an unfamiliar studio, I listen to my reference CD first, then I take 15 minutes for a listening quiz with the program to “calibrate” my ears better. At the end of the quiz, I compare my results with my average score and I know immediately if my brain adapted to the new location. Try it out, you’ll be grateful!


