Here are the essential techniques and basic information you need to get started playing slide guitar
Slide guitar gives you an expressive sound that’s totally different from what you can get fretting with your fingers. Just listen to Derek Trucks, Bonnie Raitt, Warren Haynes, Sonny Landreth, Duane Allman or Ry Cooder, to name just a few, and you’ll hear the power and almost vocal-like sound of slide playing.
When you pick up a slide for the first time and start playing, however, may find it’s not as easy as it looks. In order to produce notes that sound clean, you need to know some basic techniques about how to hold the slide with your left hand and how to pick the strings with your right. Although there are big differences between playing slide on an acoustic or an electric guitar, the basic techniques are the same.
Space doesn’t allow me to go into great depth here, but I’ll cover some important basics to help you get going as a slide player.
Gear
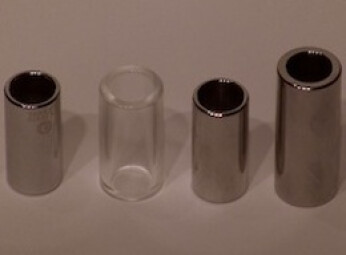
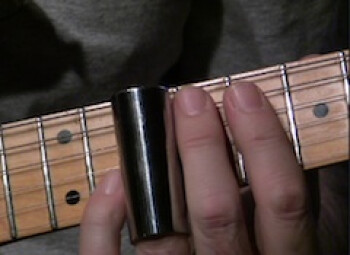
Slides come in many sizes and weights, and are made of metal, glass, or ceramic material, each producing a somewhat different tone. You might want to initially try a couple of different ones to see what you’re most comfortable with. The biggest decision you’ll need to make regarding your slide is whether to wear it on your ring finger or pinky. Most slide players opt for the ring finger, because it’s larger and lets you control a bigger slide more easily.
Pinky slides are typically smaller, and not everyone is as dexterous with their pinkies. That said, they have one huge advantage: they leave you with three fingers behind the slide for playing chords in between slide parts. To me, that’s a huge advantage, because you’re likely to face many performance situations where you may need to play rhythm and slide in the same song.
As for your guitar, you don’t want super low action (or super light strings), or you’ll find your slide banging into the frets and cutting off the sustain of your notes, especially on the 1st and 2nd strings in the higher registers. You don’t need your action set uncomfortably high, but if your slide notes are dying out, consider having it raised a bit, at least on the strings that are problematic.
Tunings
You face another choice when it comes to how you’ll tune your guitar for slide. The majority of slide players, including some of the very best, use open tunings. For instance Derek Trucks uses open E exclusively, and Bonnie Raitt primarily uses open A or open G (which have the same string relationships, but are tuned a whole step apart). When you play in an open tuning, just laying the slide across a single fret gives you a chord. Any string you play, assuming you’re on the right fret, will give you a note that sounds good against a major or dominant chord.
Here are a few common tunings to get you started, going from left to right, low to high strings:
Open E: E-B-E-G#-B-E
Open A: E–A–E–A–C#–E
Open G: D–G–D–G– B–D
Playing slide in standard tuning is trickier. Whereas in open tuning, each string on a given fret will give you a note from the same chord, in standard tuning, the largest cluster is three notes. So getting around is not as easy, and you’ll have to work harder at first, especially to get certain characteristic slide riffs. However, using standard tuning means that the notes and scales and chords are all where you expect them to be, so both for the actual slide parts and any rhythm or non-slide lead passages you might play in between slide parts, you’ll be in familiar territory. Warren Haynes is probably the most famous slide player to use standard tuning.
Left- and right-hand technique
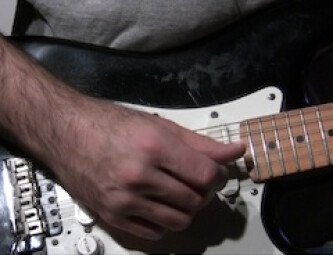
Although there are no “rules, ” many slide players pick with the thumb and first two fingers of their right hand, rather than with a flatpick. Although a pick will work for some types of slide parts, you’ll have more control with your fingers, even if it’s harder to get used to at the beginning.
The slide should be placed right over the fret itself, and parallel to it. Intonation is critical with slide playing, because it’s essentially a fretless instrument.
When you put on a slide and start playing for the first time, you’ll notice that you hear all kinds of unwanted notes and string noises. You’ll hear sliding noises as you move the slide from fret to fret, and any parts you play will sound muddy and indistinct. The solution is a technique called “dampening, ” which allows only the strings you want to sound to vibrate freely, while the other strings are muted or, at least partially muted.
Final thoughts
Good dampening technique involves both of your hands. On your fretting hand, you need to make sure that the fingers behind the slide are laying on the strings as much as possible (your index finger will make the most contact with the strings). On your picking hand, it’s more tricky. Lay the side of your hand below the pinky on the strings. By changing the amount of pressure you put on the strings and rocking your hand back and forth, you’ll eventually be able to control how much a particular string rings. Once you practice dampening enough, it will become second nature, and you’ll find that your tone, and your clarity, have improved a lot.
Slide achieves its sing-song sound from notes being slid up to from below, and slid down to from above, almost like a singing voice does. When you start learning licks from other players, you’ll see the importance of motion in slide playing.
Vibrato is also key. If you watch a slide player, you’ll see the side-to-side movement of the slide that produces vibrato. You won’t want to use it for every note, but for any that sustain, you’ll likely to want to apply some degree of vibrato.
When using a slide in open tuning, you can get started playing against a basic blues progression by moving your slide to the fret corresponding to the chord in the progression. For example, if tuned to open E, and playing an A blues progression, your I chord would be at the 5th fret, your IV chord at the 10th fret and your V chord at the 12th fret.
This was just a brief overview, but should give guitarists who are new to slide enough information to get a decent tone, and start to figure out some licks off of recordings. With the resources available on the Internet, or even better, with a good teacher, you can begin to take your slide playing to the next level.


