
In part 1 of this article, we looked at preference settings and key commands. Here in part 2, the focus will be on the Smart Tool, some important timeline options, and how to create customized session templates.
Save time with the Smart Tool
When you’re editing in Pro Tools, whether audio or MIDI, a handy way to go is to use the Smart Tool, which gives you access to any one of the three main edit tools — the Trim Tool, the Selector Tool and the Grabber Tool — depending where in the track you place the cursor. Place it at either edge on the lower half of a clip and you’ll get the Trim Tool. In the lower section in the middle it changes to the Grabber, and near the top to the Selector. If you place it between two adjacent clips or on the upper edge of a single clip, you’ll get a little square icon, which means you can apply a crossfade or fade.
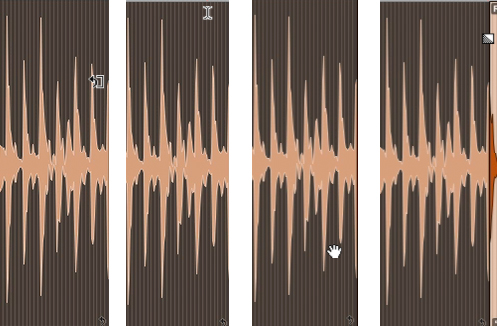 Depending on the cursor position, the Smart Tool can change between (from left to right) the Trim Tool, Selector Tool, Grabber Tool, and a Fade tool |
Toggle the Smart Tool on and off using Command + 7 (Control + 7 Windows) or by clicking on the horizontal bar just above the three edit tools in the Edit window. When it’s on, the curser turns into a little icon representing the tool that’s active at the moment.
Sometimes you think you have the cursor in the right place to change to the tool you want, but Pro Tools doesn’t seem to want to switch. When that happens, slowly move your cursor over the correct area until you find the spot. Using the Smart Tool means you don’t have to constantly put in a Shortcut or press an onscreen button to switch editing tools.
Using Commands Keyboard Focus
If you look on the upper right of the tracks display in the Edit window, you’ll see a little icon with “a-z” on it. If you click on it, it turns yellow, and you’ve just switched into Commands Keyboard Focus mode.
When it’s active, you can use numerous single-key, keyboard shortcuts, such as R for zooming out, T for zooming in, N for Insertion follows Playback (see below), and many others (look in the Pro Tools Shortcuts tab of the Help menu to find out more). To turn it on with a Shortcut use Command + Option + 1 (Mac), Control + Alt + 1 (PC).
The Link Timeline and Edit Selection setting
In Pro Tools, you can have independent edit and Timeline selections. Because the Timeline selection governs the playback stop and start, separate selections can be confusing for new users. Luckily, if you activate the Link Timeline and Edit Selection button, then any edit selection will be reflected in the Timeline, and vice-versa. You’ll want this on most of the time. The key command for it is Shift + Forward Slash.
Understand Insertion Follows Playback
Another aspect of the Pro Tools GUI that’s important to understand is the Insertion Follows Playback button, which is two buttons to the right of the one for Linking Timeline and Edit. If you don’t know how Insertion Follows Playback works, you may be mystified by what happens after you hit the stop button during playback or recording. If it’s tired on, the playhead will remain at the point in the Timeline that you hit stop. If it’s not on (which is the default unless you change it in the preferences), then the playhead will go back to the point where you started that particular playback or recording.
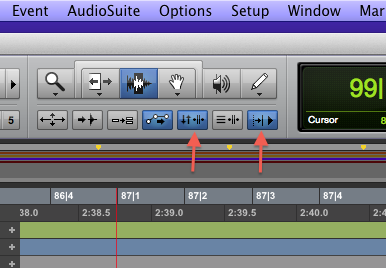 The left arrow is pointing to the Link Timeline and Edit Selection button, and the right one to the Insertion Follows Playback button |
I find that I have it off more than on. If you’re say, punching in over a particular section, you’ll want it off so that when you finish the recording, the transport goes back to the beginning of the section so you can hear it. It really depends on what you’re doing, and you’ll switch back and forth a lot. The key command for it is Control (Start on PC) + N, or just N in Commands Keyboard Focus mode.
Work non-destructively with MIDI Real-Time Properties
Real-Time Properties is a very useful Pro Tools MIDI feature. It makes it possible to add quantization, velocity and duration changes, transpositions, and track delay, all non-destructively. It works on a track-by-track basis or you can have separate settings for individual MIDI clips within a track. So if you want to, say, try out a particular quantize setting or velocity change, all without committing to it, it’s easy.
It’s a snap to experiment with different settings. You can even loop a section and mess with the settings in real-time (hence the name) until you find the setting you want. It’s a lot faster to work that way than with one of the standard Event Operations windows, where you have to dial in the setting, apply it and hit play, and then undo it if you don’t like it. However, you don’t get as many parameters in the Real-Time Properties window as in the dedicated Event Operations windows, but you get enough for most situations.
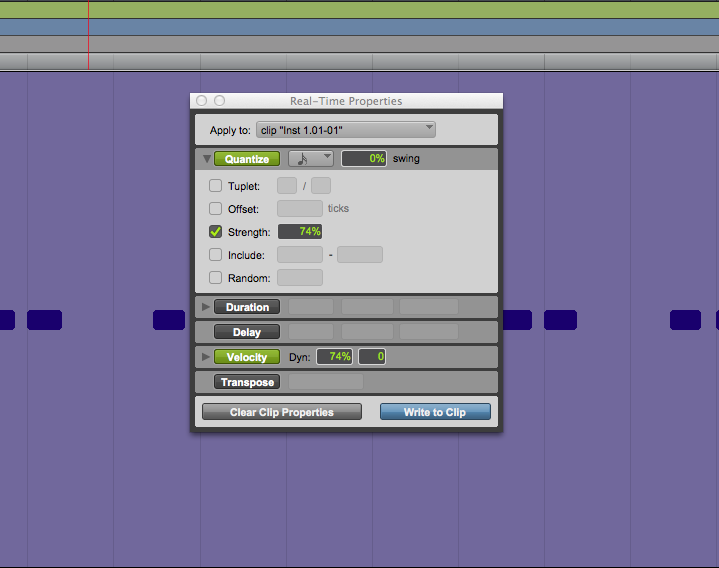 The Real Time Properties feature enables you to non-destructively apply quantizing, velocity changes, transposition and more |
MIDI Real-Time Properties is under the Event Window, and can be accessed by the key command: Option (Alt on PC) + 4 (on numeric keypad).
Make your own session templates
Another way to speed up your workflow in Pro Tools is to pre-configure session templates for the various types of projects you do. It’s easy and means you don’t have to setup a session from scratch every time. Creating a template is easy. First open a blank session, and make sure it’s set to the bit depth and sampling rate of your choice. I would advise that you check the “Interleaved” button, otherwise, Pro Tools splits all stereo files into multiple mono L and R components, which are confusing to work with.
Next, start customizing the template for whatever type of project you’re setting it up for. Start out by creating some tracks. You probably won’t know how many you’re going to end up using on a given session, so just set up a few of each kind of track you typically use, including mono and stereo Audio Tracks, Instrument Tracks, Aux Tracks, and a Master Track. If you always use specific instruments, say a particular drum plug-in and certain synth plug-ins, you can even insert them on instrument tracks in your template.
If you want it to look real slick, color-code the different track types. You can access track colors by opening the Color Palette from the Window menu.
Next, add the typical inserts you like to use, such as a channel strip or a separate compressor and EQ on each track. If you want to do this quickly, use the Control (Alt on PC)-clicking modifier we discussed in part 1 when you add the insert, and it will automatically add them to all the tracks of the same type. If you don’t want to have a ton of effects on and eating up CPU when you open the template, you can disable the effects until you need them by using the key command Control + Command [Start + Control on PC] and clicking on the insert, which will gray it out. Using that same key command on a disabled insert will enable it.
 Once you have your template configured, you can save it to a folder of your choice via the Save Session Template dialog box |
Most people like to have a couple of different reverbs and a delay or two setup on aux tracks as bus effects. You can do this by creating how ever many aux tracks you want (one for each bus effect), and then choose which bus will be the input for each track by using the Input pull down on the Aux Track’s I/O selector (track I/O is available by default in the Mix window and can be configured to show in the Arrange window by opening the pull down menu directly above the top track and selecting I/O).
Customize the session in any other way that will be helpful for you (for example, select whether the display is showing bars/beats/ticks or minutes/seconds or both, or one the other time options.
When it’s all set, go to File > Save as Template. In Pro Tools 11, you’ll get a dialog box that allows you to choose which template folder to put it in (Pro Tools comes with a bunch of preset templates, organized by category), or you can create your own folder to save it in.
That’s it. The next time you create a new session, you can choose “Create Session from Template”, pick your category and your template, and you’re off to the races.