
One of the most powerful features in your DAW is its ability to automate the volume, pan, send and return levels, and effects parameters of the various tracks in your mix.
In the pre-digital days, before DAWs came into existence, unless you had a super-expensive large-format console with moving-fader automation, every mix move had to be done by hand, in real time, as the multitrack was getting mixed to stereo.
Engineers would put white tape alongside the faders on their board, so they could mark the levels for their mix moves. If a particular song required a lot of volume rides, you might have the engineer handling volume changes on a few faders and the assistant engineer on others, and maybe even the producer or artist (literally) lending a hand.
The mix would be running, and everyone would have to execute their moves correctly. If not, the whole song would have to be run again from the beginning. A complicated mix was almost like a live performance.
But in the DAW era, all of those moves can be recorded one at a time in automation and even recalled when the mix is reopened (those pre-DAW-era engineers would have loved that kind of flexibility). The automation features on DAWs are fairly standardized across the different brands, so you should find this information relevant no matter which DAW you use.
Life in the track lanes
Typically, there are two ways to record automation into your DAW. You can do it in real time, by moving the fader or knob or pushing a button as the song plays, or you can draw it in graphically. Either way, you can always open it up and edit it more.
A DAW will represent each track as a horizontal “lane, ” and usually, the default view is a waveform display. But you can typically change that to show automation of various types, or open a dedicated automation late (depending on the DAW), where you can graphically enter and edit volume, pan, and effects parameters. I’ll give more detail on that a little later in this article.
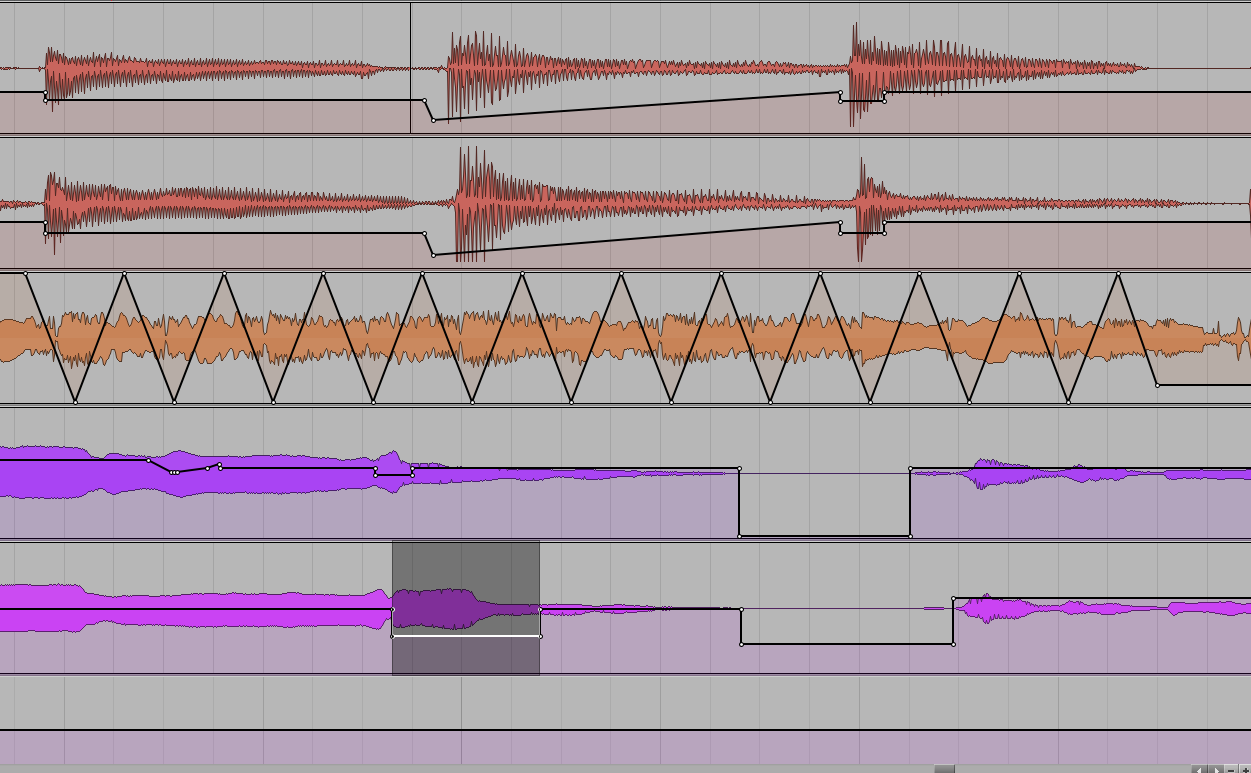
Below you see a screen shot from Avid Pro Tools 10, where the tracks are set to show automation. All are showing volume automation, except for the orange track with the triangular lines. Those are automating the track’s pan information, and were drawn in to create an autopan effect.
In the mode
First, though, it’s very helpful to understand the automation modes in your DAW, because they have a huge impact on how the automation is recorded. Most DAWs use this terminology, or something close, and you can choose a mode for each track.
Off mode: Automation is disabled
Read mode: In this mode, the tracks will respond to existing automation, but no additional automation will be recorded. This is the mode to use when playing back a track with automation.
Touch mode: As soon as you move a fader or knob with the song playing, Touch mode records your change, but immediately drops back to where it had been before your change, as soon as you release the fader or knob. It’s very useful for tweaking automation that you’ve already written. Say you have a vocal track and you’ve automated its volume rides brilliantly — except in one spot. Use Touch mode, and you can adjust that one section without affecting the rest.
Latch mode: Also quite useful, Latch mode starts writing as soon as you move a fader or knob, and then remains indefinitely at the level it’s at when you release the fader. So, for instance, on a guitar riff that that needs to be super quiet in one spot, but then loud for a long section after that, turn on latch mode, move the fader when you want the volume to go up, and it will stay there.
Write mode: Overwrites the track’s automation as you go, so it’s useful on the first pass, or if you want to erase your previous automation. Don’t use it for tweaking, because you might accidentally erase something you wanted to keep.
Drawing it in
You can also enter, or edit automation data graphically, and you’ll find that this is often a much faster way to add automation and make adjustments to existing data. Open the automation lane for the track you’re working on, and you should see (or be able to activate) an automation line that mirrors the setting of your faders or knobs. If your fader is set to –2 dB, the automation line for volume on that track will be, as well.
When you edit an automation line, control points are created where you made changes, and you can click and drag on these points to further tweak in that area.
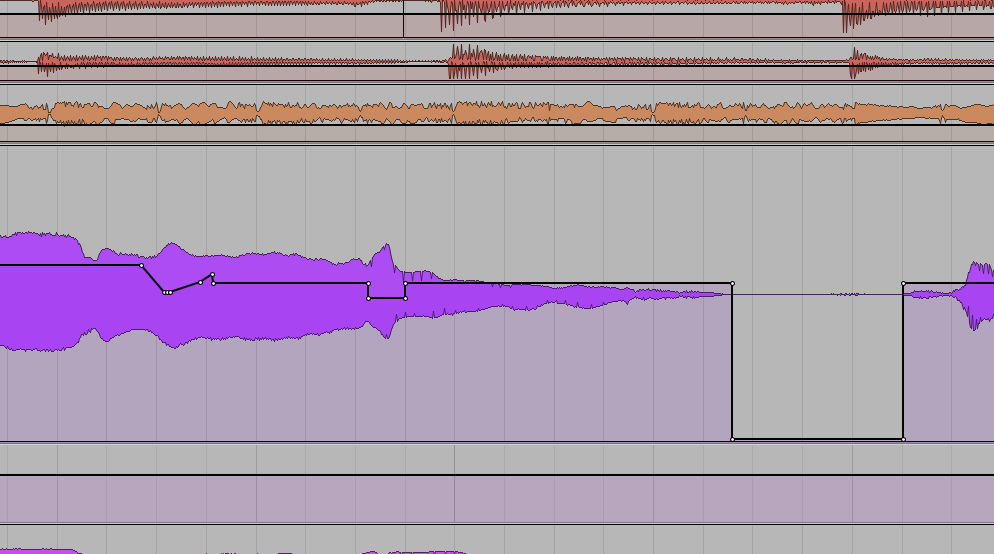
This screen shot shows a vocal track (in purple) where automation has been used to lower some peaks, and also (in the big dip furthest to the right), to mute the track temporarily where the singer is pausing, to keep any noise from getting into the mix. The little dots are the control points.
You typically also get a pencil tool for drawing in your automation, often with a choice of a straight line or free-form tool. It takes some getting used to become facile at editing automation graphically, and the control points can be annoying to work with, but it’s worth spending a little time learning, as it is a super powerful tool.
Final thoughts
Automation gives you very precise control over what’s going on in your mix. Whether you’re riding vocal levels, muting effects, or autopan effects, automating a mix gives you control that engineers “back in the day” could only dream about. Learn your DAWs automation features thoroughly — you’ll be glad you did.