Guitars, vocals, pianos, drums or virtually any track in your mix, has extraneous low-frequency information that can be filtered out without compromising the sound. While you may not notice anything wrong with the way a track sounds when you listen to it by itself, when combined with many other tracks in the multitrack mix, all that unnecessary low frequency information can cumulatively create a loss of clarity in the bottom end of your mix— in other words, muddiness.
Luckily, there’s a tool in virtually every EQ plug-in that can remove those unneeded frequencies and de-clutter the low end of your mix. It’s a high-pass filter (HPF), and it rolls off low frequencies below a user-selected setting. Its somewhat counterintuitive name comes from the fact that it’s designed to allow frequencies above a selectable cutoff frequency to pass through unaffected, while attenuating everything below the cutoff. Hence the name “high-pass filter” (it’s sometimes called a “low-cut filter”). Nomenclature notwithstanding, it gives you a simple and effective way to de-clutter the low end of your mix.
Roll with the punches
|
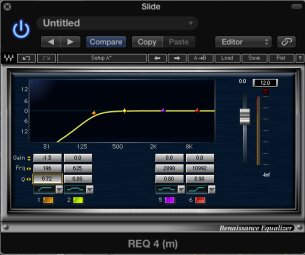
A HPF in a Waves Renaissance EQ plug-in, set with a relatively gentle roll off.
|
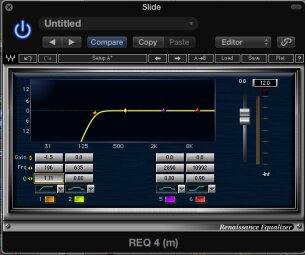
When we say that a filter “rolls off, ” below the cutoff frequency, that means it reduces frequencies below the cutoff in a graduated manner, rather than completely cutting it out. On many high-pass filters, you can adjust how drastic the roll off will be with the Q (bandwidth) and/or the slope (steepness of the cutoff) controls. Higher Q and slope settings will lead to steeper attenuation.
As you might expect, the cutoff frequency that sounds good for a given source depends on its frequency range. You want to remove lows that aren’t needed for that instrument to sound good in the mix. Ultimately, it’s up to your ear how to set your high-pass filter, but I’ll offer you some starting points for common mix elements.
Setting Your HPF
I typically start with a ballpark frequency setting, and “sweep” the filter, that is, move the cutoff frequency with the music playing until I find best setting. Usually, I’ll start lower than I expect to set it, and move it up slowly until the track sounds too thin, and then back it off until it sounds right. You can make your adjustments with the track soloed, but be sure to listen with everything on to check that your settings work in context.
|
Here the roll off is much steeper.
|
To me, it makes sense to put the EQ plug-in with the high-pass filter before any compression in the track’s signal chain. That way, your compressor will only be acting only on the frequencies that you’re keeping on that track, and won’t be affected by low end that’s going to be cut out. That’s not a hard and fast rule, however, and you’ll find plenty of contrary opinions on that subject.
Bass: With bass guitar, you want to be careful how much low end you cut, because you don’t want to take away its “oomph.” I would suggest setting the filter between 40 and 55 Hz and experimenting within that range. If you have a synth bass with a sub-bass component for a dance music track, you have to be very careful about what you attenuate. If you don’t have a subwoofer or monitors with drivers large enough to reproduce frequencies below 50 Hz, you’re probably better off leaving it alone. The last thing you want is an EDM track with wimpy bass.
Drums: On most of the kit you can set the filter in the 100 to 140 Hz region, with the exception of the floor tom and the kick. For those, I’d set the cutoff roughly around 50 Hz and 30 to 45 Hz, respectively.
|
00:0000:00  A rhythm guitar with no filtering.
|
|
00:0000:00  The same rhythm guitar with the high-pass filter set to roll off about about 150 Hz.
|
Guitar: In most cases, both electric and acoustic guitars can be trimmed quite a bit with the high-pass filter and still sound good. I typically start about 100 Hz and sweep upwards. If you’re working on a song where the guitar is the only instrument, then you will probably want to roll off less, because it needs to occupy more in the bass range.
Piano: An acoustic piano has such a wide frequency range that it depends a lot on the content of the track. If it has a lot of low bass notes, you’ll want to keep the cutoff frequency lower, in the 100 Hz range, but if it’s mostly right hand, you can come up as high as 250 Hz. Similarly to the acoustic guitar, if the piano is the only instrument in the song, the attenuation of lows should be much more subtle, because in that situation, the pianist’s left hand is playing the only bass part in the song.
|
00:0000:00  A short mix with no high-pass filtering.
|
|
00:0000:00  The same mix with high-pass filtering on all tracks features a subtly clearer low end.
|
Vocals: Where you set the cutoff frequency depends on whether it’s a male or female voice, and how low the singer’s range is. Roughly speaking, start at 100 Hz for male vocals and 150 Hz for female, sweeping higher until you find the best spot. Be careful not to thin the voice, or cut out resonant lows that make it sound warm.
For instruments not listed here, start at a cutoff frequency below their range and slowly sweep upwards until you get the results you want.
Cutting out
Incorporating high-pass filtering into your workflow can really help with the low-end clarity of your mix. Interestingly, you can use a low-pass filter — which passes through frequencies below the cutoff, and attenuates above it — to get rid of unnecessary high-end information, but that’s for another article.


