The new Sonar version has arrived. However, instead of being version 9, it is named Sonar X1. Cakewalk actually decided to completely rebuild the interface of its sequencer. And it changes everything. For good.
Interface
|
A recurrent reproach about previous Sonar versions was its confusing interface. Experienced users got on with it and liked to have a lot of information in front of their eyes, but new users could get easily lost and even miss interesting functions the software offers.
For this new version, Cakewalk put most of its efforts in redesigning the user interface. It’s almost as if Cakewalk developers asked themselves: if we could create a new software from scratch, how would we do it? The result includes new windows, a new menu and function structure, and loads of work on graphic aspects. The result looks astonishing. Everything is much clearer, much more easily readable, and all functions —especially the most interesting and powerful ones— are now easily accessible.
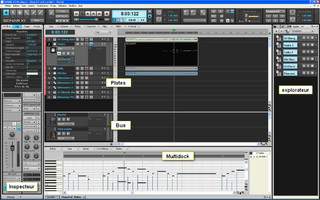
The new default screen layout recalls the old one… The Global View displays the main elements (see screenshot below).
All these elements can be floating, and the user can move, enlarge or reduce them. The different screen configurations can be saved in ten screen sets, six of which can be directly accessed by clicking on the tool bar. This way you can create different working environments depending on the task and instantaneously switch between them.
The Multidock (on the bottom by default) can host any element: the content of the current track, the mixer, the step sequencer, the matrix, etc. You can also drag the browser, virtual instruments, etc. into it. You can browse among the different elements using tabs. The GUI is very practical and fast. Like all other windows, the Multidock can be moved to a second monitor. That’s probably the ideal working configuration: it allows us to keep a track plus the inspector maximized on one screen while other elements are displayed on the other screen. Awesome!
But, there is a problem: when the Multidock is in fullscreen mode on the second monitor and you are using virtual instruments, it will appear in window mode after you restart the program and the virtual instruments will be on floating windows again. And even more annoying: after dragging the browser into the Multidock on the second screen, Sonar will crash if you try to take it back. We hope this will be quickly fixed.
Moreover, context menus have been added directly to each window, allowing you to access all useful functions and controls. We miss the possibility to open a window directly from a menu in the Multidock. That way you wouldn’t have to look for some of them in the main menu.
However, the Multidock is still a very valuable feature. The same applies to the new track inspector.
It has been updated and improved, and is now twice as wide by default. This means that, for MIDI tracks, you now get the extended view with direct access to many parameters like arpeggiator, groove, etc. For audio tracks, you get two tracks displayed side by side: the current track and the output bus it is assigned to (or the main out if the track is not routed to a bus). You can also display the ProChannel, which we will describe later and add valuable information: properties and effects of the clip or the groove, track properties, audiosnap settings, and a very convenient notepad. Everything is easily accessible, immediate and intuitive. This module is virtually perfect.
The same applies to the track display. Beside the new GUI that makes everything much more readable, a simple but highly valuable function has been added: each track head includes a menu to select the track’s content display and what you want to edit. This is what Cakewalk calls Track Filter. The days when you risked moving a clip by clicking on the wrong place when you wanted to edit overlayed automation curves are now over. From now on, this menu allows you to display and edit only the desired automation curve. It allows you to edit clips, track or clip automation curves, as well as audio transients (audiosnap). For MIDI tracks, transient editing is replaced by note editing.
And it all turns even more awesome with the SmartTool. Thanks to this intelligent tool, Cakewalk has made the workflow with a mouse much more fluid now. The basic idea is that you don’t need to change tools to manage different tasks. Although the usual tools are still available, you almost don’t need them anymore, because the mouse automatically adapts to what you’re doing and where you’re doing it.
Thus, without changing tools, you can add and edit notes in the piano roll, move clips, manage fades in/out in an audio track, edit an automation curve in the neighbor track (depending on the filter of the selected track). The type of operation/action is defined by the place where you click the object. Very useful. If needed, you still have the possibility to quickly switch between tools via a pop-up window using the “T” keyboard shortcut or clicking with the mouse wheel (which must be preset as “center button”).
To wrap it up, this new interface is really excellent. Experienced Sonar users will quickly find everything they need, considering that everything is based on what already existed. Moreover, they will be able to improve their workflow, which will be faster and more comfortable (and they will not contribute to make their optician rich). As for new users, they will be able to learn the software much easier and faster and will easily access many well-conceived and powerful tools.
There is one thing that will surely disappoint some users: the score display is still the same after all these years. It seems that Cakewalk planned to improve it but they decided to take some time to launch a major evolution… Hopefully.
We would like to mention two new features that appeared in version 8.5, which we hadn’t reviewed.
The first one is the Matrix, a heritage of Project 5, Cakewalk’s electro sequencer. This grid is similar to what you can find in Ableton Live where lines correspond to tracks (audio or virtual instruments) and rows to song parts.
Cells can contain audio or MIDI loops (or one-shot samples). Clicking on a cell starts the playback, a second click stops it. The same applies to rows: click on them to start all cells in a row. Rows can correspond to sections of a song you can mix together. For example, click on the bass of an other row and this bass line will replace the bass of the current row. Triggering can be instantaneous or synced (to the bar, 1/4 note, 1/8 note, etc.). The cells can be played in loops or only one time. And you can control everything via MIDI, so you can compose or improvise either with the mouse or a master keyboard. The Matrix can work independently from the track data (only the matrix is played) or on top of the project playback. You can also record in a track whatever is being done in the Matrix.
The other new feature is the step sequencer. It uses the principle of vintage sequencers (like Rebirth does). Say hello again to the grid! However, this time lines are notes (or drum elements) while rows correspond to beats. This sequencer is quite powerful and very easy to use. We just miss a glide (or glissando) function to perfectly emulate a vintage sequencer. You can load and save sequences (called patterns) independently from the project.
Effects and Virtual Instruments
Once again you’ll find the superb pack included in previous versions, including the noteworthy Dimension Pro, Rapture LE and Z3TA+. I mention only these modules because they are the most impressive. Some of them are sold separately and are almost as expensive as Sonar! You’ll also find the SessionDrummer, a virtual drums plug-in (still in version 3, since Sonar 8.5). Although it cannot compete with dedicated software tools (but, seriously, who would expect that from a plug-in provided with a sequencer?), the sound is quite good and can easily find a place in many productions. It also provides good sounding drum machine kits like Roland TRs and the LinnDrum.
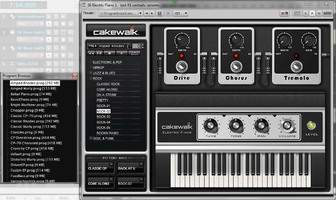
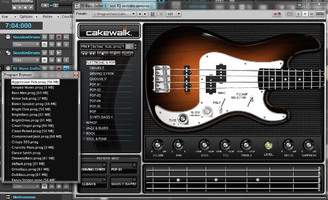
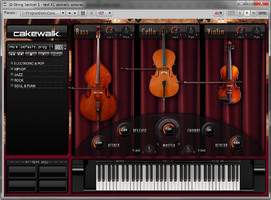
You’ll also find four “Studio instruments” that were already available in Cakewalk and now join the Sonar pack: the SI DrumKit, a kind of Session Drumer lite, the SI Bass, the SI StringEnsemble, and the SI Electric Piano. These light and simple instruments provide you with a wide range of sounds. Some of them are very good and they are all very easy to use. I like especially the Electric Piano, which provides some good Rhodes simulations (plus good distortion, chorus, tremolo effects), and the StringEnsemble. You cannot produce symphonic music with it but it does the job within a mix. It provides nice and consistent string ensembles for electric, electronic, hip-hop and pop music.
None of these instruments will replace a good sampler (you get Dimension Pro) or the leading products in the market, but they are good tools that will do a decent job in many productions.
Sonar Producer offers you many quality instruments. Enough to produce good-sounding songs in many different music styles. This is excellent news if you are a DAW beginner. And many of these instruments will also delight people who already have a rich VSTi library.
The same applies to effects. From now on, Sonar includes version 4 of Guitar Rig LE. It offers a wide range of sounds that ought to be enough for common tasks. People who want the Pro version can upgrade for half its normal price. It obviously includes the same effects already available with previous versions: the Sonitus suite with almost all classic studio effects, the convolution reverb, the very useful and effective TranscientShaper for drums, multiband compressors, and a linear phase EQ for mastering applications.
But you’ll also find two new strips: the Percussion Strip and the Vocal Strip. Both are awesome! The concept behind them is that each plug-in hosts a wide range of different effects. The VocalStrip includes a deesser (with listening function), a compander (compressor + expander), a tube EQ, a doubler, and a delay. In the PercussionStrip, the desser is replaced by a Transient Shaper, compressor and expander are separate and a stereo wider replaces the doubler.
Both include input and output gain settings plus adjustable tube saturation. The signal can be routed freely through the various modules, so imagine the huge possibilities these strips provide. Many presets provide decent basic sounds you can use “as is” or fine tune them. The presets were made for sound enhancement, to produce a special sound color or to destroy the original signal. Nice! And they sound really good. Some presets immediately give that big production character to raw recordings.
Moreover, if you are used to using the same effects over and over for specific types of recordings, you can save them as an FX chain and then quickly recall the chain. Cool, uh.
The last new feature we want to mention (not that it is the last one) is the ProChannel.
This comprehensive channel strip is available on all audio tracks. It includes several modules you can activate individually. The first one is a compressor. In fact, it’s a dual compressor since you can choose between two different models. Then, you get a four-band EQ plus adjustable low-cut and high-cut filters. You can choose between three EQ types: pure, vintage and modern. Then you have a tube simulation (two types available).
You can freely route the signal through all these modules. And the ProChannel can be switched pre or post insert effects. Once again, the sound is very good.

- String ensemble eleonor00:20
- Morceau presets Sonar X102:29
Here’s a video about the ProChannel:
Performance and Resources
To test resource consumption, I took one of my most comprehensive Sonar 8 projects: 30 audio tracks with aux sends, six busses, four virtual instruments, 17 effect plug-ins, everything at 24 bit/88.2 kHz with 7.3 ms total latency time (in+out), which means 256 samples. I progressively added some elements to overload the CPU: the PerfectSpace convolution reverb on a bus (not enough), then the LP64 linear-phase multiband compressor. I could listen to some audio noise but no drop outs. Windows’ CPU load meter showed 50% but Sonar showed that one of the four cores was overloaded.
I then opened the same project with X1. Same result: audio noise appeared when I activated the LP64. However, Windows shows about 60% CPU load.
I performed the test in different ways: closing the mixer, changing the plug-ins. The result was always the same. Resource consumption with X1 is a bit higher than with the previous version. However, this doesn’t change anything in use, maybe because the load is optimally distributed among all CPU cores.
So, does everything work perfectly? Not really: I had several crashes under Win XP and I just couldn’t get the contextual tool box displayed.
The system worked much better under Seven 64 bit on the notebook. I had almost no problems, but the audio engine stopped responding frequently. It occurred when there was no playback and nothing was consuming resources (the load meters were very low). It even happened when I wasn’t using Sonar (which was minimized while I wrote this review). However, my Echo Indigo IO sound card might be guilty, since it gave me some trouble with this computer in the past.
If that’s the case, Sonar proved to be very stable with my notebook and includes almost no bugs, which is astonishing for a release candidate version.
Conclusion
Sonar keeps all its advantages and gains considerably in readability, ease of use, working comfort, and effectiveness. I realized it when I went back to version 8 and wanted to compare the performance: it felt as if I had gone back several years in time! The virtual instrument and effect package provided is still very good and the added plug-ins sound really nice. What else could you ask for? That it were cheaper? It is! Cakewalk decided to strike a decisive blow offering the “big” Producer version for less than $400.


