While guitar players might have been disappointed by Musikmesse 2013, keyboard players, sound designers and home-studio owners were delighted by numerous new products.
As proof of this, let’s mention Roland — in fact BOSS — who gaveall musicians a tool that is usually intended for guitar players: The Loop Station. The Loop Station comes back as a desktop device and now with 4 additional tracks under the name RC-505.
At Musikmesse, the product attracted many visitors, maybe also because of the skillful musician who demoed it…
Since then we want to know more about the RC-505, especially if the product lives up to its promises. Are you ready to dive head first into the beast? Let’s go!
Look
The first obvious thing is the lack of included USB cord although a USB Audio logo is depicted on almost every side of the package! It’s a pity, even if the device doesn’t necessarily require a computer connection to work (however, we’ll see below that the RC-505/computer combination is very powerful!). As a compensation, BOSS provides us with a printed manual in seven different languages. Some users will find it an ecological outrage while others will praise this convenient solution. An external PSU rounds off the included accessories.
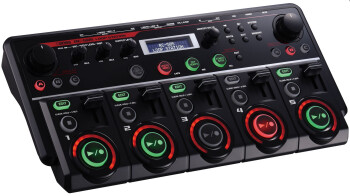
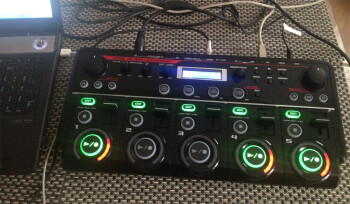
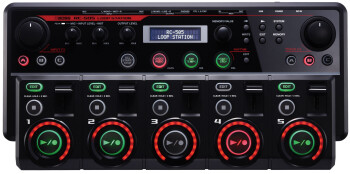
RC-505’s housing has following dimensions: 16.5" width, 7.9" depth and 2.7" height with the controls. Made out of plastic, the housing looks rather classy with its glossy black finish, a gray metallic strip and its big buttons. The device is quite light. We might fear that this can become unstable while playing, but it’s not the case and the RC-505 stays perfectly steady on a desktop. This is also due to the sensitivity of the keys: Don’t need to strike them hard to get them under control. On the front panel, the keys are arranged in two different groups.
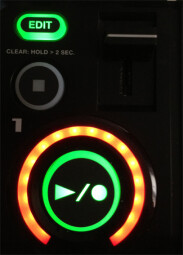
The lower group is the main working zone. It is divided into five sections. Each section is assigned to a single independent track. Each section includes a big backlit Play/Rec knob of which the color depends on the status (play = green, rec = red, yellow = overdub, plus off), a volume fader, a stop knob and an edit key to access the parameters of each track. What’s missing? A solo knob…
The upper working zone includes all general settings and a 2-line, 16-digit LCD which is easily readable regardless of the view angle. Left from the display, we have a big rotary control to adjust the input effect level of the RC-505. Effects are accessible and editable via 3 backlit keys below the big encoder. Three rotary controls allow you to adjust the mic input level, the instrument input level and the main output level. Please note that the output level control affects only the analog outs, not the USB out. It would be convenient to have an additional control to set the USB signal level. But this is a detail.
Right from the display, we have an endless encoder called Memory/Value allowing you to select a preset or to edit parameter values. We also have six small keys to browse/save presets and system parameters. In the right corner, we have a big rotary control above three small keys to control the output effects.
Finally, four small backlit keys with explicit names are aligned below the display. “All Start/Stop” starts and stops the playback of recordings. “Undo/Redo” allows you to undo or redo the last editing step. However, you can only go one step back or forth. This is no crucial limitation considering the possible applications. The Tap Tempo key allows you to manually sync the RC-505 with an external beat. The key blinks to show the external beat or the internal tempo setting. Those last three keys also allow you to insert or delete digits and to set their case while editing a preset name. Finally, the Rhythm section gives you access to 58 preprogrammed rhythm patterns, their time signature and audio routing.
Let’s have a look at the comprehensive connections on the rear panel. From left to right, you’ll find the power connector, a power on/off switch, a USB connector, MIDI in/out as 5-pin DIN connectors, a control/expression pedal connection, three 1/4" connections for main and phones outs, an aux input on 1/8" TRS, for example for a MP3 player, two 1/4" instrument inputs and one mic input on XLR. The latter is able to provide phantom power via the system options. However, a classic on/off switch like on every mixer would make things easier. The silkscreen on the front panel includes the description of all rear-panel connections. It’s a quite simple idea that makes plugging and unplugging cables much easier, and many competing products should offer this feature too.
Loop the loop
First of all, let’s turn on the unit: Wait 12 seconds until the internal OS is loaded, then start playing! Please note that everything works in real time without noticeable latency, neither while recording, nor when effects are loading, nor when switching between several sequences, etc. The RC-505 is equipped with a protection circuitry (delayed power-on process) to avoid any voltage overload, especially in home-studios where the full system is powered on/off by the switch of a single power strip.
Now, let’s give it a try! First of all, we need a metronome to stay on the beat. Instead of a simple “ding-tac-tac-tac”, I’ll select one of the pre-programmed patterns, for instance “Conga & Hi-hat” for a Latin mood, and assign it only to the phones out using the dedicated Edit button.
I set the microphone input level and start with a small beatbox kick. When I feel good, I push the Rec/Play button in track 1. Notice that the track doesn’t need to be previously armed: It’s a push 'n’ play device! I record two bars, push the Rec/Play button once again. The latter switches to overdub mode, which means it starts the playback of the source I just recorded, of course with perfect tempo sync (even if this is a must-have feature for a looper), and is ready to record and mix an additional signal on that track. The overdub mode can be replaced by the Replace mode which, as the name implies, replaces the signal already recorded with the input signal instead of mixing them both. But for now, the device is in classic overdub mode, so I add a beatbox snare to the kick in track 1.
But the result is not entirely satisfying. My first reaction is to think that it would have been better to record the snare on track 2… but I remember that the RC-505 is equipped with a 1-step undo/redo function that might help me. So I hit the corresponding key. The Rec button lights red to show which track will be affected by the undo function. I push the Rec button to cancel the last operation assigned to it, that is to say the snare recording. Now the Rec button blinks green to show me that I can redo the operation. But I ignore this because my first snare recording was really very bad.
So I disable the redo function, I push the Rec button in track 1 once again to go back to overdub mode and I record a new snare as well as a hi-hat. Ok, that’s it for track 1.
On track 2, I want to record a bass synth. No problem: I just connect the outputs of my faithful Korg SV-1 to the RC-505 instrument inputs.
Time has come for a small digression: The RC-505 is equipped with a digital audio interface, but both mic and instrument inputs can’t be sent separately to the computer via the USB connection. Thus, it is impossible to process both signals separately in your DAW. This is not a big disadvantage but it must be mentioned. However, don’t worry: Although the inputs are not distinguishable on the computer, they are separate in the analog stage. Remember that you can freely set the input level of each signal source and assign a phantom power to the mic input.
But let’s go back to the recording process itself. Here I’m facing a new obstacle. Since my track 1 includes only 2 bars, it seems that the other tracks are also set to this number of bars. But I’d like a longer bass line including more bars. No problem: I just have to edit the loop duration parameter using the Edit button in the track. You can choose following settings: “Auto” is the default value. In this case, the loop duration of each track matches the loop recorded in the 1st track. “Free” allows you to record “ad libitum”, without taking the duration of the other loops into account. In this case, the other loops are automatically repeated. You can also select a resolution from 1/16 note to half note, and from one full bar to… 1,000 bars! It’s more than enough.
Please note that some values must be selected before recording. For example, you’ll have to delete the recording in a given track if you want to set its duration parameter to “Free”. A bit cumbersome. It would be better if the recorded material could be kept, even if it must be truncated, as in the case of duration reduction, or followed by a silence in case of duration decrease. The tempo can be synced between the tracks, or not. You can also increase the tempo of all tracks except one.
I decide to set the duration of my basic loop to 4 bars and record it. Everything goes perfectly. But I have a new exciting idea… What about recording/bouncing all audio material in tracks 1 (drums) and 2 (bass) to a third track? Unfortunately, this is impossible for now… and it’s a real shame! However, you can try to do this with an external sequencer.
RC 505 + computer
Now, the connection to a computer really makes sense. As already mentioned, the computer recognizes the RC-505 as a digital audio interface and the USB connection allows audio transfer in both directions. In this case, you can route the USB input signal coming back from the computer in three different ways: “Line out” assigns the USB signal to the RC-505 analog outs (line + headphones), “Submix” mixes both input and output USB signals (there is a limiter to avoid feedback loops), and “Loop in” routes the USB signal to the RC-505 loop tracks. The “Loop in” option is the most creative, e.g. to feed a track with several loops that you already recorded or to use an external sequencer and its huge signal processing features. And, if the sequencer specializes in loop recording, the communication with the RC-505 becomes obvious. Of course, we prefer avoid using an external sequencer, but we must acknowledge that this greatly increases creativity.
But the connection between RC-505 and computer allows for even more. In fact, the device records WAV files and it can be recognized by the computer as an external mass-storage device (3.62GB) thanks to the system options. This way, you can access all recorded files from your computer, edit them in your favorite audio editor and save them again in the RC-505. Very good!
Going MIDI
The MIDI functions also bring the RC-505 closer to your computer. Because the RC-505 can be used as a MIDI controller. You can assign up to 8 sources, each with 8 internal or external parameters or functions, to the RC-505. The parameters are editable in the Memory menu and assigned to the device presets. This means that the different presets can include different MIDI assignations. And considering that you have 99 presets, you virtually have 99 different assignation combinations. Not bad at all! The assignment process is a bit boring (we regret the lack of a software editor to set all parameters with the computer mouse), so it’s recommend to create different standard presets matching your different applications.
The possible sources are expression and control pedals, the input and output FX controls, the Rec/Play and Stop buttons in each track, plus CC1 to CC31 and CC64 to CC95 sent by an external device. Did something catch your attention? Yes, the RC-505 faders don’t belong to the possible MIDI sources! This means they can’t be used as MIDI controls, which is very disappointing. As possible targets, we have all Play, Rec and overdub functions in the RC-505, FX on/off for both input and output internal effects, plus one single parameter per effect (factory setting). The MIDI integration also allows you to switch between presets, and CC1 to CC31 and CC64 to CC95 can be sent to an external hardware or software tool. This features can change the RC-505 into a “MIDI translator”: For example, send CC1 from an external device into the RC-505, and the latter will send CC88 (it’s an example!) to a third unit. Finally, the RC-505 offers a very wide range of MIDI functions, and it’s all the more disappointing that faders are not included to the set of MIDI controls.
Effects
Let’s go back to our test song. We already have drums and bass, and maybe we could add vocals? I quickly check the mic input gain and look for an input effect. We get following effects: filter (low-cut, high-cut or band-pass), phaser, flanger, synth (reminds a vocoder with analog feel), a lo-fi effect (crushes the signal), a guitar-to-bass effect (greatly lowers the pitch of the signal), a transpose effect (-12 to +12 half-tones in 1/2-tone steps), a robot effect (dehumanizes your vocals), a vocal distortion effect, a MIDI-controlled vocoder (one track of the RC-505 can be used to modulate the input signal), a dynamics effect like a compressor, a 4-band EQ with fixed values (low, low-mid, high-mid and high), a band-cut filter with fixed values, an octaver (creates and adds a signal 1 or 2 octaves below the original signal), a pan effect (sets the signal position in the stereo field), a slicer effect (creates signal slices depending on predefined patterns), delay, tape echo (simulates an analog tape), granular delay (repeats very short signal segments), chorus and reverb.
For my case, I select the guitar-to-bass effect which is, in my opinion, one of best provided effects. Generally speaking, I would say that effects are not the main asset of the RC-505. They are not so bad, but also not so good. It seems that they were conceived in order to give you the possibility to add short effects to your performance and thus surprise your audience from time to time. Moreover, you must browse the sub-menus to edit them, which makes their use not so easy in live performances. For this reason, it is recommended to set your effects properly before starting your performance. Also note that you have the possibility to assign three different effects to the trigger buttons, but you can use only one at a time.
Some effect examples:
Guitar to Bass

Synth

Reverb

Slicer (applied to several predefined patterns)

The output effects are exactly the same as the input effects, and BOSS added a beat repeater (repeats a signal segment selected by the user), a beat shifter (shifts the sound backwards or forwards), a beat scatter (emulates a scrub effect) and a vinyl flicker (simulates human action on a vinyl record rotation).
Beat Repeat

Save and Backup
My wonderful sequence (so wonderful that I won’t present it to you here, you could be envious…) is finished and I can save it. Each sequence (called “phrase memory” in the product manual) can be freely renamed in the Memory menu, then stored by pushing the Write button. But watch out: It is impossible to store a sequence while the looper is in use. This means you cannot create a sequence during a live performance and save it in order to use it later without stopping the audio playback. Once again, this emphasizes the advantage of using the RC-505 together with a computer. And finally, also note that any track in any sequence can be imported individually to any new project.
Conclusion
For sure, the RC-505 is a lot of fun. The responsiveness, the imperceptible latency and the perfect loop sync make you quickly unleash your creativity and have fun in no time. Add the very comprehensive connections, the integrated digital audio interface and the numerous MIDI functions, and you’ll think you have here the ideal gear. But nothing is perfect in this world and we want to mention following disadvantages: The MIDI functions could be easier to handle, especially if the faders were also assignable, the average quality of the effects and the lack of direct control over their parameters, and the necessity to use an external sequencer to bounce several loops to a single track.
However, BOSS struck a decisive blow, and in my opinion the price (about $600) fully matches the features of the product.


