
Whether you’re upgrading to a new pedalboard, switching over from an all-in-one digital unit, or getting your first pedalboard, there are endless options. The aim here is to give you the info you need to buy or build a pedalboard that will work for your situation.
This article focuses on pedalboards comprised of a selection of individual pedals rather than multieffects pedal units. If you’re not sure which type is best for you, check out our previous article about that issue.
Sound is key
|
|
The decision to use individual stompboxes usually comes down to a question of sonics. The majority of guitarists will tell you that individual effects pedals, especially analog ones, just sound better. So much better that they’re willing to put up with more work and expense in order to have a pedalboard filled with individual pedals, rather than get a digital multieffects unit. They’ll also probably tell you that being able to choose your own pedals is better than being stuck with what the manufacturer thinks you should have, which is what you get in a multieffects unit.
This article will look at the logistics of putting together your own pedalboard setup. Whether you’re buying a premade pedalboard or doing a DIY version, you face a lot of similar issues including what types of effects to include, in what order to put them on your pedalboard, how to attach your pedals, and how to get power to them. We’ll address all of those concerns in this story. The aim here is to arm you with enough information that you feel confident in moving forward with your own setup.
What pedals do you need?
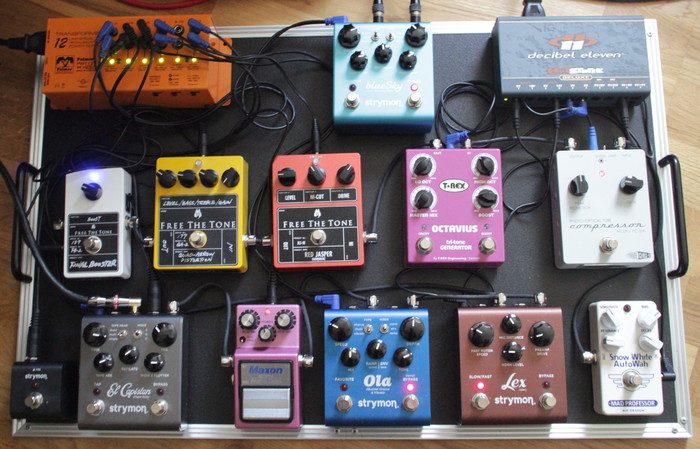
Deciding which specific pedals to get is a huge subject, which I’m only going to touch on in this article. There are no rules as to what types of pedals to put in your pedalboard. Cost and space notwithstanding, its a matter of taste, and the sonic needs of your music. The only pedal that’s common to virtually every guitarist’s pedalboard is a tuner. No matter what kind of music you play, you want to play in tune, and for most rigs, it makes sense to have a pedal-based tuner, which allows you to tune silently and accurately onstage.
I’m assuming that most of you already have some of the pedals that you want for your pedalboard. What I will say on the subject of pedal choice is that if you’re going for ultimate tone, you want to choose analog pedals wherever possible. Remember that the pedals on a pedalboard are connected in series, that is one pedal goes into the next and so forth, so one crappy sounding pedal can mess up your entire tone. This is not to say that all pedals with digital circuitry are bad sounding, but you can be pretty sure that the inexpensive ones are. So rule number one is stay analog as much as possible. Rule number two is buy the best quality pedal you can afford. In most cases, it’s better to have one good pedal than two lousy ones.
 |
If you are not sure what effect types (generically speaking) to get for your pedalboard, a standard setup typically consists of one or more distortion or overdrive pedals; an ambience effect like a delay and/or a reverb; and usually one or more modulation effects such as chorus, tremolo, or flanger. Some guitarists like to have an EQ pedal to further modify the sound of the amp.
Also popular are gain boost pedals, because stepping on them gives you an instant jump in gain which is great for soloing. Many guitarists like to incorporate looper pedals into their setups. Many have a wah or volume pedal as well. There is such a huge universe of pedals out there that part of the satisfaction of putting together your pedalboard is the process of choosing from the various types, sizes, colors and shapes on the market. You can see a huge range of pedals by perusing our Guitar Effects category.
If you’re going for the purest tone possible, consider pedals equipped with True Bypass or Buffered Bypass circuitry, which are designed to keep your tone intact when in bypass, so your signal is not degraded as it flows through the input and output jacks. True Bypass is passive, that is, it requires no power to move your signal from the input to the output when bypassed. Buffered Bypass circuits are active, meaning they require power to function. They sometimes add a little amplification at the output of the pedal to make sure it matches what comes in at the input.
Store-bought or DIY?
One of the biggest decisions you have to make when you decide you want a pedalboard is whether you’re going to use a manufactured pedalboard or one that you build yourself.
The advantages of DIY boards are that they’re less expensive and you can customize their size to fit your needs. The advantages of manufactured pedalboards are that they’re already built, they looks more professional than most homemade pedalboards, and they most likely come with a carrying case. The latter is very important. If you’re putting together a pedalboard, you’re presumably going to be carrying it around to rehearsals and gigs, so if you don’t have a case, your pedals and the board could get damaged over time.
You can find some generic pedalboard cases on the market, but you’re not likely to find one that fits your homemade pedalboard as well as a purpose build case would fit a manufactured board, unless you build it to fit the case. You can also carry your DIY board in one of those metal, flight-case style briefcases or try to improvise something else. Unless you’re handy, though, it might be a lot easier to get a pre-made pedalboard that comes with a case.
Manufactured pedalboards come in myriad shapes, sizes and price ranges. You’ll find them from companies such as Boss, Behringer, Gator, Johnson, PedalTrain, SKB, and Free the Tone, to name just a few. Not all come with cases, so make sure the one you choose does, before buying.
Sizing it up
Whether you’re buying a manufactured pedalboard or building your own, one of your first decisions will be what size to get. If you already own the pedals you’re going to use, you can base your size decision on whether they’ll all fit on the pedalboard together. When making that kind of a calculation, remember that you have to leave room for the jacks of the cables connecting the pedals. Assume you’re probably going to need a couple of inches between pedals. That’s especially true if you’re using dedicated pedalboard cables with molded, right-angle ends (more on cabling in part 2).
 |
Consider leaving some room for expansion. If you fill up your pedalboard with the max number of pedals that will fit, you won’t have any room for a new one, or you’ll have to jettison one of your present pedals to make room. On the other hand, you don’t want to carry around a behemoth that’s only half filled.
A lot also depends on whether or not you have a full complement of pedals already, or are starting from scratch or with just a couple. Try to envision your needs, and don’t hem yourself in by choosing too small a size. (If you are making a DIY pedalboard or buying a manufactured one without a power supply, remember that you’ll need to put the power supply somewhere. If there’s room, it’s good to put them on the underside of the pedalboard. I’ll talk more about power supplies in Part 2.)
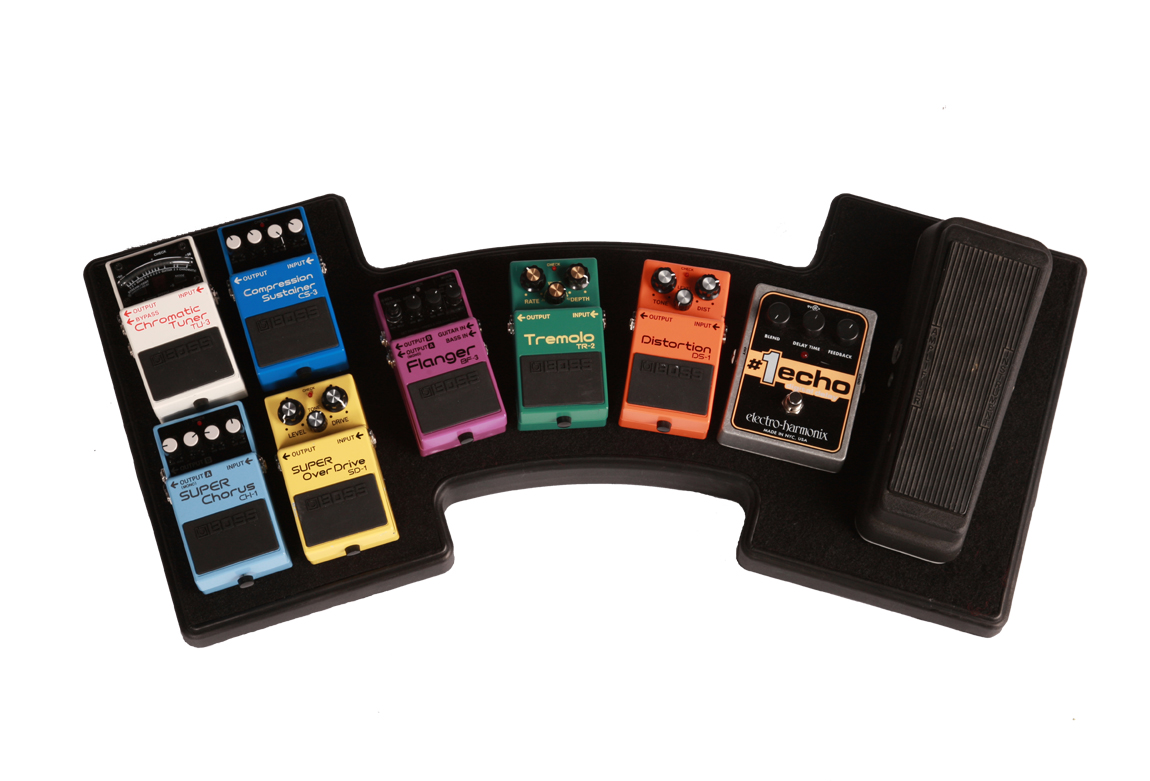
You also have some choice over shape. Not all pedalboards are rectangular — although the majority of them are. You can also find manufactured pedalboards that are curved such as the Gator G-Mega Bone (see above photo). The shape of DIY pedalboards is only limited by how handy you are. That said, a rectangular shape with two horizontal rows of pedals is the typical design, and has developed like that based on its convenience. Pedalboards are typically tilted back slightly towards the player, and are designed to make it easy for you to reach the switches on the pedals, whether they’re located on the top or bottom row.
That being said, it’s usually easier to reach the bottom row — the row that’s closest to your foot — so when you’re deciding where to place your various pedals on the board, the ones that you’re going to be switching on and off the most during a gig should be in the front row wherever possible. I’ll get more into the subject of pedal order in part 2.
To help you figure out what size pedalboard you need, the manufacturer Pedaltrain offers an interesting online utility called the Pedalboard Planner. It first asks you to choose a Pedaltrain pedalboard model (no obligation), which then appears onscreen. Next, you can add graphic renditions of virtually any pedal on the market (over 1600 pedals from 158 manufacturers are available in a pull-down list) that are size-accurate in relation to the pedalboard you chose, and which you can arrange on the pedalboard to see how they’ll fit. Cool. Even if you’re not getting a Pedaltrain pedalboard, it can give you an idea of the kind of space you’ll need for particular dimensions.
How to actually build a DIY pedalboard is beyond the scope of this article, but I will mention that plywood works well. You can use 1/2” or even 1/4” plywood. You’ll probably want to paint it black after you’ve cut it. There are, of course, plenty of other options. I’ve even seen pictures of a pedalboard made from an old skateboard. Be creative.
In part 2, I’ll cover such issues as power supplies, attaching your pedals and more.


