When the original Magic A/B came out a couple of years ago, I was pretty blown away by it, because it made the important process of A/B-ing a mix a lot easier. Now SampleMagic has rewritten the application from the ground up, and what was already an excellent plug-in has gotten significantly better.
Installing is easy

Magic AB Version 2 is easy to install, and authorizes to your computer without need for a dongle. You’re given a serial number in your account after you buy the plug-in, and you just have to enter that along with your email address the first time you open the plug-in to authorize it.
Magic AB Version 2 supports VST, AU, and AAX on the Mac and VST and AAX on Windows. Unlike the first version of Magic AB, there’s no RTAS support. Because the new version is a completely independent plug-in, rather than just an upgrade of the first version, you can have both on your system at the same time. That means you can still upgrade even if you still have projects where you need to load RTAS plug-ins.
The manual includes a list of officially supported DAWs, which is comprised of Pro Tools, Live, Logic, Cubase, Studio One, Reaper, Sonar, Fruity Loops, GarageBand, Nuendo and WaveLab. But according to SampleMagic, the plug-in should work with any VST, AU, or AAX host, it just hasn’t been fully tested it on the others.
What a concept
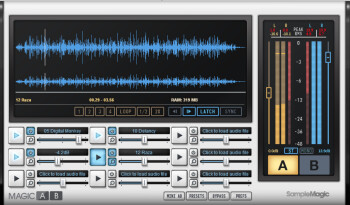
Like the original Magic AB, the new version is conceptually simple: You insert the plug-in on the end of your master bus chain, then load a song file into one of the nine reference track slots, and, as your DAW plays your mix, you can switch between listening to it and a reference song at the press of a button.
Magic AB Version 2 makes this easier in a number of ways. Not only does it have a new engine and lots of new features, but it has increased the number of file types that it directly supports. These now include WAV and AIFF files up to 24-bit / 96kHz, mp3, m4a, and AAC. The previous version didn’t support M4a, or 24-bit files on Windows, which meant that in some cases you had to convert reference files before you could load them into Magic AB. Also new is the ability to drag and drop reference songs to load them into the plug-in.
The most significant improvement is the addition of two new play modes: Latch and Sync. In version 1, you manually started your DAW and then did the same for the reference track. The new modes simplify the process and make it more precise. Latch mode links Magic AB’s transport to your DAW’s transport. As soon as you hit play on your DAW, the reference file starts and you can begin your A/B comparison. Hit stop and it stops.
The other new mode is called Sync mode. It was designed for when you’re comparing your mix with an earlier version of the same mix. I don’t know about you, but that’s something I do a lot. Not only does Sync mode follow the transport, it syncs to the DAW timeline. That means it will move the reference track to the same point in the DAW timeline where you start playback. This is an awesome feature. In the original Magic AB, it was always tricky to try make your mix and the reference mix play back from the same point in the song. Now, it’s easy. Having both the Latch and Sync modes makes it a snap to do very precise song-to-song comparisons. I’d never want to use the manual method from the old version again. But for those who like working that way, the plug-in reverts to Manual mode when neither Latch or Sync are selected.
Leveling the playing field

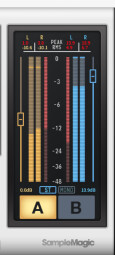
The Meter area on the right has also been significantly improved, although at first glance it looks pretty similar. It still has meters for A and B, buttons to switch between them, and volume sliders for evening the levels of A and B (the individual reference tracks also have volume sliders). But just over the A and B buttons are Stereo and Mono buttons, so you can switch to mono for a different perspective, and then back to stereo, when A/Bing your mixes. What’s more, you now have a way to check mono compatibility if your audio interface or monitor controller doesn’t offer such a feature.
The L&R level meters themselves have been widened and feel more spacious and less cramped than before. More importantly, whereas the old version’s meters ranged between –60 dBFS and 0, version 2’s meters go from -48 to 0 dBFS, and are focused mostly on –12 to 0 dBFS, which is where most mixes are going to be peaking at. As a result, you get more resolution in the meter in the area that’s most important. Nice.
Another addition to the meter section is adjustable Peak Fall time. What is that? It adjust how long the peak indicators on the main meters stay on a peak before falling off. One hundred percent is the fastest setting and 0% the slowest. Personally, I found the slow settings to be the best for grokking the peaks.
As with the previous version, you get numeric readings at the top of the meters for both Peak and RMS levels, and L&R downward moving red meters that represent crest value. Also referred to as “peak to average ratio, ” the crest value is calculated by dividing the waveform amplitude by the RMS value, and gives you an idea of the dynamic range of your mix. If the crest values are too low, you’ve probably over-compressed your mix.
Riding the wave
The largest window in the Magic A/B v2 GUI is the Waveform display, which shows you the waveform of the active reference track. It shows what appears to be a stereo display, but is actually two displays: the main Waveform Display above the Waveform Overview.
Dragging up or down on the Waveform Overview lets you zoom in and out on the active reference song, which is represented in the Waveform Display. You can show the entire track or only a small section. Once you zoom, whether a lot or a little, a white navigation bar shows up under the Waveform Overview that you can drag to the left and right to navigate to another part of the song. These zooming features are redesigned from the original version, and though somewhat streamlined, are not as obvious, as SampleMagic has taken out the zoom activation button and plus and minus buttons from the previous version. Now you have to read the manual to figure out how to zoom.

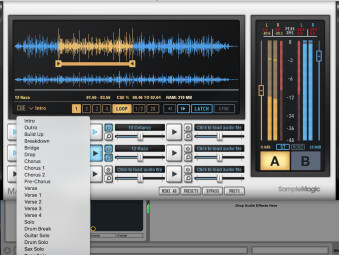
As before, you can set up a loop within the reference song, which is helpful if there’s a particular section you want to focus on for your referencing. The old version let you select a cue point for starting the reference track at. Version 2 features four separate cue points. Each has a corresponding button that you set the cue point and to trigger it. You can also assign a name to each cue point from a long pull down list of song-section names (intro, verse, chorus, etc.) that also includes labels for guitar solos and other solos, and even a couple of fun ones “WTF?” and “The Bomb.” Unfortunately, you can’t name the cue points yourself, although SampleMagic states in the manual that they’re working on that for a future release.
Mini me
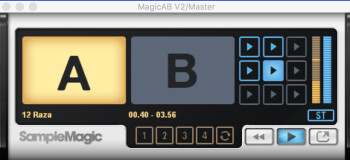
SampleMagic redesigned the Mini AB feature, which is a smaller control window you can open instead of the main GUI if you needed to save screen real estate. It offers access to new functionality such the four Cue Point buttons and the Mono/Stereo toggle button. It’s slightly smaller than the previous Mini AB window, but still has the same large A and B buttons .
Speaking of large buttons, version 1 offered an option called Big Button Mode, which, when activated, showed large A and B buttons right under the waveform display of the main GUI. SampleMagic has dropped it in version 2. I personally liked using it, so I’m a tad disappointed, but you don’t lose any significant functionality by not having it.

A couple of other important new features: You can now deactivate reference tracks. Previously, each reference track that you loaded into Magic AB used up additional RAM. While that’s still the case in the new verison, now you can deactivate the tracks you’re not using at a given time if you need to save RAM.
If you need access to a deactivated track, just a press of the button turns it on. I tried deactivating a couple of tracks to see how they impacted the RAM usage of the plug-in (which is always shown in the main window), and deactivating a four minute song saved about 80 MB of RAM. Depending on how much RAM you have in your system, this may or may not be an important feature for you.
SampleMagic has added more functionality and convenience to the Preset feature, which lets you save a playlist of songs as presets to be recalled at any time to use as reference tracks. You might have particular songs that you like to regularly use as a reference tracks, and you can keep them all handy. What’s new are menu options that let you either save a preset as just a pointer to the song file on your drive (Save Preset) or to actually copy the song into the Saved Audio Folder. Previously, you had to turn on or off a preference to control whether or not audio was saved along with the song data. Also new is a Preset menu item that gives you direct access to the Saved Audio folder.
Conclusion
The first version of Magic AB was a unique plug-in that made A/Bing much easier than it ever had been in the past. The new Magic AB Version 2 takes the functionality up a number of notches. The new features add to the control and convenience of the plug-in, none more so than the new Latch and Sync modes.
If you owned the previous version of Magic AB, upgrading only costs about $15 (the published upgrade price is in English Pounds), and considering the significant improvements, it’s a total no brainer to upgrade.
If you’re buying it for the first time, the price is around $69, which is also quite reasonable. Considering how important A/Bing is to the mixing process, it’s worth seriously considering. There’s nothing else like it on the market, and it simply works great.
