Here in the final part of this 3-part article, I’ll finish scoring the hypothetical commercial, working with variables like tempo, start time, and meter, while never losing sight of the original assignment.
Trying this and that
For this job, the most important event to hit with the music was the product logo (aka “the super”, a term that came from way back meaning that the logo was being superimposed on the video). I wanted to go for something that worked with all three hit points as much as possible, however. I ended up using all the variables I had at my disposal: tempo, meter, and start time.
I started with a click of 119, which we’ll say was the tempo of the temp music sent to me for this theoretical job.
Something to remember is that while you’re experimenting with tempo and start time and meter, trying to maneuver those sequence parameters to work best with the picture, you never want to lose sight of the instructions you got from the client. It’s easy for that to happen. Make sure you keep the tempo close to what was in the temp music, or the feel might change too much.
I had a couple of situations where I didn’t heed that warning closely enough, and when I presented my piece, I was told it wasn’t what they were asking for, so be careful.
In the case of this hypothetical commercial scoring job, let’s say that the client asked for something acoustic guitar centered, sparse, and a little melancholy. Let’s say it was some sort of public service ad promoting conservation.
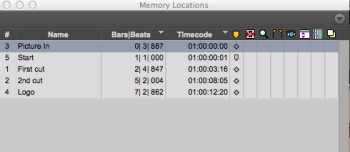
OK, now back to figuring out a tempo. I opened the marker window (called Memory Locations in Pro Tools). If you recall from part 2, I added locked markers in the sequence at the hit points. I changed the tempo in 1 BPM increments (I could use .5 bpm increments if needed), and listened to the click while watching the picture, as well as checking the marker window to see where the beats were falling in terms of bars, beats, and ticks. I was looking for tempos at which a strong beat was landing close to the super. At one point, I slid the start point forward by a frame because the hit on the product logo was a little late. In Pro Tools it’s easy to do that, just by dragging the start marker. Most DAWs give you a way to move your start point. Check your manual to find out for your DAW.
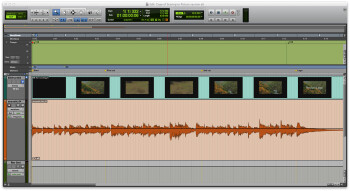
Anyway, watching with the click wasn’t doing it for me, I wanted to see it with some actual music to get a better feel, so I put down a scratch track. At the current settings I had for tempo and start time, I recorded a basic finger-picked guitar part along with the video. I even went “old school” and took out a piece of music paper and wrote a basic chord chart. On it, I marked the approximate spots of the hits, and it was helpful for visualizing what was going on, and deciding on the chords for the piece. Because this was only a :15 second spot, I tried to keep the amount of harmonic motion pretty limited. I changed chords within a measure only in one place.
Busting out the guitar
I decided to play a scratch guitar part, I found that if I put a bar of 3/4 for the intro, I could hit the super very close to beat 3 of bar 7, and make that a held ending chord, plus, the other cuts in the video were now occurring in or close to spots where the chords were changing, which was a bonus. You have to be careful with meter changes, because they can make the music feel unnatural, but as an intro build up the bar of 3/4 at the beginning worked fine. Looking at the scratch track, the music was feeling pretty good with the other cuts. I figured I could use the melody instrument (electric guitar in this case) to finesse any of those a little if need be.
So to recap. Without losing sight of the musical feel asked for in the assignment, I:
1) Experimented with different tempos close to the original, looking at my markers list and listening with a click while watching the picture to see how the click meshed with the hit points.
2) Also experimented with changing the start time to help find a click that worked
3) Wrote out the chords on a piece of staff paper, to help visualize musically what was going on.
4) Recorded some scratch tracks while still experimenting with tempo and start time to see how my idea was working with the picture
5) Decided to use a measure of 3/4 in the intro to line up the other hits more closely with the downbeat of new measures, where chords were changing.
I then spent some time recording final tracks, using similar instrumentation to the hypothetical temp" track, including electric guitar, mandolin, acoustic guitar and a sampled acoustic bass. I tried to make sure what I wrote matched the mood they were looking for, and was musically interesting.
Final thoughts
These techniques can be used in any scoring situation, whether you’re working on a TV commercial, a web video, or a film score. I didn’t go very far into the artistic aspects of scoring, because that varies a great deal from one form of media to another. But hopefully, from reading this series, you’ll have a basic grasp on how to make music work with picture.
This video features a mix of the “final” track against the picture. Imagine that there would be a voiceover on top of the music.


