The Lurssen Mastering Console is new mastering software from IK Multimedia that was created in conjunction with Gavin Lurssen at Lurssen Mastering in Los Angeles, a high-profile facility that’s responsible for mastering multiple Grammy-award-winning albums, and Oscar-winning film scores and more. The product lets you access a software emulation of Lurssen’s mastering chain, incorporating some of the studio’s techniques and “tricks.”
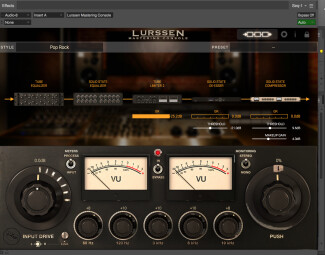
The new software is available for both for Mac/PC and for iPad. This review focuses on the Mac/PC version (the iPad version appears to be very similar). For Mac and PC, Lurssen Mastering Console runs both as standalone program or as a plug-in for AAX, VST2, VST3 and Audio Units on Mac; and AAX, VST2 and VST3 on Windows.
Conceptually speaking

With Lurssen Mastering Console, you don’t get a selection of separate modules that can be added and deleted from the signal chain and rearranged at will like you do with other mastering software, (for example iZotope Ozone). Instead, you get a simplified interface, giving you way fewer options than you’d get elsewhere, but the limitations are also its strength. That is, you’re always working through the Lurssen effects chain, and if you’re a mastering novice, you can get good results without a big learning curve.
While not as simplified as processors such as Waves One Knob series or Toontrack’s EZ-Mix, which are focused on mixing, IK’s Lurssen software is based on similar premise of removing a lot of parameters from user control in order to make it easier to use, and the results more predictable. For an endeavor like mastering, which can be pretty intimidating if you’re inexperienced, there’s a lot to be said for that approach.
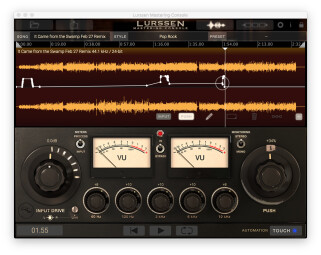
The standalone and plug-in versions of the Lurssen Mastering Console have the same processing controls, but differ in one significant way: the former lets you load audio files (WAV or AIFF), and provides a waveform display, transport controls (play, play from start, and loop), and facilities for exporting your finished songs. The plug-in version “outsources” those functions to your DAW. In some ways the plug-in version gives you more flexibility, because you can insert other processors before or after it. The standalone version is a closed system. Unlike Ozone, it doesn’t offer the ability to open third-party plug-ins. This was intentionally done to keep everything within the Lurssen eco-system so that the results could be more controlled. Some people will like that simplicity while others will find it restrictive.
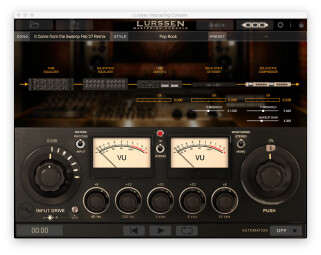
The basic signal chain consists of either four or five processors. The order is Tube Equalizer (controlled with knobs in the lower section) Solid State Equalizer, Tube Limiter 1 or Tube Limiter 2, Solid State De-Esser and Solid State Compressor. The presets in the Styles Menu, which is a pull-down showing 10 Americana, 5 EDM, 5 Hip Hop, and 5 Pop Rock style presets, dictate whether one of the Tube Limiters are in the circuit. The Hip-Hop and EDM presets have no Tube Limiter in their chain. The American Presets feature Tube Limiter 1 and the Pop/Rock Tube Limiter 2.
The processors are generically named, and although the manual doesn’t give specifics as to which processors were modeled, it says that the tube limiters are “the two most popular and iconic Vari-Mu limiters in music recording history.” Based on that information and its shape, it appears that Tube Limiter 2 is modeled from the Manley Variable MU.
Some hints are given about some of the other processors, for example the Solid State Compressor is described as being “based around one of the most popular and widely used mix bus compressors designs in the industry.” But the emphasis of Lurssen Mastering Console is not on which specific processors were emulated, but rather about how Gavin Lurssen uses them in combination.
One last bit about the Chain view: You do get a couple of adjustable parameters including Threshold on the De-Esser and Threshold and Makeup Gain on the Solid State Compressor. giving you a little bit of added control. In addition, Gain Reduction meters are provided for the Tube Limiters, the De-Esser and the Solid State Compressor, right in the Chain view panel.
Touring Lurssen
The GUI is split into two main sections, stacked vertically, with additional controls running across the top of the screen in the plug-in, and the top and bottom in the standalone. The lower section contains the main controls. On the far left is the Input Drive knob, which governs how much input is coming into the processor and consequently, how much compression and/or limiting is applied. Like with any mastering dynamics processor, you must be careful not to overdo it, or you’ll end up with an overly squashed song. This is particularly true with acoustic material, which generally requires a lighter touch.

At moderate settings, the dynamics processing in the Lurssen Mastering Console will give you plenty of loudness, while keeping more natural dynamics and transient response. The Input Drive is actually two controls left and right, which are linked together. You can unlink them if you want to treat the left and right separately.
In the middle of the lower window section are two VU style meters, which can be switched between showing input levels and post-processed levels via a toggle switch just to the left of the left-side VU. Another toggle switch changes the monitoring to mono, letting you check the mono compatibility and listen for phase issues.
Underneath the meters are five EQ knobs from the Tube Equalizer, which is always in the mastering chain. You get control knobs for five fixed frequencies: 60 and 120 Hz, and 3, 6 and 10 kHz. There are no Q controls, and this is the only EQ in the chain. That’s not a lot of EQ options, considering that this is a mastering product. You can’t adjust bandwidth, get surgical, or change filter types. That said, the knobs are are fixed at useful frequencies and work nicely for tweaking different frequency ranges of the mix. The manual doesn’t say what tube equalizer this one is modeled from, but whatever it is, it sounds good.
Continuing with the knobs and controls, you get a Bypass toggle switch that lets you easily compare the processed and unprocessed signal. Being able to switch back and forth is good for hearing the affect of the volume increases you’ve dialed in with the Input Drive. However, it’s less useful for comparing EQ changes because the volume discrepancy between when it’s on and off typically makes the processed version sound louder — and therefore better — and it’s tough to judge the impact of the EQ. I found myself wishing for a feature like the one in Ozone, which offers the option to match the volume of the bypassed and non-bypassed sound. This gives you a more realistic way to compare the frequency changes you’ve dialed in.
Give me a push
On the far right is the most unique control in the software, the Push knob. Turning it up raises each of the EQ knobs by an equal amount. According to the manual, this mimics a signature technique of Lurssen, who applies it to specific sections of songs to add emphasis. It doesn’t feel exactly like it’s getting louder when you turn up the Push knob, especially compared to just turning up the level with the Input Drive. Because it simultaneously raises or lowers all the EQ knobs at once, it does affect the overall level, however. Still, the Push effect, especially when used judiciously, gives the impression of additional intensity and dynamics that’s more subtle than a volume change would be.
What’s even cooler is that you can automate it in the standalone version. (If you’re using the plug-in you can use your DAWs automation.) Pressing the Automate button reveals buttons for Off, Read, Touch, and Write, which function similarly to DAW automation.

So if you had a song that felt kind of dynamically flat, you could add emphasis to, say, the chorus by automating a raise in the Push control every time the chorus comes around. I also found it useful for adding presence to an entire mix. The amount of Push you’re adding is shown as a percentage in a numeric readout right above the knob. To help you mark a specific spot, a moveable depiction of a piece of masking tape with a marker line on it (called the Push Reference Marker) can be moved anywhere around the circumference of the Push knob. While a tad gimmicky, it’s useful for marking your settings.
You don’t have to worry too much about being perfectly precise with the Push knob, because of the Automation in the standalone version or your DAWs automation in the plug-in — anything you write can be tweaked after the fact via a breakpoint automation line. That really adds to the power of the Push effect, because you can control it so accurately.
You can also automate the Input Drive knob, and it has its own breakpoint line that can be edited after the fact. Input and Push are the only automatable parameters in the Standalone version. Those two plus the editable parameters in the Chain and Bypass can be automated in the plug-in. It would be nice to be able to automate the EQ knobs.
In the standalone version, you can export as either a WAV or AIFF file, in 16-, 24-, or 32-bit resolution, and at either a 44.1, 48. 88.2 or 96 kHz sampling rate. In the plug-in you’d export through your DAW.
Loading and export
The standalone version can load multiple files at a time (WAV or AIFF are supported), which can be activated one at a time for listening and processing. The program remembers the settings when you switch between songs. You can also save a project, which then has all your settings and your audio files saved in it. One very cool feature is that when you switch between files or between presets, any processor or parameter that’s been changed flashes briefly to let you know. Kudos to IK for that feature, which is quite helpful for keeping track of what has changed.
My biggest complaint about how files are handled in the standalone version is that you can’t trim the beginning or end, or add fades to a file, nor can you setup a sequence for your album. (I made a similar complaint when I reviewed Ozone 7, although that program does let you trim and add fades.) As a result, Lurssen Mastering Console is not a complete mastering solution, because you’ll still have to export your files to another application to trim, add fades, and sequence them. Obviously, since you can’t sequence the songs, there are no facilities for exporting a DDP file (used for CD mastering) either.
What’s your preference?
A setup window, available in both the standalone and plug-in versions, makes it possible to choose between small and large GUI sizes (the small is especially handy if you’re working on a laptop) and, more importantly, lets you turn on the HD engine, which runs the processing at either 88.2 or 96 kHz, depending on the source file (44.1 kHz files run at 88.2, and 48 kHz files run at 96 kHz), providing 2X oversampling. It definitely uses more CPU in HD mode, but it’s not likely to overload your computer, and it gives you more headroom for the processing, which should result in better quality. Unless you’re having CPU issues, I would recommend running Lurssen Mastering Console in HD Mode (which is not the default) all the time.
Conclusion
I tried Lurssen Mastering Console ($199) on a variety of musical styles from acoustic to rock to dance, and found it to be very capable of punching up the level of a mix, tweaking EQ, and creating a finished file of high quality. The Push control is a cool feature and works nicely for adding intensity. The overall sound quality is quite good.
While you’re not going to get the kind of control and flexibility you would with many other mastering applications, it lets you get professional sounding results very easily. As mentioned, you’ll still have to use your DAW or another audio editor to sequence your tracks if you’re creating an album, and there’s no MP3 conversion or direct-to-SoundCloud features like with Studio One 3’s Project Page. But for making your mixes louder and adding a professional sounding mastering sheen, Lurssen Mastering Console is a very useful product.
Check out this video to see the software in action.

