After adding the RX to its software catalog in 2007, iZotope has made a name for itself in the audio restoration world. The second version came out in 2010 and really drove it home making the software a reference in this domain.
The developer seems to update the software every three years, so 2013 is the year of RX 3, which promises performance and usability improvements, as well as new modules. A necessary update to mix audio files?
Just like its most direct ancestor, RX 3 is available in two versions: Standard ($349) and Advanced ($1199) with specific modules and parameters. For this article, we used the Advanced version, and we will point out whenever a feature is exclusive to this version. A comparative table is available on the publisher’s website.
New skin
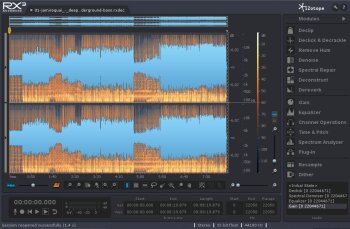
Before looking inside the hood let’s look at the bodywork. RX 3 has a slightly different GUI, but users of the previous versions won’t get lost. In the center we have the waveform and spectrogram (a slider allows us to go from one to the other progressively), to the right we have the modules (declick, denoise, dereverb…), at the bottom are the transport buttons and the tools to select audio segments (to which we will come to later), and in the bottom right corner is the list of undos. The interface is clear and easy to get a hold of, which is a first good point. Among the new features we have the possibility to work with several files simultaneously via tabs. The software can handle now multicore processors and is still 32 and 64-bit compatible, which means certain processes are faster, and if your system has 4GB+ RAM it will make very good use of it.
Another interesting novelty, the RX 3 introduces a new file format (RX Documents) that groups all undo history, audio data, markers, and last selection, everything within the same easily transportable file, whose size can be imposing if the original audio file is big and you have lots of undos. It’s a great opportunity to retouch old projects.
The Host
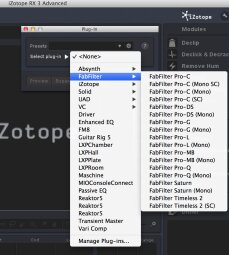
In the modules we can see that both versions can host VST plug-ins, which was something formerly available only in the Advanced RX 2 edition. So we can load any VST, DirectX and AU plug-in into the standard version and use it directly within RX 3. If you want to use 32-bit plug-ins you will need to run the 32-bit version of RX 3.
You can then apply any processing to your selection (via the RX 3 tools available) and have Preview and Compare (to make quick and easy A/B) options as well. Given the selection tools available in the software, this host is no toy, considering that most sequencers don’t offer quite as many tools to select an audio segment. The only somewhat annoying limitation is that we can only load one plug-in at a time, even if you can save the settings of the plug-ins as an easy recallable preset (we can even assign it to a keyboard shortcut). We also have to point out the availability of Dither Mbit+ in the standard version (available only in the Advanced version previously). The same goes for SRC, the house-own tool that allows sampling rate conversions limiting aliasing.
As for selection tools, there are also some novelties, particularly Invert Selection and Invert Selection Frequencies. Very practical when we want to keep a specific element of the frequency range. Plus, we have “Select Harmonics” that adds to the selection (the fundamental frequency most of the time) the harmonics above it. These novelties may not seem much, but don’t forget that RX was already very comprehensive with lasso, brush, magic wand, zoom, “grab and drag” (the hand), and rectangular selection tools (time, frequency or both at once). A true audio Photoshop!
Let’s move on now to the new modules.
Seek and denoise
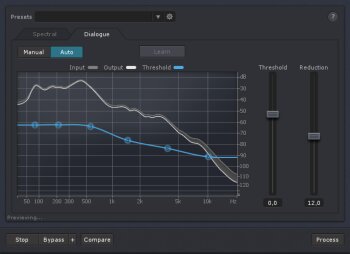
One of the highlights of this version is the Dialogue Denoiser, only available in the Advanced version. Even if it’s not a new feature strictly speaking: RX has allowed us to remove background noise for a long time, but the Dialogue Denoiser adds comfort and ease of use thanks to its latency-free processing and limited number of parameters. As its name implies, this feature is optimized for dialogs and promises very good results in a few clicks.
There are two modes: an automatic one that takes charge of everything and a manual one that offers the possibility to reduce the noise of one or several segments of an audio file via the “Learn” function. The developer recommends to take a passage of at least one second of only noise. The software will then automatically adjust the reduction curve, which is visible on the left side of the interface: in fact it establishes a noise profile for the whole audible frequency range. It will result in a six-point curve that can eventually be modified or automatized (with your sequencer). If your file has variable background noise, it will be easier to use the automatic mode, which works fairly good. The user only has to adjust two parameters: threshold, that controls the six curve points simultaneously and avoids cutting the signal that we want to keep; and reduction that adjusts the noise reduction level itself. You will have to play with this parameter if the result is not entirely satisfying (if the noise isn’t reduced enough or it doesn’t sound natural). The Dialogue Denoiser holds 64 band-pass filters that act as a multi-band noise gate.
Here you have some examples we made in a couple of clicks:

- Dialogue Denoiser Off 02:56
- Dialogue Denoiser On 02:56
- Dialogue Denoiser 2 Off 00:16
- Dialogue Denoiser 2 On 00:16
- Dialogue Denoiser 2 On Manual 00:16
In the first example both protagonists are far from the mics and the machines (lights and camera) make a lot of noise. We voluntarily turned all Denoiser settings up and the voices start to wane. Nevertheless, a large amount of noise is gone. A good point. In the second example, the deafening street noise is in the low end of the frequency range. We observed that the processing works better on the female voice close to the mic than on the male voice further apart, which gets swallowed a bit. The result is nevertheless very good and the track is much more useful.
Rev it up
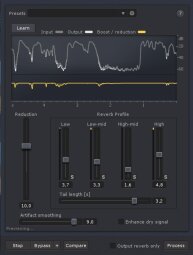
The Dereverb module, available only in the Advanced version, allows us to control the space and reverb of the audio file. We can actually keep only the direct sound and remove the reverberated sound. The module will need to analyze some seconds of the signal in order to detect the direct sound, reverb length and noise level. If you have lots of early reflections, the developer recommends to give it a few passes, first to remove the reverb tails and then to tackle early reflections (with the Tail Length set to around 0.5). Once the analysis has been made you can see the reverb reduction during the last five seconds thanks to the indicators on the top of the GUI and play with the reduction fader that will allow you to control the processing, the goal being to reduce the reverb as much as possible without altering the direct signal.
The Reverb Profile section allows you to control the processing per band (there are four of them), very interesting to fine tune the settings. The Tail Length parameter aims to give an approximation of the reverberation time, allowing you to work more on the reverb tail (high value) or early reflections (low value). By reducing the value of the Artifact Smoothing parameter you can affect certain resonances that might be too prominent in the room. On the other hand, certain artifacts could arise if you process using very high settings. You can also increase the level of the direct signal and only listen to the reverb that has been processed. This might prove useful to fine tune the settings.
We tested the module on vocals (Tracy Chapman and Bobby McFerrin) and we observed that it is more comfortable dealing with the reverb tails than early reflections.. Special attention ought to be paid to this fact because it’s very easy to alter the direct signal. We also tried it on a guitar stemming from a Jeff Buckley album and the result is much less satisfactory than on the vocals alone. We have the impression that the software struggled to distinguish the instrument’s sustain from the reverb. Remember that the end results depend a lot on the original files and that you can download a trial version (without restrictions during 10 days!) to do some tests with your own files.

- Bobby Original 00:05
- Bobby Dereverb 00:05
- Chapman Original 01:49
- Chapman Dereverb 01:49
- Jeff Original 00:47
- Jeff Dereverb 00:47
Clicks and clips
iZotope took the occasion to update some already existing modules, starting with the Declipper that allows us to remove, as its name implies, the clipping that arises when the signal going into AD converters is too high, which results in the waveforms being clipped and generating distortion. The histogram available with RX allows us to quickly repair any clipping and it is relatively easy to place the threshold above which the processing should take place. We really like the automatic mode that allows us to place the threshold in a couple of clicks. It is now possible (with the Advanced version, once again) to have different thresholds for the negative and positive parts of the waveform, which might be useful with certain audio files that don’t clip on one “side” of the waveform.
The Declick module, whose goal is to restore old recordings or vinyls, also benefits from two new parameters (in the Advanced version): Frequency Skew and Click Widening. The first of them allows you to change the frequency response of the click detection: low values for muffled noises and higher values for clicks without any low frequencies. The second parameter allows you to control the width of the processed region. High values are better to correct digital clicks. We also noticed the arrival of new presets to find a solution to our problems faster.
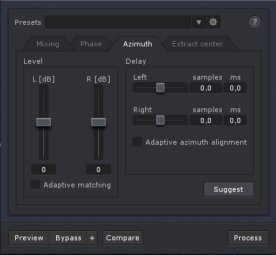
In the “Channel Operation” module, the “Adaptive matching” algorithm under the Azimuth tab (Advanced version), which allows us to apply a time delay between the left and right channels of a stereo file in order to level them, was improved. There’s also a new tab called Extract Center, which, as its name implies, allows us to extract information that is in the center of a stereo mix. A slider is available in order to dose the balance between the audio that is on the sides and the center. This processing might prove very useful if the audio file is originally monophonic but was transferred to a stereo tape. As a consequence, the noise of the sides can be easily removed. We can also remove the information placed at the center, to do karaoke, for example.
Note also the possibility to invert the phase to increase the headroom of a file. In fact, certain recordings can have symmetrical waveforms with, for example, higher peaks on the negative than on the positive side of the waveform. Inverting the phase can help balance that. The developer recommends using such processing on vocals (both spoken and sung) and brass instruments. Since the file is symmetrical and the peaks are equivalent on the negative and positive sides, we can increase the overall level and gain a couple of dBs.
Shaping the problem
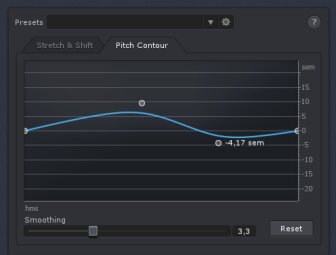
The Time & Pitch module, that uses the Radius algorithm, has some new features too, like Pitch Contour. This tab allows you to change the pitch of the selection over time, a bit as if you would put your hand on a vinyl or a tape (the pitch can’t be dissociated from the time here, since the algorithm uses resampling). The interface represents an X/Y graph with the time on the horizontal axis (whose length depends on the selection you’ve made) and the pitch percentage on the vertical axis. We can place up to 20 points to design any type of curve and the “Smoothing” parameter allows us to smoothen out the latter (which is useless if your curve is a straight line).
We can use the Pitch Contour as an effect to simulate the famous “stop” of a tape or even to get really wild with sound design. But we can also correct the defects of an audio file stemming from tape or vinyl, considering that such media aren’t always perfectly even. If, for example, the motor of your turntable has the annoying tendency to speed up or slow down from time to time, you can correct it with Pitch Contour. But you will need some know-how, since the module doesn’t offer any automatic detection… A pity.
Conclusion
This third version of RX doesn’t mock the world and introduces new features at all levels: aesthetically, with its new interface, which is a bit clearer, and functionally, with the possibility to work with several files at the same time, the new RX documents, new selection tools, a plug-in host in the standard version, the possibility to record directly within the software, and new presets. There are changes under the hood as well, with a software optimized for multicore processors. The Advanced version saw the arrival of two new interesting modules, the effective Dereverb and the very practical Dialogue Denoiser, as well as certain interesting parameters for already existing modules. iZotope was even kind enough to include Insight in the Advanced version.
There’s not much to criticize, except maybe for the lack of an automatic mode for the Pitch Contour and the price of the Advanced version. But the standard version, even if lacking some of the more important toys, remains much more accessible (the price difference is well justified, at least). There’s no doubt that RX confirms its status as a reference with this third version. And since there is a trial version available (10 days without restrictions), why don’t you give it a try?
Download the audio files (in FLAC format)


