Recording yourself whenever you mix is an excellent habit that will allow you to learn and grow your DJ skills. Listening to your mixes later with a clear head allows you to put things into perspective, which is certainly impossible to do when you are in the middle of a set!
This article, divided in several parts, is addressed to DJs who mix with vinyls or CD. We will not consider here users of software such as Virtual DJ or Traktor since these tools already include a native recording option. This is how you should prepare your hardware to record your sessions on a computer:
The decks and the records
First of all make sure that:
- The vinyls or CDs that you plan to use are clean to avoid any skipping during your session
- The pressure applied on the vinyl decks is enough to keep the records from skipping while “rewinding” or doing “baby scratching, ” although it shouldn’t be too much to prevent unnecessary wear on the records and the stylus
- The ground of your turntable is correctly connected to the ground of your mixer (otherwise you’ll have unwanted noise all the time)
- The styli of your turntable aren’t too worn out (otherwise you risk losing sound quality, volume or both)
- The mixer doesn’t produce any background noise that might end up being recorded
If your mixer provides panorama controls for the decks (also called “balance or simply ”pan"), check that they are set to the middle position and that they don’t modify the original source in any way. Certain mixers allow you to toggle between stereo and mono mode (like the Pioneer DJM 700): I suggest you to use the stereo mode in order not to lose any information of the original mix..
The faders
Concerning the crossfader:
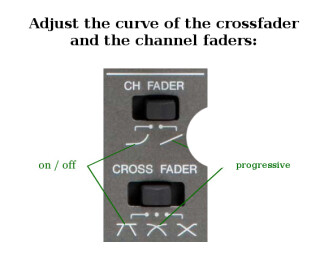
- If you use it during your sessions, check its position and settings (progressive, on/off…) before you start recording so that it suits your performance, specially if you plan to do some scratching
- If you don’t use it, set the crossfader to the middle and adjust the curve so that it doesn’t affect the decks’ volume (on/off), or even better: deactivate it completely if your mixer allows it (with a four-voice mixer, for example, don’t assign any deck to the crossfader)
Don’t forget to adjust the curve of the channel faders if your mixer has the option. If it doesn’t, it means the response curve is linear, which is suitable for most DJs.
Connections
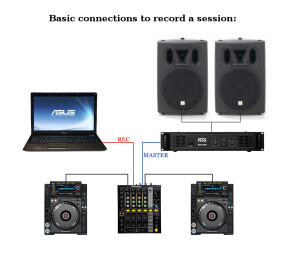
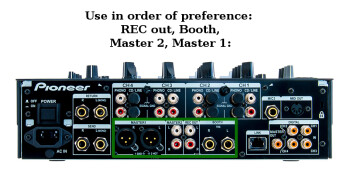
Let’s move on to cabling now. The best is to use the “REC” output of your mixer, if it has one, because its signal is independent from the master output (its volume is constant, which allows for an easy recording).
If you don’t have a REC output but you do have a “Booth” one (intended for monitor speakers), use it: it will allow you to adjust the recording level independently from the speakers volume you use to mix. In the worst case scenario you will only have a master output.
In this case, see if you can connect your speakers to the 1/4" jacks and your recorder to the RCA connectors (for example), otherwise you can use a Y-cable (like this one or this one) to split the signal.
You might need to use a minijack -> 1/4" jack adapter, but only as a last resort! Since the signal sent to the computer will be the same sent to the speakers (via the sole master output), you should pay special attention not to use a very hot signal: start from a low volume and increase it as needed!
Always check the condition of the cables and all eventual connectors/adapters you will use. And finally, connect your mixer to your computer’s soundcard.
Article written by YannOO (Yann Costaz), DJ and computer music lover.


