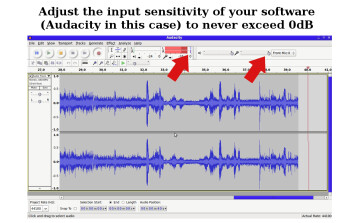
In the first part of this article, we discussed how to prepare the decks, records and mixer to have an optimal audio signal...
The hardware being functional (read the first part here) we can focus now on the software and ho-w to adjust its settings correctly.
Configuring the soundcard and recording software
Other types of software allow you to record all sounds that go through your computer, like Freecorder: I don’t recommend them, because your risk recording unwanted sounds from your operating system (for example) and you will probably not be able to export to an uncompressed format (like .wav).You can now choose and install a software that will allow you to do high-quality recordings. Some options are: Audacity (Mac and Windows), Adobe Audition (Windows and Mac), Sony SoundForge (Mac and Windows), and even Magix Audio Cleanic (Windows). These audio editing software tools are perfectly suited to record DJ sessions. They will provide you with a good enough recording quality and retouching options if needed (to which I will come back in a future article).First of all, you have to configure your soundcard so that it doesn’t modify in any way the audio signal received from the mixer. Some soundcards process the signal by default (preamplification, EQ, noise reduction…): disable all sound effects to have the most neutral signal possible (remember: your signal is already “correct” and at around –6 dB).
Once the software is installed, you have to adjust the input level to have a recording level around –6 dB, which will give us enough margin to avoid distortion. You won’t be able to know what’s the best input level for recording right away, so you will have to experiment a bit.
Test your recordings
Once everything is ready, do a recording test and visually check that the signal isn’t distorting (check both the mixer and the software for distortion).
If you discover a problem (the sound being too soft or too loud or there’s too much noise, for instance), verify the whole signal path by checking every single element one by one, from the source to the software: turntable -> channel on the mixer (fader all the way up, lows / mids / highs set to “2 o’clock” for example, and the gain set in such a way as to have 0 dB on this track) -> master output of the mixer (volume set to 0 dB) -> soundcard input -> recording software input.Listen to the export on the same speakers you used to mix (to compare easily with the original sound) or with a good pair of headphones to assess whether the end result is adequate (little or no noise, no distortion…) and that the volume is loud enough.If needed, correct the input sensitivity and, when everything is ready, do an export to an uncompressed file format (wav, for example).
In the next part we will address levels in more detail…
Article written by YannOO (Yann Costaz), DJ and computer music lover.


