
What makes a live recording sound live? The audience, of course. A live recording is all about the energy of the event, and that energy comes from the crowd, so some real thought has to be given as to how it’s captured.
| http://a3.twimg.com/profile_images/313810739/psw_twitter_reasonably_small.jpg Article is provided by ProSoundWeb |
Just setting up some microphones haphazardly usually produces less-than-desired results. To avoid that scenario, let’s have a look at some proven mic techniques for live recording.
First, it can be tempting to use approaches that engineers recording classical music deploy, such as spaced pairs, X/Y, ORTF and Blumlien. What they’re trying to do is capture the ambience of the environment and a “perfect” stereo image, but our primary concern is capturing the audience. Note that these are two different beasts and have to be handled that way.
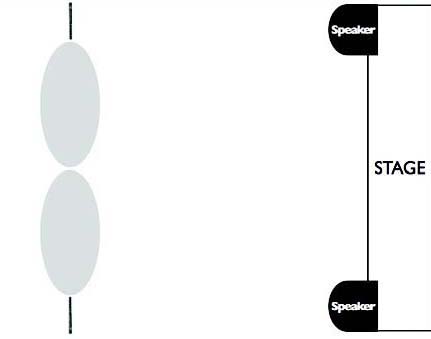 Figure 1: Center hall position. |
Sure, capturing some of the ambience is essential to a great sounding live recording, but it will come as a byproduct of a well-mic’ed audience, so it’s not important to worry about it until the primary mission is accomplished.
Audience mic’ing is a situation for omnidirectional mics if you have any, but never underestimate the value of a couple of short-scale shotgun mics.
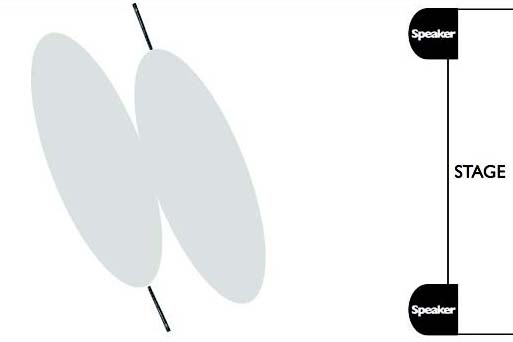 Figure 2: Mono center hall position. |
These are especially useful because they help to attenuate the intimate conversations from the crowd that happen around where the mic is placed.
In you don’t have the option of either an omni or short shotgun, make sure that the mics that you do utilize are identical models. Also, don’t forget to engage the low-frequency rolloff switch if the mic has one.
Simple Methods
 Figure 3: Omnidirectional mics hung from ceiling. |
More often than we would like, we need to record some audience tracks but don’t have anything special in the way of mics or any time to experiment. Here are some quick ways to get you in the ballpark in smaller venues like clubs. Keep in mind that the larger the venue, the more care and mic coverage is required.
Simple method 1: Place a pair of identical mics at about the halfway point between the edge of the stage and the back wall of the venue. Make sure that the mics are placed at least 3 feet above the audience.
The higher the mics reside over the audience, the better, but if it’s a club with a low ceiling, it’s better to seek placement closer to the audience to avoid ceiling reflections that can impact quality.
 Figure 4: Front hall position. |
Start with the mics facing directly at one another across the audience as in Figure 1, then aim them both down towards – but not exactly at – the middle of the audience.
Simple method 2: For mono tracks, splay the mics off access, as shown in Figure 2. This configuration produces fuller sound in mono, but will result in a stereo track that’s off balance because one mic is pointed more toward the stage and house system than the other.
Simple method 3: At about the middle of the venue, fly a couple of mics from the ceiling, pointing directly down and hanging by their connectors, as shown in Figure 3. Many clubs use this for more permanent audience mic placement, but it works temporarily as well, assuming flying the mics isn’t too complicated.
Be sure to hang each mic the same distance from the stage as the other to keep the stereo image balanced. This approach is where omnidirectional mics can come in handy.
Advanced Methods
Let’s up our game a bit, and note that the following techniques can be used either by themselves or in combinations for best audience coverage.
Front hall: Directly in front of the stage, place two identical mics between the house system loudspeakers, pointed at the middle of the room, as shown in Figure 4 .
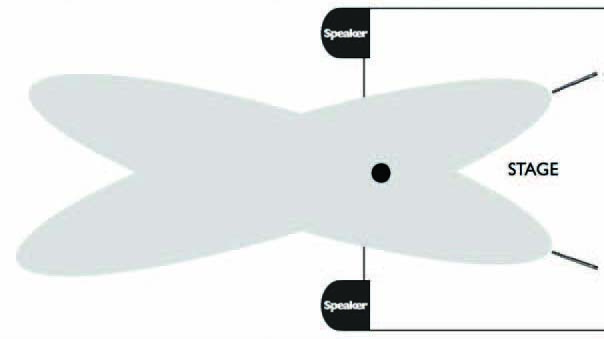 Figure 5: Backline position. |
The trick is to find the null point in the loudspeakers, where in general you can hear them the least, and low frequencies in particular are at their weakest. As a variation, use two mics pointed towards the center, and two more mics pointed towards the side.
This technique works great when you just can’t find anywhere secure to place mics in the crowd. And, if there’s a balcony, aim the mics at the farthest seat instead of the middle of the room.
Backline: Placing mics on the backline of the stage provides a great drum sound (not that you’re really looking for one), but more importantly for live recording, it also results in a great audience sound.
Place these on tall stands on the back of the stage pointing at the back of the singers(s) heads, as shown in Figure 5.
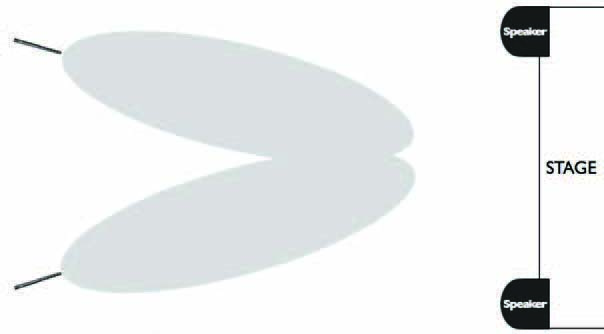 Figure 6: Rear hall position. |
Rear hall: In cases where you’re already using the front hall or backline configurations, a pair of rear hall mics is usually needed as well.
Place these mics forward looking at the stage and 6 feet or so from the rear wall and/or corner of the venue so they don’t pick up any unwanted reflections, as shown in Figure 6.
At The Console
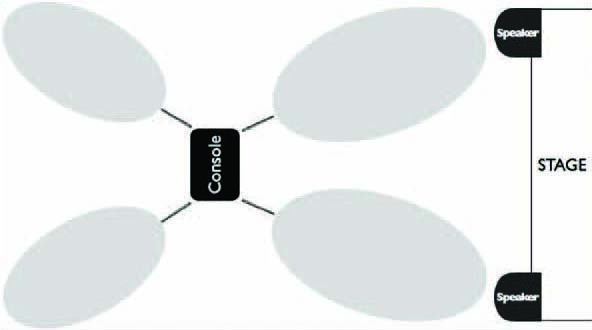 Figure 7: Mics at the console position. |
Sometimes the easiest place to put audience mics is at the front of house console, especially in a large venue. Assuming that you’re set up in the middle of the audience and not under a balcony or some other obstruction, locate four mics (preferably shotguns) at the corners of the mix position, as shown in Figure 7.
The front two mics should aim toward the front of the house. just in front of the PA stacks, while the rear mics should point at deep house left and right – in other words, towards the corners of the venue. This approach works great by itself, and even better with the addition of front hall or backline mics.
Further, any combination of any of these methods that cover the front, rear and middle of the audience present not only a lot of options for great audience coverage, but for capturing some really nice ambiance as well (Figure 8).
Keep in mind that when using multiple pairs of mics, it’s best to record them on multiple stereo tracks to keep your variations open during mixing.
The Great Outdoors
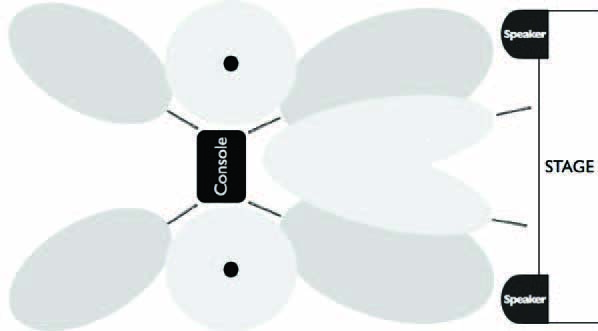 Figure 8: Mics at multiple positions. |
Mic’ing a crowd outdoors poses a different set of circumstances in comparison to the indoor experience. For one thing, placement is usually a lot more difficult, with fewer options for hanging mics. In addition, the ambience of the venue is lessened, so you usually need to resort to using more mics as a result. And don’t forget the windscreens, because nothing makes a track unusable like wind blasting across the mic capsules.
For more news and information for the audio professional visit ProSoundWeb.