The article title alone is enough to cause some professional mastering engineers to run to various forums and start complaining. "That's what's wrong with this industry, these kids don't know how to master, you gotta have a professional do it, blah blah blah."
Normally I’d be a lot more deferential if I didn’t hear so many horrible mastering jobs from “professional” mastering engineers. Will people mastering at home just add to this mess? Very possibly…then again, maybe the project/home recording people will be able to restore some sanity to the overcompressed, overhyped style of mastering that has ruined many a good recording.
Of course, there are excellent mastering engineers; I’ve used them, and how they take a recording from “okay” to “WOW!” is a thing of beauty. And to be fair, many of them are pressured by record companies to make ever-louder recordings. If you can afford a truly good mastering engineer, you won’t regret it. But if you can’t, or if you want to get started learning a new skill, consider trying your hand at mastering your material.
What Do We Mean by “Mastering”?
Let’s define “mastering” as “taking a mix and making it sound even better, then if applicable, assembling these mixes into a great listening experience.” A really good mastering engineer can make the mastered version sound way better than the mixed version, but any improvement is a good thing.
But Isn’t Mastering Too Archane for the Average Musician?
Yes…and no. There are three main benefits of using mastering engineers: Ears, objectivity, and technological mastery. Mastering technology used to be much more complex than it is now, because of the limitations of vinyl and cassettes. The gear required was hellishly expensive, and the tradeoffs between album length, level, distortion, and other factors required serious expertise. Mastering wasn’t something the average person could do.
The digital audio revolution has changed that. Digital can be a forgiving medium, with plenty of dynamic range. Quality audio plug-ins and processors have become ever more affordable. For musicians who want to master, gear is not the issue.
But ears still are. A veteran mastering engineer will know how to bring out the best in a piece of music. Maybe you have good ears, which means you can probably do good mastering. But exceptional mastering requires exceptional ears – something no plug-in can provide. Mastering requires learning about how to use technology, but also, the you need ability to hear the gestalt of a piece of music, not just individual instruments.
First, the Acoustics
You can’t mix or master well in a room with bad acoustics, but even minimal acoustical treatment can help. Rather than re-hash acoustic principle, here are some links with useful information.
- www.acoustics101.com and www.auralexuniversity.com, part of the Auralex site, are great places to start that contain a wealth of information, audio examples, and links.
- The RealTraps site at www.realtraps.com has articles, calculators, a downloadable test tone CD, and more. Click on the “Acoustics Info” tab.
- The Primacoustic site has a basic primer on acoustics (www.primacoustic.com/primer.htm) that’s good for novices.
- You’ll find useful background on acoustics at Acoustical Solutions’ Acoustic Education page (www.acousticalsolutions.com/education/index.asp). It even includes info on hearing and how the ear works.
- The MBI site has a Room Acoustics Calculator, and an introduction to room acoustics.
- RPG Diffusor Systems’ library page (www.rpginc.com/news/library.htm) is a little more advanced than the other references, but definitely worth a look.
Of course there are plenty of other references on the World Wide Wonderful, but these should get you started.
Flow: The Artistic Aspects
One of the most important aspects of mastering is determining an album’s flow. It’s one thing to master a track; it’s another to master a complete album, and make it a cohesive listening experience. Here are some tips.
- Make a rough CD with all cuts from the album, and listen to it on random shuffle. Sometimes hearing a certain order of songs will sound “right” just because you’re used to it. Listening randomly gives a better understanding of each piece on its own.
- Check the key for each song. All things being equal, I try to arrange the song order so that the keys ascend, and avoid having two songs in a row with the same key. Just as individual songs use modulation to change the “vibe, ” you can do the same thing for an album. Of course, key shouldn’t be your only criterion for choosing order, but it’s important.
- Determine the tempo for each song. Do you want the album to start off slowly, and build? Hit the listener hard, then go through variations? Choosing a proper tempo flow can help. An obvious example: For a dance music CD, you can manipulate how your audience reacts by building ever-increasing tempos, then pulling back if you want to “chill” things a bit.
- Consider “song pairs.” Some songs dovetail naturally into each other, so consider these as individual entities to be arranged with other songs and song pairs.
- Lead off with your strongest material. Many people will listen to only the first 10–15 seconds of your album, then decide whether to continue listening. I prefer an album that develops over time, which may involve starting off slow and easy. But that’s taking a chance in today’s hyperactive world.
- Crossfades can be effective. Fading out one song while fading in another can ease the transition from one song to the next.
- Consider a short transitional piece or two. I once mastered a CD where everything held together perfectly except for one pair of songs. They didn’t really match thematically, and putting the songs elsewhere upset the balance of the other songs that did work together. The solution: A 30-second transitional piece, mostly a drone with no tempo, that crossfaded with the end of one song and the beginning of the next.
- Don’t necessarily normalize all the tracks to the same peak level. Normalization can work if all the songs have the same basic average and peak levels, but that’s not always the case. I generally normalize all tracks to the same level as a diagnostic tool, then listen to the complete CD. If some songs stand out as objectionably louder, I’ll bring them down in level. If all the songs seem okay but one or two seem overly soft, rather than bring down all the louder songs, I’ll add a little dynamics control to the softer ones so they have a higher apparent level.
- Ignore all the previous tips. The point of assembling an album is to take listeners on a journey that holds them rapt with attention. Although the above tips have worked for me, assembly is not a “science” – maybe you do want two songs in the same key in a row. Don’t be afraid to cut test CDs with different orders, analyze them, and keep tweaking.
Mastering Tools
Mastering tools used to be pretty specific, but now people are even using host programs like Samplitude and Sonar to do their mastering. I’m more old school, and use the following:
- Digital audio editor for working on individual cuts. Common Windows programs are Adobe Audition, Sony Sound Forge, Steinberg Wavelab, and Magix Sequoia. BIAS Peak and DSP-Quattro are popular editors for Mac, and Wavelab (formerly Windows-only) is now Mac-compatible.
- DAW for assembling the different cuts to check out song order, do crossfades, etc. For this, I use a multitrack host; it’s easy to just drag the cuts around on different tracks, burn a CD, and live with the song order for a while to hear if it works or not.
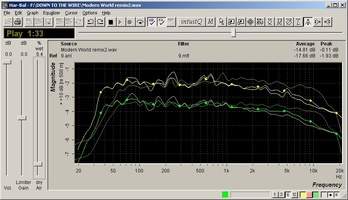
- Har-Bal EQ program. This clever stand-alone program (Fig. 1) is great for fixing EQ issues because it excels at identifying “rogue” peaks (e.g., peaks caused by room acoustics, microphone response anomalies, etc.).
Fig. 1: Har-Bal is a mastering program designed specifically for equalization. The spectrum display identifies possible problem areas, making it easy to do corrections if you can distinguish between unwanted peaks/dips and ones that are part of the music.
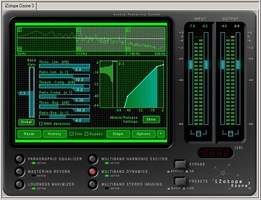
- EQ and multiband dynamics “mastering quality” plug-ins. “Mastering quality” plug-ins aren’t afraid to devour CPU cycles in the name of more accurate calculations, and may have long look-ahead buffers, making them unsuitable for automation and general-purpose track EQ applications. For an all-in-one Windows solution, iZotope’s Ozone (Fig. 2) is a great suite of mastering-related plug-ins, but you may prefer to go “à la carte” so you can pick and choose particular processors. Of these, Waves plug-ins get the biggest buzz for audio quality, but there are plenty of other excellent contenders from Sonnox, Universal Audio, PSP, WaveArts, Sony, Cakewalk, etc.
Fig. 2: iZotope’s Ozone 4 is a plug-in suite of mastering tools.
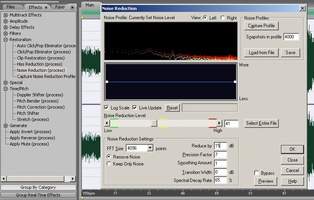
- Noise reduction. This includes getting rid of hiss, any “clicks” if present, and the like (Fig. 3). Careful, though: Noise reduction can affect the file and create artifacts. But it’s usually not a problem to get rid of subtle amounts of hiss, such as the residual effect of using lots of mic pres. In any event, when in doubt…don’t use it.
Fig. 3: Adobe Audition comes with a wealth of noise reduction tools: Click/pop elimination, clip restoration, noise reduction (shown), and hiss reduction.
- The occasional “special sauce.” I’m reluctant to use stereo wideners, harmonic enhancers, and similar plugs…but sometimes, they can help bring sparkle to a less-than-optimally-mixed song.
- A loudness maximizer. This is a type of limiter but use it, don’t abuse it, to trim up just a few of the peaks that prevent getting a higher average level. And if you follow the “Loudness Without Overcompression” technique described later, you won’t need much maximization at all.
Mastering Strategies
Being a great mix engineer doesn’t necessarily make you great at mastering – the skill set is different. While both activities are subject to Newton’s 3rd law (“every action has an equal and opposite reaction”), with mixing, all the elements that need balancing are isolated. For example, if the kick drum fights with the bass, you can work on the sound of one or the other to fix the problem. In mastering, nothing is isolated, and everything interlocks. Let’s discuss some strategies for mastering individual tunes.
1. Listen to the song all the way through – several times. Don’t touch a control; just listen. Take notes. Understand what the artist wanted to communicate. I feel the purpose of mastering is not to impress a “sound” on the artist, but to bring out the best of what’s already there.
2. Fix technical problems, such as clicks or hiss. This is also your last chance to edit the guitarist’s overdulgent 32-bar solo into a svelt, four-measure statement.
3. Fix EQ problems. You’ll likely run into two types of EQ problems, specific (e.g., resonances) and general (e.g., the track needs more treble, or less midrange). Because an EQ change at a specific frequency affects all instruments at that frequency, changes in EQ while mastering are often minuscule – changes of even a quarter or half a dB, which you would never really hear on an individual track, can have a huge impact on a final mix.
4. Fix dynamics problems. With multiband dynamics, getting the right settings takes a lot of expertise and experimentation. Start with subtle changes in only one band, and bypass individual bands frequently to get a reality check. If multiband compression is too overwhelming, you can often “gang” all the bands together, so it operates like a single-band compressor, but without as much pumping or breathing. Or, just use a standard, two-channel compressor if you don’t need much dynamics control – you’ll get decent sound without pumping.
5. Do the final trims. Once you’re satisfied that a song is complete, trim the beginning and end but don’t necessarily take it right up to the signal; leave at least a few dozen milliseconds of “air” to soften the transition between silence and music.
Loudness Without Overcompression
Dynamics are an essential component of a tune’s overall emotional impact. Yet some engineers kill those dynamics with excessive compression and limiting, because “everyone else does it, ” and they don’t want their songs to sound “weak” compared to others.
I’m often asked to make a CD loud, but can’t bear to wreck a great song. So, I’ve come up with a compromise: Finding that “sweet spot” where you preserve a fair amount of dynamics, but also have a master that’s loud enough to be “in the ballpark” of today’s music. If you follow these techniques maybe your tune won’t be quite as loud as everyone else’s, but it just might elicit a more emotional response from those willing to turn up their volume control a bit.
1. Remove subsonics. Digital audio can record and reproduce energy well below 20Hz. While inaudible, this energy still takes up headroom. You may be able to reclaim a dB or two of level by simply removing everything below 20Hz. However, if you can find individual tracks that create subsonics, fix those rather than apply filtering to the final mix.
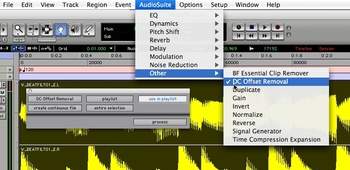
2. Remove DC offset. DC offset can also reduce headroom because positive or negative peaks are reduced by the amount of offset. Removing residual DC offset, using the “Remove DC offset” function found in most digital audio editors and many host programs (Fig. 4), “centers” the waveform around the 0V point, thus allowing a greater signal level for a given amount of headroom.
Fig. 4: Pro Tools includes an AudioSuite plug-in that can remove DC offset. In other hosts, you might find DC removal in a DSP menu.
3. Be cautious with bass. The ear is less responsive to bass frequencies, so those who lack mixing experience, or have rooms with poor or non-existent acoustic treatment, often crank up the bass. Using no more bass than needed can open up more headroom for other frequencies. To create the illusion of more bass:
- Use a multiband compressor on just the bass region. The bass will seem as loud, but take up less bandwidth.
- Try the Waves MaxxBass plug-in (a hardware version is also available), or the Aphex Big Bottom process (hardware only). MaxBass isolates the signal’s original bass and generates harmonics from it; psycho-acoustically, upon hearing the upper harmonics, your brain “fills in” the bass’s fundamental. The Big Bottom process uses a different, but also effective, psychoacoustic principle to emphasize bass.
4. As you mix, find/squash peaks that rob headroom. This is the real “secret, ” but it involves an understanding of peak vs. average levels. For example, consider a drum hit. There’s an initial huge burst of energy (the peak) followed by a quick decay and reduction in amplitude. You will need to set the recording level fairly low to make sure the peak doesn’t cause an overload. As a result, there’s a relatively high peak energy level but a low average energy.
On the other hand, a sustained organ chord has a high average energy. There’s not much of a peak, so you can set the record level such that the sustain uses up the maximum available headroom.
Entire tunes also have moments of high peaks, and moments of high average energy. Suppose you’re using a hard disk recorder, and playing back multiple tracks. Of course, the stereo output meters will fluctuate, but you may notice that at some points, the meters briefly register much higher than for the rest of the tune. This can happen if, for example, several instruments with loud peaks hit at the same time, or if you’re using lots of filter resonance on a synth. Setting levels to accommodate these peaks reduces the song’s average level.
You can compensate for this while mastering with limiting or compression. This can bring the peaks down, thus allowing a higher average level. However, if you instead reduce these peaks during the mixing process, you’ll end up with a more natural sound because you won’t need to use as much dynamics processing while mastering.
To do this is, as you mix play through the song until you find a place where the meters peak at a significantly higher level than the rest of the tune. Loop the area around that peak, then one by one, mute individual tracks until you find the one that contributes the most amount of signal. For example, suppose a section peaks at 0dB. You mute one track, and the peak goes to –2. You mute another track, and the section peaks at –1. You now mute a track and the peak hits –7. That’s the track that’s putting out the most amount of energy.
Zoom in on the track, and use automation or audio processing to insert a small dip over a very narrow region that brings the peak down by a few dB. Now play that section again, make sure it still sounds okay, and check the meters. In our example above, that 0dB peak may now hit at, say, –3dB. Proceed with this technique through the rest of the tune to bring down the biggest peaks. If peaks that were previously pushing the tune to 0 are brought down to –3dB, you can now raise the tune’s overall level by 3dB and still not go over 0. This creates a tune with a 3dB hotter average level, without having to use any kind of compression or limiting.
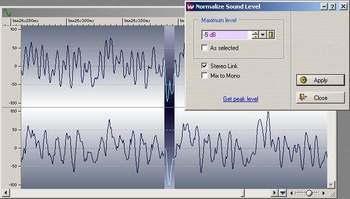
5. If you can’t fix it in the mix, fix it in the mastering. If a two-track file has “rogue” peaks, use a digital audio editor to locate the 10–20 highest peaks in the file. For example, suppose most of the levels in the file don’t go above –5dB, but there are 12 peaks that hit above –5dB. You can select just the individual half-cycles that go to 0, and normalize them to –5dB (Fig. 5).
Fig. 5: Note how a “rogue peak” is about to be tamed to the level of other peaks using Wavelab’s Normalize Sound Level function, which will trim the peak to –5dB.
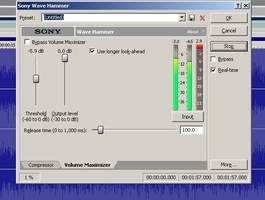
You have not affected the song in any way other than trimming those 12 peaks, yet now you can raise the overall level by +5dB, making a much louder sound that doesn’t mess with the dynamics or add artifacts.If you now add a few dB (like 2–3dB max) of loudness maximization (Fig. 6) or multiband compression, you’ll get an even louder sound that still retains the dynamic “feel” of the file.
Fig. 6: The Wave Hammer plug-in in Sony Sound Forge has two stages, one for compression and one for volume maximization. This example shows a maximum gain reduction amount of 2.9dB.
To anyone who’s about to comment about how “normalization is evil, this is a really stupid technique, why don’t you just use a limiter, ” etc.: Don’t bother – I’ll just respond with “try it, it works.”
6. Cheating with frequency response. The ear is most sensitive in the 3–4kHz range, so you can use EQ to boost that range by a tiny amount, especially in quiet parts. The tune will have more presence and sound louder. But be extremely careful, as it’s easy to go from teeny boost to annoying stridency. Even 1dB of boost will almost certainly be too much.
7. Consider making a second master for the web. Data compression actually allows for a reasonable amount of dynamics. If you’re streaming audio, then the sound quality is already taking a hit; preserving dynamics can help the music sound a little more natural. If you work with streaming audio, try the techniques mentioned above instead of heavy squashing, so you can judge whether the resulting sound quality is more satisfying overall. Doing two different masters isn’t unprecedented; record companies frequently did different masters for vinyl and cassettes.
If You Are Still Unhappy with the Sound…
Go to a professional mastering engineer, but keep two things in mind: Provide the raw, mixed tracks at the highest possible resolution (e.g., 24-bit/96kHz), don’t add any processing to the master stereo bus (no compression, EQ, limiting, etc.), and don’t trim the file’s beginning and end – the engineer may need to “sample” any hiss that’s present in order to remove it. And, don’t assume the engineer is good. Listen to examples of his/her work before you commit.
Mastering is a crucially important part of the recording process. Don’t fool yourself into thinking you can do a good job when you can’t, but don’t fool yourself into thinking you can’t do a good job, either. Give it a shot, and if everyone who listens to it says “Wow, that sounds fantastic!, ” then consider yourself at least a fledgling mastering engineer.
Originally published on Harmony Central. Reprinted with permission.


