The first Maschine made its debut in 2009. Consisting in a controller and an associated software application, it intended to provide mouse and screen fans the workflow of an MPC-type device, while providing the processing power of a computer to MPC hardliners.
At the time, the product seemed like an outlier, or, at least, a pioneer. But Maschine rapidly made itself a place in the market and won enthusiastic users. To the point of developing a whole range of products (Maschine MK2, Mikro MK1 and 2, iMaschine for iOS) and forcing other brands to interest themselves in the concept, especially Akaï with its MPC Renaissance or its partnership with Ableton for the APC and Push series.
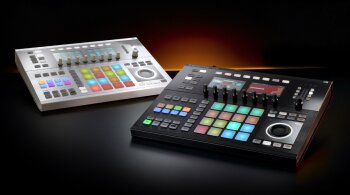
Today, Native Instruments continues expanding the product family with what aims to become its flagship: Maschine Studio, a controller associated with the new software version Maschine 2.0, recoded from scratch to (finally!) be able to handle multi-core processors. Associated doesn’t necessarily mean dependent, the software can be used on its own but also with other models of the Maschine family.
Let’s see what the German manufacturer proposes with this new hardware-software combination sold for $999 (or $99 for the software upgrade only)…
Come again, please?
To make the reading of this article easier for those who aren’t familiar with Maschine, here’s a brief reminder of how the system works, as well as of the terminology used. A Group refers to a group of sounds working as an autonomous entity. A Sound consists in a sound generator (a sample loaded into the Sampler module, a virtual instrument, an external hardware instrument, etc.) and it is the foundation upon which a group is built. A Group can gather up to 16 Sounds, which can be played simultaneously or not. Each Sound can only contain one sound generator, but an unlimited number of effects in this new software version. All these Sounds can further benefit from a second layer of effects, which is common to all of them, and are also unlimited. Altogether, Sounds and Effects constitute a group.
This 2.0 version of Maschine allows an unlimited number of groups to be created. With these groups you create musical sequences called Patterns, which are themselves organized in Scenes.
And that’s about it for this brief introduction, it’s time to open the box!
First impressions
The box includes the controller itself, a USB cable (nice!), a power cable with adapters for international power outlets (very nice!), and a DVD to install the Maschine drivers. All additional contents (sound libraries, software bundle) must be downloaded, at least with the version I have. It does not come with a printed user guide, but rather two PDFs (very informative and very well thought-out!): a Getting Started guide that’s 205 pages long, and a full user guide with no less than 737 pages.
As usual, I’ll start my analysis with the external looks of the unit.
The first contact with it is fairly reassuring. Though it’s made out of plastic, it’s a thick, heavy plastic with the goal of giving it a nice finish (the assembly has no protruding corners nor loose parts). The big rubber-like pads on the bottom keep it perfectly in place. The buttons turn very smoothly and pleasantly. The pads seem fine as well, but the only way to test them is by playing, so we will come back to them later. The big jogwheel sits tightly in place, leaving little space for dirt to get inside. The push buttons respond pretty well, with a reassuring click: you will have no doubt as to whether you activated this or that function!
In short, it gives a very good overall impression.
I was only a bit skeptical about the large reflective surface on the upper half and my fears were confirmed in use: while the material gives it a classy look, it is a real pain when it comes to finger marks. But, hey, it’s a purely aesthetic consideration.
The controller is the biggest in the Maschine series: 17" long, 13.8" wide and 2.3" high. The height is doubled if you use the retractable feet to tilt it.
This last feature is a very wise choice, and it spares you having to buy a special support like for the Maschine MK2. And, now that we mention it, Maschine Studio is not customizable anymore. It is available in black and white, and that’s it.
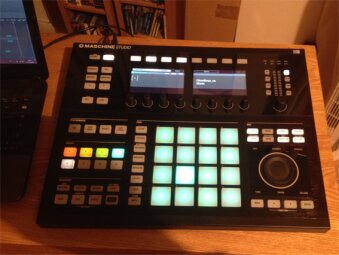
After having reviewed the aesthetic aspects, I’ll move on now to the technical ones. As usual, all the connections are on the rear panel: one MIDI input and three MIDI outputs, two 1/4" jack inputs for footswitches (which aren’t freely assignable, for the time being), a USB port, and (surprise!) a power connector. That’s correct, the USB port isn’t enough to supply the Maschine Studio with power anymore, which you can blame partly on the two multicolor displays the size (and resolution) of an iPhone 3G each. They are not touch screens, which isn’t a bad thing in itself, considering the amount of information that, as a consequence, can come together in a not-too-important surface.
As usual in the Maschine series, the controls are placed around the displays, with push buttons above and rotary knobs below the displays, all of which are assigned different functions depending on what you are doing at the moment.
To the left of the displays is the Channel button to access the different input/output functions of each group, as well as the editing functions for the macros. The Plug In button allows you to directly access the parameters of a previously selected plug-in. Arrange activates the arrangement, and Mix the mixing options (such overwhelming logic!). Browse not only allows you to search plug-ins, but also load projects, while Sampling handles all the aspects related to audio recording and editing. The arrow buttons allow you to scroll through different parameter pages, the All button, when combined with Shift allows you to save your project directly from the controller, and Auto allows you to manage automations.
Below is the Performance section with the Tap button to set the tempo, Step Mode to manage the integrated step sequencer, Macro to access macro editing more directly than with the Channel function mentioned above, and, finally, Note Repeat to configure and trigger note repetitions.
Next, we have the Groups section with eight buttons that allow you to create, access and control the different Groups of a project (refer to the first paragraph to understand how a Group is defined in the Maschine universe).
Right at the bottom is the transport section with the classic Play and Rec buttons, but also Restart to take it off again from the first Pattern, Metro to activate the metronome, and Events to access individual MIDI events in the piano roll of a pattern. “Erase” deletes patterns and scenes, and even groups when combined with “shift, ” which is also in this section and, as usual, allows you to access supplementary functions. Finally, the Grid button allows you to adjust the grid of the piano roll and the quantizing.
Left of the 4X4 matrix pads you have, from bottom to top, Mute and Solo to silence different elements of a mix, Select to access the parameters of a Sound, Pattern or Scene without stopping playback, Duplicate, which, as its names implies, allows you to duplicate elements, Navigate to visualize at a glance all parameter pages of a plug-in and access them directly with the pads, Pad mode to manage the behavior of… the pads, Pattern and Scene to access Pattern and Scene parameters, respectively.
But the real innovations are to be found on the right side of the Maschine Studio. At the top is the monitoring section with four LEDs (1 in/3 out) to monitor MIDI. Right below it is a backlit VU-meter to display, at your choice, the gain of each of the four audio inputs managed with Maschine (bear in mind we are talking about the inputs of an external soundcard, since Maschine doesn’t have a built-in audio interface) or the Master, Group, Sound and Cue outputs. Yes, Cue, you read that correctly, Maschine now offers the possibility to send the signal to an alternative output.
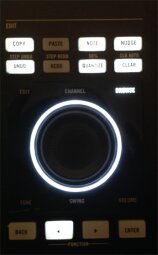
Another great novelty is that the editing functions were moved from the pad zone to a dedicated one. We have Copy and Paste; Undo and Redo; but also Note, to move events vertically in the piano roll; Nudge to move them horizontally; Quantize to activate quantizing; and Clear to erase the contents of a pattern. All these buttons are used together with the detented jogwheel located right underneath.
At the bottom, you’ll find the Back and Enter buttons, to validate navigation options between scenes and patterns, and two arrows to assign to the jogwheel parameters usually assigned to the rotary knobs above.
Power on
Discovering Maschine Studio is like being a child again and discovering your presents underneath the Christmas tree.
There’s no question that the device is very good-looking, and lights up brighter than a Christmas tree when you turn it on ─ it’s a festival of lights and colors.
Then, it introduces itself on the displays: “Maschine — Groove production studio.”
|
|
Now you know. A brief remark: if the screen freezes there it means something went wrong with the installation. It is very important that your Maschine is turned off when installing the drivers. And it’s actually indicated on the installation DVD’s packaging. Right, but that applies to all upgrades, too! And that’s not specified when downloading a patch. If you don’t observe the “shut down before installing” instruction — for example, when you have different sequencers and plug-ins open to test the device — you end up with nonoperative screens. And there you are, wondering why, going mad uninstalling and reinstalling everything — with Maschine turned off this time — and, oh, miracle, it works. Yes, and it just took you one hour to figure it out. A brief message from Native reminding airheads like me that you need to turn off the controller before every update, is certainly not too much to ask for, is it?. Especially since the installation issues don’t stop there.
After installing the drivers, I decided to install the Komplete Selection, which is the software bundle that comes with Maschine. It includes the Massive virtual synth, the Prism module for Reaktor, the Mark 1 virtual Rhodes by Scarbee, and the Comp(ressor) from the Solid Bus series. A fine software selection, and in full version, obviously! The only problem is, there’s no discount on the website for those who already have them. You indeed get a coupon worth $25 to buy new plug-ins, but that’s not even close to the price of these four software tools.
Once I downloaded, installed and authorized everything via the Native Instruments Service Center, I launched the software. Really excited I pressed Browse and then Instruments to choose a synth. A graphic representation of every Native software title showed up on the left screen. I chose the Synthesizers category with the rotary knobs underneath the screens, which reduced the choices to Maschine, Massive and Prism in my case. FYI, I did the installation on an “empty” computer, before installing the Komplete 9 Software Suite of the same publisher.
But let’s go back to the knobs.
Thanks to them I highlighted “Massive” on the left screen of the Maschine Studio. The right screen showed the plug-in presets available, which you can also sort into subcategories. I chose the good old Analog Classic 1 from the Analog Bass in the Bass category, and confidently pushed the Load button, only to learn that the software can’t find the plug-in. I then tried with Prism and Scarbee Mark 1 with the same result. Only the drum kits from the dedicated Maschine library could be loaded. Damn!
Actually, you only need to go to the software Preferences and point to the paths of the plug-ins and have them rescanned. That would be understandable if the paths entered during installation were somewhat esoteric. But, if you are like me and let the Native Instruments “wizard” do its magic, it is evident that the communication between software programs of the same brand could be improved! I must also note that this bug doesn’t seem to affect everybody, but it is nevertheless a matter of discussion in the NI forums. We can only hope that it will be fixed in a future update!
Anyway, once the plug-ins are correctly located and scanned, browsing is a real pleasure, and even more so considering that you have the possibility to validate your selections with the knobs underneath the displays or with the jogwheel. Everything is pretty easy and swift, and there’s no need to touch the computer. Nevertheless, you need a computer that isn’t too anemic. On my quadcore i5 I can feel it slow down when browsing large libraries and when loading presets, which makes the use of the knobs a bit risky sometimes.
Let’s take a brief detour now that we are talking about computers: there’s no reason to fear the controller accidentally disconnecting from the computer. Not only does it not result in a software crash, but the Maschine Studio can even be “hot reconnected” without the need of restarting the software. That’s a very good feature, especially for live applications. Now, let’s focus on the new version of the Maschine software.
Maschine 2, a return with a vengeance
To begin with, the software can be used in standalone mode or as a plug-in within a DAW. The plug-in formats available are: VST, Audio Units, AAX 32 and 64 bits, ASIO, Core Audio, and Wasapi. Particularly noteworthy is the fact that, when used as a plug-in within a DAW, Maschine can load other plug-ins in formats that are not supported natively by the DAW in question, so it can be used as a sort of bridge for other formats. That broadens the possibilities, doesn’t it?
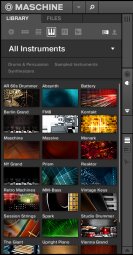
Visually, the software got a major facelift and was also improved in terms of usability, especially regarding the browser. The latter now displays, under the usual “Maschine, ” “Groups, ” “Sounds, ” “Instruments, ” “Effects, ” and “Samples” tabs, a big banner indicating the name of the chosen tab, which you can scroll to display all available options. If you choose the “Instruments” tab, for instance, scrolling the banner in question will display visual representations of the NI instruments, which makes browsing more pleasant.
But do note that only Maschine’s internal plug-ins are accessible directly via the browser. External plug-ins are loaded via a sub-menu in the group where you want to use them. We would’ve liked it to be more direct. Otherwise, you have the possibility to save your external plug-ins within a group (in the Maschine sense), in which case you can easily reload it via the browser.
Below this banner are the categories and sub-categories that make use of the same terminology used in the browsers of most software programs of the brand. Finally, at the bottom is the preset list corresponding to the chosen category. As mentioned above, these sub-divisions are entirely reproduced on the screens of the controller. As a general rule, all information displayed on the computer can also be viewed on the controller, and vice versa.
Besides the browser, the Maschine 2.0 interface also includes the Arranger window on the top right, where scenes are organized, a “control area” in the middle, from where you can control the parameters of each plug-in, as well as the group parameters, and, finally, the Pattern Editor to edit and modify the MIDI notes via a piano roll.
While the browser may be hidden at will (although we would’ve liked to be able to do it from the controller), the other windows may not — still. This is regrettable, especially knowing that they are not or only slightly resizable. As soon as the project gets a bit serious, you spend lots of time fooling with the scrollbar, even though it is not necessary to have all three windows open at the same time. It’s a bit annoying, but on the bright side, it makes using the controller more pleasant, since it doesn’t have this disadvantage.
Do note, however, that two small windows are fully retractable: Control Lane which allows you to control, among others, the velocity of MIDI notes, and the window handling MIDI assignments of the software’s parameters and the creation of macros. In my opinion, a better readability of the loaded plug-ins on each group would be very much welcome. This is nevertheless made up for by the other great innovation of this Maschine version 2.0: the Mixer view, which we’ll see in detail in the next section. To finish this part, also note that this new version now allows you to select several groups or sounds simultaneously, in order to affect their basic parameters (gain, pan, etc.), as well as the parameters of a plug-in that is part of different groups, in a common way.
A view to a mix
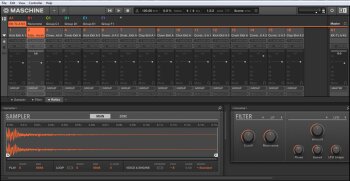
To switch to Mixer view you must use the Shift + Navigate buttons on the Maschine Studio controller or, within the software, use the View menu or the Tab key. Users of Ableton Live will feel at home, however, this key is disabled when Maschine is used as a plug-in. In Mixer view, the computer screen is divided into two parts: a stylized mixing console on top with a channel per group (or sound, as we will see) and, at the bottom, a detailed display of the plug-ins on each group, called Plug-In Strip.
The mixing console can be reduced and you can activate, at will, the display of audio inputs/outputs, MIDI, names of plug-ins loaded, and aux management. The mixing console also allows you to manage the new Cue output of Maschine. Remember that the gain of each of the four virtual inputs and outputs (Master, Group Currently Selected, Sound Currently Selected, and Cue) can be directly controlled with the big knob on the controller’s top right corner.
The overall design is understated; it shows the names and colors of each group, as well as of the plug-ins and presets used.
As I mentioned earlier, the mixing console has two display modes: one for Groups and one for the Sounds contained in the Groups.
You can display either the Group or Sound channels, which is an excellent thing and makes mixing Sounds easier. However, it’s a pity that this transition between Group and Sound mixer modes can only be done within the software and not from the controller. That’s one of the only actions that can’t be done via the controller, which ought to give you a good idea of the possibilities it offers, and the frustration you feel when you face such minor details.
Just like in the Arrangement view, you can select different Groups and manipulate them simultaneously.
Also note that the activation of the Mixer view on the controller is independent of the computer: you can activate it on the controller while the Arrangement view is on the computer, or vice versa. The controller can also be seen as an extension of your computer screen.
Plug-In Strip
The Plug-in Strip window that appears below the mixing console allows an horizontal display of all plug-ins within a Group or Sound channel of the console.
The representation of the plug-ins varies depending on their origin. The parameters of all Maschine’s own plug-ins are visible and accessible, and with a relatively standardized design. On the other hand, external plug-ins, whether from Native Instruments or other brands, are represented with simple “boxes, ” without any visible parameters.
It’s a pity that, in Mixer mode, there is no way to see this simplified parameter version for those plug-ins like in the Arranger view. I understand that the developers gave priority to saving space, in order to display as many plug-ins as possible on screen at the same time. But, considering that the “boxes” aren’t that small, we can’t help asking ourselves, why didn’t they follow their idea through, since there is enough space for the buttons?
Fortunately, all plug-in parameters are accessible via the controller. The display and management of these parameters is one of the major advantages that the integration and interconnection between the Maschine 2.0 software and the flagship controller of the Maschine series brings with it.
Whatever the active view on the computer (Arranger or Mixer), you can access specific menus of the selected plug-in by pressing the Plug-In button together with the corresponding group button. Regardless of whether it’s a Maschine internal plug-in or not, or published by Native Instruments or not, you will find all its MIDI parameters automatically assigned to the eight knobs on the controller, even if it means having them spread across several pages. It’s a somewhat similar system to Novation’s Automap, except that you don’t have to wrap your plug-ins in advance. On the other hand, knob assignment configurations can’t be exported into other sequencers. The same old story of wanting to have your cake and eat it, too.
Because parameters are spread across both screens, it makes it easier to read them, especially considering that most of them will have their full name displayed on the screen. It may seem dumb, but it makes a big difference.
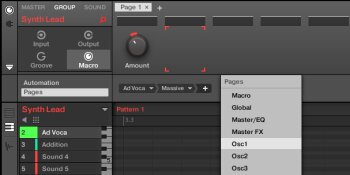
If the automatic assignments don’t suit you, you can create your own macros. To choose the parameter to be edited is pretty straightforward with a tree that looks something like Plug-In, Plug-In Element (oscillator, filter, etc.), Element Parameter (oscillator or filter frequency, etc.), and so forth for each of the eight rotary knobs, on as many pages as you want. This can only be done from within the software.
The macros are then saved together with the project or with the sound to which they were assigned. Regarding MIDI and the manipulation and automation of parameters, there are two innovations we would like to point out. First of all, macro editing is now possible both for sounds and groups, as well as for the master. And, most notably, you can create independent MIDI parameter tracks (called MIDI Tracks) for any MIDI message type. It took Native Instruments some time to implement this feature on Maschine, which has been available for ages on many sequencers!
Maschine Studio meets MIDI
Remember that the Maschine Studio has one physical MIDI input and three physical MIDI outputs. The latter will allow you to control external hardware modules (or plug-ins with a standard MIDI interface, The latter will allow you to control external hardware modules (or plug-ins with a standard MIDI interface, although in this case it’s more convenient to use the USB connection). Nevertheless, the connection to the computer is indispensable for one good and simple reason: although Maschine is powered with a dedicated cable, it turns off when you disconnect the USB cable! A pity, in my opinion, especially considering that the Maschine software, by contrast, is not necessary to control an external module or third-party software.
To switch to generic MIDI controller mode you just need to press Shift + Channel. The corresponding CC numbers appear above the rotary knobs and below the push buttons on the top. In addition to this, the left screen displays the pages available for the different knobs and pads, while the right screen displays the note values of the active pad matrix.
Maschine Studio can be teamed up with Maschine, Maschine MK2, Mikro and Mikro MK2, and it can also control their plug-ins, plus different Maschine software instances and third-party software tools and sequencers, but only according to very specific rules. For starters, only one unit of each type of Maschine controller can be recognized. You can work with a Maschine Studio and a Maschine Mikro, for example, but not two Maschine Studios or two Maschine Mikros. A Maschine Studio can control several instances of the Maschine software, switching between them with the “Shift + Plug-In” buttons. If you connect two Maschine controllers, either they control two different instances of the software or, if there’s only one active instance, one of the controllers will control the software while the other one is in generic MIDI mode.
Finally, the Maschine software automatically connects to the most recent controller model, respecting the following order: Maschine Studio, Maschine MK2, Maschine, Mikro MK2, Mikro.
MIDI implementation when using Maschine as a plug-in within a host sequencer was also reviewed. Among others, MIDI messages from an external environment can now be sent directly to Maschine internal parameters, without the need of macros.
Drum synths
The other great novelty announced by Native Instruments is… the Drum Synth, oh yes! But what is that, anyway?
Well, as the name doesn’t imply at all (ah, nothing like a little irony!), we are in the presence of a virtual synth dedicated to the production of drum and percussion sounds. To be more precise, it’s actually several independent synths, each dedicated to the production of a particular type of percussion sound. Each plug-in is named after the type of sound it is supposed to emulate: “Kick, ” “Snare, ” “Hi-Hat, ” “Tom, ” and “Percussion.”
These plug-ins are structured in the same way, more or less, namely with a synthesis engine and different effects. That said, each plug-in offers the possibility to choose different engines, each of which has its own set of specific effect parameters.
So, for the Kick, you have the following engines: For the big electronic bass drums, you have Sub for sub lows and Tronic, which produces a sound richer in harmonics. For acoustic bass drums, Dusty offers a rather deep sound, Rasper is more crunchy, Snappy allows you to play with the position of the virtual mics, Bold emulates a rock-like kick, Maple a more jazzy one, and Push offers a double-kick kinda sound.
Snares include the analog-style Volt; the more aggressive Bit; Pow, based on filtered noise; Sharp, somewhat disco; Airy, which is closer to an acoustic set; Vintage, moving even more in the analog direction; Chrome, with an acoustic feel to it but with a bigger sound; Iron, an acoustic emulation with a brilliant character; and, finally, Clap, which emulates the famous analog claps.
Hi-Hats have the following engines: Silver, with a very analog-synthetic sound; Circuit, which produces a robotic sound; and Memory, which is closer to an acoustic sound.
The Toms feature Tronic, analog, belonging to the same family as the one on the kicks; Fractal, which allows you to create a wide variety of sounds, ranging from organic to really crazy; and Floor, which emulates acoustic toms.
Finally, for Percussion you have Fractal, based on the feedback oscillator bank of the toms Fractal; Kettle, which emulates the kettledrums of an orchestra; and Shaker for all Latin hand percussion sounds, like shakers or maracas.
In the field
But after all these technical and theoretical considerations, you are surely asking yourself: How does the system actually perform?
Let’s find out!
I powered on the controller and launched the Maschine 2 software in standalone mode. And that’s when I thought to myself that it would be nice to be able to launch the software with a button on the controller. Is it too much to ask for? I don’t think so: My eight-year old scanner has a feature that starts the software automatically, and it is very practical. But, anyway, that’s just a detail.
Maschine and the software, was now open.
The rest of the actions I describe in the following text were carried out from the controller. I will specify whenever any action required the use of the software.
Maschine Studio was ready to receive its first Sound in group A.
I pushed the Browse button and the left screen displayed all available Native Instruments plug-ins. Under the Group tab I chose a drum kit from the sound libraries that come with Maschine 2 ─ almost 7.22GB of Samples, Sounds, Patterns, Loops, effects combinations, everything particularly tailored for “beat making.”
On the right screen I chose the Danton Eeprom A kit from the Artist Kit sub-category. I, personally, would have preferred to use the detented jogwheel and the arrows to move within the preset tree, rather than the non-detented knobs. But that’s a matter of taste. We are grateful that Native gave us alternatives. A simple push on the jogwheel sufficed to load the selected kit. Three seconds later, it was ready.
Only one of the pads in the matrix was illuminated, which meant that from the 16 sound slots of group A, the first one had been assigned. You just have to press “Shift+Pad mode” to activate the keyboard mode and the pad matrix is ready to use. I then tapped in a couple of riffs. The pads were excellent, they responded perfectly to velocity: The lightest touch was interpreted and translated into a sound, at the right volume, unlike pads on other controllers that, even after adjusting the velocity, require that you tap on them like a madman.
Next I tried the step sequencer, to make sure the rhythm was tight. The first thing you need to do is define a pattern via the Arrange window and the Pattern button. I chose a length of two bars, out of a maximum of 256.
Once I defined the pattern, I enabled the pad containing the kick I chose with a light finger touch and pressed Step Mode. The pad matrix turned into a step sequencer: I defined the position of my bass drum hits with light finger touches. I did the same for the snare. I decided to record the ride manually, but I wasn’t very accurate, so I decided to quantize it, but not too much. Maschine offers the possibility to semi-quantize what you just played, in order to keep the rhythm precision “human, ” which is what I did. It might have been better to quantize fully, since one of the MIDI events created on the piano roll still doesn’t quite please me. Anyway, I did it manually.
The screen on the right showed the details of my pattern (with the possibility to zoom in at will), so I moved quickly with the arrows to the event I wished to modify. I pushed the Nudge button to gain a finer control over the note’s position, I then turned the jogwheel until the “rebel” note was correctly in place. It’s child’s play and it works very well. Quite satisfied with my drum pattern, I then used the Duplicate function to make three copies that would serve as foundations for rhythmic variations. All that was done very quickly, it didn’t take me more than a couple of minutes.
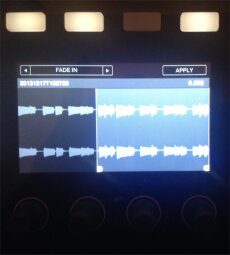
The next step would have normally been to add the bass, but I felt more like playing keys. And since I was in the mood to experiment, instead of creating a MIDI file to control my external keyboard, I recorded it as audio. As easy as always, I pressed the group B button to create a new group, and then selected Sampling. On the left screen I could access the recording parameters, namely the source and recording mode. The source was the audio input of my sound card (remember, the Maschine Studio supports up to four separate inputs). But the audio from any other group of the project could have also served the purpose. The recording mode can be set to Sync, to record a preset length, or Detect, which starts recording without a predefined length from a given audio threshold. So, I recorded the keyboard part. Once the waveform was displayed on the screens of the controller, I could start editing the sample.
Edit functions allow you to loop, copy any part of the sample and paste it anywhere in the waveform, import and superimpose any other sample (uncompressed formats), isolate a part of the waveform to make it the main sample, create fade ins/fade outs, slice the sample into 4 to 32 different parts that can be superimposed or used separately, normalize the gain, invert the waveform, correct the offset, insert silence, and time-stretch the sample. By the way, the time-stretch function can only be applied manually, sample by sample. No automatic time-stretching when you decide to distribute a sound across all the notes of a virtual keyboard in the sampler. In this case you only have a basic pitch-shifter with playback speed increase as you move towards the highs: unfathomable in 2014!
Next up was a bass. I enabled group C, load the Massive Analog Classique 1, the one I wanted to use right at the beginning of the test, remember? This time around, it worked. But just when I was about to do it, my fingers played a trick on me and I loaded it into group B instead of C, so it overwrote the nice sample module with my beautiful keyboard recording! Fortunately, there’s an Undo function that made everything all right again. By the way, you have unlimited undos/redos ─ as long as you don’t save, of course ─ and they apply to all functions of the software, even to the loading of a plug-in. When you want to undo the parameter modifications you made with a knob, you have the choice of doing it progressively, which will allow you to go through all intermediate steps, or you can delete all modifications once and for all.
I recorded my bass line, making use, again, of the excellent velocity response of the pads that allowed me to easily get a nice groove. In this respect, it is important to note that the new Pad mode allows you to easily access different parameters associated to how pads react to your playing, like the Keyboard mode (chromatic), 16 Velocities, which assigns a different velocity to each of the pads, from the loudest to the softest, or even Fixed Velocity, which, as its name implies, defines a fixed velocity value for all pads. This menu also gives you access to the pitch buttons to transpose events by semitones or octaves. I, personally, would’ve preferred to have the latter more at hand.
OK, so my small sequence was almost finished. But it seemed to be a bit slow. Luckily, the Tap Tempo feature, accessible at all times, allows you to adjust the tempo tapping on it, or with the jogwheel while holding the Tap Tempo button. If, on top of that, you press the Shift key, you can adjust it in finer increments of a hundredth of the BPM. That applies to all settings. So no more faders that can be set, at best, to –0.1dB or +0.3 dB, like on other controllers and software programs. You want exactly 0dB? Maschine can give it to you.
But my bass still sounded a bit dry, so I decided to add some effects to it. You can load as many effects as you wish, thanks to the new multi-core support of the software. Among other things, I added a bit of reverb, and since I really liked it, I decided to route to it the sound of my previously recorded keyboard, too. I could have also done that without taking my eyes or hands off the controller. You can route whatever you wish to any destination you please, even, as I did here, the output of a Group to the effects of another Group.
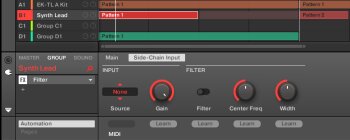
Going back to my bass sound, it seemed to be competing with the kick drum. The magic world in this case was “sidechain.” And what do you know, the new Maschine version offers by default the possibility to manage the sidechain of all plug-ins concerned. Life’s nice, isn’t it?
Before sending the signal of my keyboard to the reverb, I wanted to add a bit of the excellent Ohm Force’s OhmBoyz to it. Since it’s not a Native Instruments effect, it is not directly accessible via the Browse function. You have to use Shift Browse, and specify that it’s an “external” plug-in, to find it and be able to load it. Its modifiable parameters are well recognized by the Native Instruments software, the GUI is also nicely displayed, but it didn’t fully work: the buttons displayed didn’t follow the parameter modifications I made. The audio engine worked fine, which is the most important part. But still a bug, without a doubt.
To finish the song, you can very easily duplicate scenes, keep or not keep the patterns from one scene in the other or copy/paste these same patterns ─ everything exclusively via the controller. In practice, the transition between the creation of melodic and/or rhythm patterns and the triggering of the different patterns is achieved naturally via the Pad mode and Pattern buttons. Generally speaking, the workflow is extremely smooth.
Once done with the project, I exported it as audio (uncompressed formats only: WAV on PC, AIFF on MAC), which I would’ve loved to be able to do directly from the controller. You can save the project with the Maschine Studio, thanks to a key combination (Shift + All).
Finally, I must also mention that Maschine performed pretty well during the review in terms of CPU management, even though some people in the forums have complained of some erratic CPU behavior with this new version of the software.
Conclusion
The Maschine Studio is a very nice and well-thought out device. It will certainly be sad to have to part with it when the time comes. Overall, and even if I regretted certain things, like the lack of a button to launch the software from the controller, I was able to manage without the computer. This was true even when carrying out operations normally restricted to the use of a mouse and an associated screen, like the arrangement of scenes, the loading of projects or even sample editing. The availability of dedicated buttons for editing and the presence of the jogwheel make the operation with the controller much more accurate and comfortable when editing samples, not to mention the excellent color screens.
And don’t forget that Maschine Studio comes with four excellent software tools (in full version): Massive, Prism, Scarbee Mark 1 and Solid Bus Comp.
I hope Native Instruments looks into the issues some of us had when installing the software, as well as into CPU stability. I’d also like to see a time-stretch tool worthy of its name!
Now, considering all the above, and as an add-on to the review, I would like to give my opinion regarding the price. $99 for the software can be understood when you know that the software was recoded from scratch. But when it comes to the $999 price tag for the controller and the software, it gets a bit more complicated. Granted, the controller is well-built, practical, fun, etc., but it doesn’t have a built-in soundcard. It is also true that the software tools bundled with it are interesting and they come in their full versions. But apparently there is no discount foreseen for people who already own the software in question. The sound library of Maschine is 7GB+ big and of great quality, but it is essentially aimed at beat making. So, for someone who is devoted to beat making, who already has a soundcard, and doesn’t have the software included in the bundle yet, it’s an investment that might be interesting, since the comfort and the fun this system provides are unquestionable. However, for musicians for whom beat making isn’t their main interest, but who would like to benefit from a complimentary tool in this domain ─ and even if you get a $25 coupon to buy other NI products ─ the price seems too high.
Would it be too much to ask for, ladies and gentlemen at Native?
Tested on a PC with a quadcore I5 2.3 GHz processor, with 6GB RAM, running Windows 7 64 bits Premium Family edition


