If you think that "sample accurate" has something to do with random drug tests, you're probably browsing the wrong web site. But if you've heard the term applied to digital transfers, loop timings, edits, and more, you're in the right place. Our mission here is to get to the bottom of sample accuracy, and explain how it affects our world of recording and editing.
First, the basics: When dealing with digital audio, the most fundamental element of a signal is an individual sample, which has a certain duration and value. For the purposes of this article, we don’t care about the value, just the duration. For example, with a 44.1 kHz sample rate, there are 44,100 samples per second. Thus, each sample is exactly 0.02267573696 milliseconds long (you can trust me on this), and there are 44.1 samples per millisecond.
Sample Accurate Transfers & Edits
Let’s consider sample accurate transfer as it applies to transferring an ADAT tape to a Digital Audio Workstation (DAW). Suppose that starting from the zero point on the tape, a guitar starts playing 670,020 samples into the tape, and stops playing at 900,347 samples into the tape. With a sample accurate transfer, if you select the “samples” time ruler calibration on your DAW, you’ll see that the guitar starts playing 670,020 samples into the project referenced to the beginning (zero) point, and ends at (you guessed it) 900,347 samples from the beginning.
Why does this matter? With transfer methods that aren’t sample-accurate, such as SMPTE, there could be “slippage” where tracks would be off by a few samples. Normally, this wouldn’t be too big a deal, but what if you were transferring a drum track that had leakage on another track? Any variations could cause comb-filtering effects due to additions and cancellations between the two tracks.
As applied to edits, sample accurate editing means that you can edit a file length, split point, or whatever with single-sample precision. In other words, the resolution is far better than, for example, being able to edit a file to the nearest millisecond.
Sample Accurate Loops
As to why you’d need to edit to single-sample accuracy, consider the use of loops in music. By definition, loops repeat; if a loop’s length is not precise, there can be timing drift as it repeats.
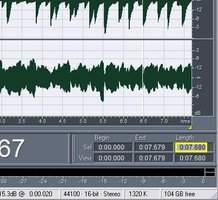
 In Adobe Audition, simply typing a new value into the Length field (outlined in yellow for clarity) can trim a file to a specific number of samples.
For example, suppose you record a loop from a groovebox set to 120 BPM. There’s no guarantee this tempo is exact (they don’t use atomic clocks, y’know); it might actually be 120.035 BPM, meaning that the loop will be a little faster than the ideal. Assuming a 44.1 kHz sampling rate, a 120.000 BPM one-measure loop lasts 88,200 samples, whereas a 120.035 BPM loop lasts 88,174 samples. That means there is a timing discrepancy of around 0.58 ms.
Now, suppose you import that 120.035 BPM loop into a DAW where 120 BPM is indeed 120.000 BPM, and copy the loop 16 times (by butting the beginning of one instance of the loop against the end of the previous instance) to fill out part of the song. Only problem is, the loop you imported runs slightly fast, so at the end of the 16 measures, it’s (16 * 0.58 ms) out of sync, thus ending 9.28 ms before it should. This is enough to be noticeable.
Of course, some programs, like Acid, Live, Sonar, Digital Performer, Logic Pro Audio, Garageband, and Project5 can automatically time-stretch a loop to fit a desired duration, and thus run at a specific tempo. But if your program doesn’t do automatic time-stretching, or if you don’t like the artifacts that time-stretching sometimes produces, you can trim that “almost there” 120.035 BPM loop to be sample-accurate, and hit 120.000 BPM exactly.
To do this, load the loop into a program like Adobe Audition, which can indicate the loop length in samples. Because the 120.035 BPM loop (with 88,174 samples) runs short of the desired 88,200 samples, add some silence to the end of the loop to extend it, then trim to exactly 88,200 samples by typing that number in the Length field (this of course assumes the ruler calibration is set to samples). Now, if you paste these trimmed loops end to end for 16 measures, they’ll fit perfectly. Granted, there will be a tiny error within each loop because you had to add that half-millisecond of silence, but I bet you won’t hear it. It’s more important that all the loops add up to the correct overall duration in the context of a song.
When you see a loop library described as having “sample-accurate loops, ” it means that the person doing the library calculated the number of samples used by a loop of a particular rhythmic value playing at a particular BPM, and made sure the loop was exactly that duration. For example, if the loop is claimed to be 120 BPM, then it will be exactly 88,200 samples long.
The one “oooops” is that sometimes the math works out so that each loop should theoretically have a fractional number of samples. There are several ways around this:
- Switch to a higher sampling rate, which gives better resolution. You may still end up with a fractional sample value, but it will represent a really, really tiny amount of time.
- Just ignore any difference. That’s right, live dangerously! For example, suppose your song tempo is 120.035 (we’ll say you did this to match the groove box tempo mentioned above), so a one-measure loop should be exactly 88,174.28 samples. Therefore, your groovebox loops fit perfectly, but suppose you also have a sample-accurate 120.000 BPM loop you want to use. You trim it to 88,174 samples, the best resolution you can do at 44.1 kHz; however, that means the 120.000 BPM loop is short by 0.28 samples. Multiply that by 16, and the total amount of error is 4.48 samples—about 1/10th of a millisecond, or hardly enough to get excited about.
- Snap the loop to a measure boundary each time you copy it. This leaves a tiny bit of space at the end of the loop, but as it’s only 0.28 samples, trust me—no one will care. I certainly don’t, and neither should you.
Do the Math—Or Better Yet, Don’t
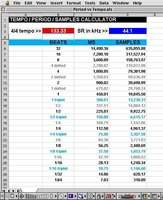
 The Excel spreadsheet calculates durations in milliseconds and samples for particular rhythmic values at a given tempo and sample rate. To download a free copy of the Excel file, click here.
I use a lot of loops in my music, and have developed quite a few loop libraries, so I need to relate particular rhythmic values to a specific number of samples when creating sample-accurate loops. After reaching for a calculator one too many times, I created an Excel-compatible spreadsheet where you enter the tempo in BPM (note that the chart assumes a 4/4 time signature) and sampling rate in kHz. The program then generates a listing of durations, in both milliseconds and samples, for different rhythmic values.
This is really handy; even if you’re not into sample accuracy, it’s a great way to set delay times so they match tempo. But it’s even handier for you, because you won’t have to set up this spreadsheet yourself! Just download the file, and you should be able to put theory into practice with a minimum amount of effort.
Originally published on Harmony Central. Reprinted with permission.
