More drum libraries are showing up in multitrack format from companies like Discrete Drums, Wizoo, East-West, Reel Drums, etc. Although these are sold on the basis of being useable out of the box for drum parts (with the additional advantage of being mixable), I see them more as a gold mine of raw materials for creating custom drum loops. Being able to process individual tracks separately is certainly a major advantage when deriving loops from multitracked parts, and of course, proper looping allows using these parts at different tempos.
For example, I just did a “remix” of the Discrete Drums sample library for the company, who had received numerous requests for “dirtier, ” lower-resolution versions aimed for more hardcore hip-hop and dance musicians. Hard disk recording programs are ideal for doing this type of remixing; this article will concentrate on using Sonar, but most techniques apply to other programs, and specific examples are given for Acid as well.
Dealing with Human Error
Drum libraries played by real drummers are great, because of the additional “human feel” compared to using machines. But due to timing inaccuracies, it sometimes takes a little tempo tweaking to line up measure markers with downbeats.
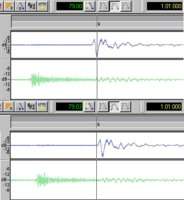
This illustration shows a loop whose stated tempo was 79 BPM, but in the upper view, note how the downbeat at the beginning of measure 9 (the loop end point in this particular case) hits a little early compared to the measure marker. In the bottom view, changing the tempo to 79.03 BPM places the measure marker at the downbeat’s exact beginning.
If you need to change the tempo compared to the original file, then time-stretching becomes necessary. Sonar has a built-in time stretch function that’s very similar to the one in Acid; Cubase SX has a nifty ReCycle type feature that works particularly well with drum loops. For programs that don’t stretch, you have three options if you want to change tempo:
- Import the file into ReCycle, change the tempo as desired, then export back to WAV or AIF.
- Import the file into Acid, Sonar, or a recent version of Sound Forge, “acidize” the file, then export.
- If the tempo change is small, change the pitch withoutcompensating for duration. Tranposing pitch upward will speed up the tempo, transposing down will slow it. For small changes, the pitch difference may not be noticeable (and in some cases, may be desirable).
After tweaking the track mix and setting the tempo, render the file to a stereo loop. Import this into your hard disk recorder or a digital audio editor and set looped playback mode. If there’s a click when the loop jumps back to the beginning, add a 4 ms fade-out to eliminate clicks, and if absolutely necessary, a 2–4 ms fade-in. In drastic cases, I use Sonic Foundry’s Click Removal DirectX plug-in to remove clicks at transition points.
The Perfect Slice
ReCycle, Acid, Sonar, and Cubase SX all uses the principle of cutting an audio loop into “slices, ” each of which represents a discrete sound, sound group (e.g., kick drum and snare hitting at the same time), or specific rhythmic interval, such as a 16th note. When you change a loop’s tempo, each slice’s start point shifts to accommodate the change. For example, if the original loop is at 130 BPM and there are slices every 16th note, if you change tempo to 140 BPM, the slice start points will move closer together to retain a 16th note relationship.
The ReCycle/Cubase approach is subtly different from the Acid/Sonar approach, although the differences are mostly “under the hood” in the technology used to do the slicing. With Acid or Sonar, speeding up generally truncates or time-compresses the decay, because the ear is most interested in where the attacks fall. When slowing down, the decays are extended to lengthen the slice accordingly.
The key to successful time-stretching with rhythmic loops is making sure the slices fall exactly at attack transients. With loops generated by drum machines, this is easy. With parts played by humans, there will be slight timing changes that require custom placing of the slice markers. Also note there must also be enough slices to define the beat, but not so many that the loop gets cut up excessively, thus creating sonic artifacts or other glitches during the stretching process.
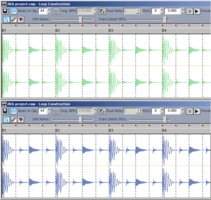
These two clips in the Loop Construction window have slices every 16th note. The top one has no swing, and all the drum sounds line up with the 16th note grid. The lower clip has significant swing, and while the kick (the big blob of audio located at B1, B2, B3, and B4) and the open hi-hat (halfway between each kick) line up perfectly, the swung, closed hi-hat sounds do not.
Sonar can read “acidized” files (i.e., ones that have pitch and tempo information embedded in them according to Acid’s file format). These should be optimally sliced, and follow tempo (and pitch) changes without requiring any type of preparation. However, a non-acidized file will not have these time-stretching properties until you convert it into what Sonar calls a Groove Clip. This automatically adds slicing markers, which you can edit later to optimize the stretching process. Acid automatically “acidizes” any file you import, and treats it as a loop (rather than one-shot or hard disk file).
When you play back a Groove Clip, if it’s standard, percussive-oriented material without swing, odds are Sonar will make a decent guess about where the slices need to go, and you’ll be able to change its tempo without having to tweak. But not all clips are accommodating, especially when slowing down tempo. For example, suppose the clip has a lot of swing applied to a 16th note hi-hat pattern. Sonar can place slices every 16th note, but the “swung” notes don’t fall on that particular rhythmic grid.
Slowing down a loop where slices don’t line up with attacks produces “flamming” due to the difference between when the program thinks the hi-hat should hit, as opposed to when it actually does hit. Speeding up the loop may not sound as bad, because the flamming gets closer together—but tweaking will almost always make it sound better.
The place to edit slices is Sonar’s Loop Construction view, which you reach by double-clicking on a Groove Clip. It has two main slice editing sliders: A Basic Slices slider that determines the rhythmic interval between slices, and a Transient Detect slider. The higher the Transient Detect percentage, the smaller the transient Sonar will consider a percussive attack. In general, use the longest rhythmic values and lowest transient detection possible, consistent with the loop stretching properly. For most dance-oriented drum loops, 8th- or 16th-note slices with a transient setting of 0% – 20% works well.
Loops that don’t stretch properly require editing the slice markers. Each marker has a small, triangular-shaped handle. Editing involves lining up markers with attacks to teach Sonar the loop’s precise rhythm. Optimally, you want the marker to line up at the precise beginning of the transient; it’s advisable to zoom in to get this as close as possible.
Once you move a marker, its triangle turns blue to show that it has been edited. You can also insert markers anywhere by double-clicking where you want the marker, on the same horizontal line as the other triangles. Because inserted markers are not generated automatically, they too will have blue handles.
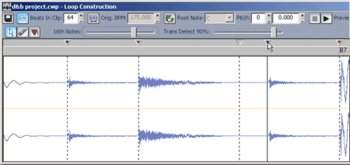
A marker has just been dragged from its old position (indicated by the triangle’s “hollow” look) to the attack of the swung hi-hat just before beat 7. Upon releasing the mouse to complete the drag operation, the old marker’s outline goes away. Note the blue handle in the modified marker.
High Basic Slice and Transient Detection values may add unneeded slices where no attacks exist. These degrade the sound by splitting sustained sounds, and should be removed. Click on the eraser tool, then click on a marker’s handle to delete the slice.
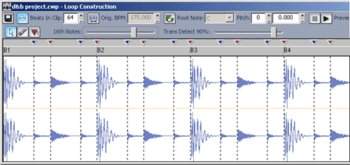
This tweaked Groove Clip has moved several of the original markers from their original position to match up with the swung hi-hat notes.
All this editing may sound like a lot of work, but it’s more complex to explain than it is to actually jump in and move markers around to match up with attacks. Your reward for doing so will be clips without flamming or artifacts, assuming the amount of stretching isn’t too huge.
Tricks with Sonar
Each program has its own little groovy goodies that help in creating cool drum loops. Of course, you can use generic VST or DirectX plug-ins, but Cubase has some proprietary tempo-synced plug-ins that are very effective with drums. Sonar’s Cyclone virtual instrument is also killer for drum grooves, as you can mix or match slices from acidized files to create new loops.
But while we’re here, let’s cover two other Sonar tricks that work well with drum loops.
Retrograde loops. This reverses the order of the slices within a groove clip, thus creating a new loop variation. This works best with loops that are staccato, and have sharp attacks. Otherwise, when continuous sounds are broken up, clicks can occur at the splice points.
- Start off with an Acidized WAV file, or clip that has been converted into a Groove clip using Sonar’s Loop Construction window. Select the file, then goProcess > Audio > Reverse.
- Disable Groove Clip looping for the file (click on the file and type Ctrl-L, or right-click and select “Groove-Clip Looping”).
- Once the file has been converted into a standard audio clip, again go Process > Audio > Reverse.
- Re-enable Groove Clip Looping. Press “Play, ” and enjoy the retrograde fruits of your labor.
Truly deranged loops. Sonar’s Groove Clip function is not just a way to loop, but can also process rhythmic tracks in totally bizarre ways. This works with Acid as well.
- In Sonar, double-click on a loop to bring up the Loop Construction window. In Acid, call up the loop Properties window (right-click on the track name and select Properties).
- Set the pitch parameter to +24 (in Acid, this is under the General tab and called Pitch Shift).
- With Sonar, set Transient Detection to 100%.
- In Sonar, use the Loop Construction window Play button to start the loop playing. In Acid, use the Track Properties window Play button.
- Experiment with the Slicing slider (or in Acid, edit the Stretch Spacing parameter under the Stretch tab). Start with 64th notes for the most robotic/metallic effect, then try 32nd, 16th, 8th, etc. Each slice setting produces a different type of freakazoid effect.
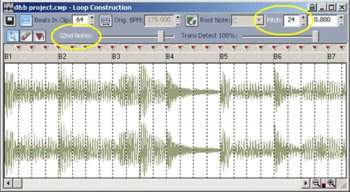
Forcing the Loop Construction window to “incorrect” parameter values can produce some great robotic/synthetic timbres. The key is to set pitch to 12 or 24, and a high slices value (in this case, 32nd notes; both parameters are circled in yellow for clarity).
These bizarro loops seem most effective when layered with the original loop, which should be set to normal loop settings. They also make great breakbeats when you drop out the original loop.
Although +24 is a somewhat “magic” pitch parameter, +12 also produces useful effects.—12 and—24 give weirdly pitched, slowed-down effects that also sound fabulous layered with the original loop. Often, you can simplify the loop beats by setting the Trans Detect slider to a low value, like 10%.
Bottom line: want some really weird, but musically useable, loops? Messing with the loop itself presents a gold mine of possibilities—just learn how to tweak the “wrong” settings.
Before closingout, let’s check out various tips.
Groove Clip Tricks
- All programs that use slicing to do time-stretching work most efficiently when speeding up rather than slowing down. Therefore, if you want to create a loop that works well from, for example, 100 BPM to 120 BPM, you’re better off creating it at 100 BPM and speeding it up than starting at 120 BPM and slowing it down.
- Editing markers is usually mandatory for drum loops played by human drummers instead of machines, as editing can compensate for any timing variations that interfere with the stretching process.
- Before getting too much into editing, try adjusting the Basic Slices and Transient Detection sliders first. Often choosing different values will solve flamming and other problems, without the need for editing.
- Use the lowest Slice Rhythmic Value possible (e.g., 8th note instead of 16th note), consistent with good sound. Extraneous slices can cut off drum decays. This is particularly annoying with kicks, as you lose some of the fullness and “ring.”
- Sonar will endeavor to keep any markers that you’ve moved manually in their assigned positions, so you can experiment at any time with the Slicing and Transient Detect controls without losing the positions of your carefully-placed markers.
- When you save a Sonar song or bundle, it retains all the Groove Clip parameters. To save a Groove Clip in acidized format for use other programs, simply drag the file to the desktop; it will be copied and saved with its groove parameters intact. However, you will likely want to rename it, as Sonar generates the name automatically.
Originally published on Harmony Central. Reprinted with permission.


