Toms are an interesting part of the kit that often add flare and excitement to a drum track, just look at the intro to Enter Sandman by Metallica, or the fill before the chorus of Africa by Toto. They are probably also the area of the drum kit that will give you the most grief. Lets dive straight in and take a look at some useful ways to get those toms sounding great.
Main Issues
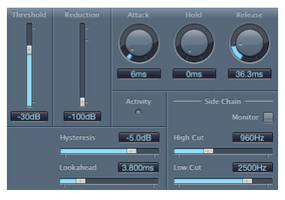
The main problem that many others and I will come across is resonance. Because how the toms work, you will often find that when you record them, the tom mic will pick up a resonance sound when not being played. This will ruin your whole drum mix if not dealt with. This will ruin not only the frequency balance, but will also obscure any effects of processing added to them. Welcome the hero of the hour, our trusty Noise Gate/Expander. With minimal ease one can be set up that cleanses your track of this extra-added waffle. Have a play around with the attack and release times, so that you not only cut out this resonance, but also keep all of the transient and the sustain of the tom present. In some genres, cutting the sustain off completely and adding some reverb can work well.
Tweaks and tricks
You can thicken up the toms and add some sustain by using your trusty compressor. I often like to keep compression on drums to a minimum at most looking for only 3–4dB of gain reduction, with a lower ratio of about 4:1. Attack and Release times are to taste, with a quicker attack and release for punchier toms in a drum fill, and slower times for added sustain. Sometimes grouping the toms and compressing them by about 4–6dB (Again at about a 4:1 ratio) can glue them together, making them sound like a set of toms, rather than 3–5 separate ones.
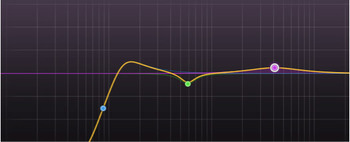
We can enhance/shape the toms with a bit of EQ, but like the Snare drum, the quality and tonality will be directly based on your source material. Here are a few frequencies to use as starting points, but please remember that depending on how your toms were tuned, these could be much higher, or much lower:
- Below 150Hz can be rolled off to stop your toms and kick fighting
- 130–200Hz will add weight to your floor tom, be careful, too much here can make it a bit boomy
- 180–250Hz will add weight to your middle tom, again this can make it boomy, so take care
- 260–350Hz will add weight to your high tom
- 300–800Hz can be cut, as there isn’t much going on for the toms here, freeing up some room for other instruments
- 2–3kHz will add some slap to your floor tom
- 3–4 kHz will add some slap to your middle tom
- 4–5 kHz will add some slap to your high tom
To get the most from these you should use your ears, and play around, sweeping the areas around to find the exact spot for your specific track.
Reverb can take a good tom mix, and really add that sheen needed to take it to that next level. Just take a look at Tommy Lee’s thundering drum sound. Try gating a longer reverb such as a Cathedral or Hall setting, and adding it to the toms, panning it to the sit “behind” each of the toms. Set the gates on the reverb so that it opens and closes with your reverb; adjust the level of the send to taste, so that it fits with your track perfectly.
There we have it, hopefully your tom tracks will be sounding great. Let us know your results, and if you think we have missed out on anything let us know via the comments sections below.
This article was originally published on Home Studio Review. Reprinted by permission.


