Next to the Kick Drum, the Snare Drum is the most important component of the Drum Kit. So its paramount that we get it to sound as good as its potential.
There are probably 101 different way to mix your Snare drum, so it can seem like a hard task. But there are a few things we can do to give your snare the sound it deserves. Lets take a look at a few tried and tested methods for processing the Snare Drum.
Eliminate spill
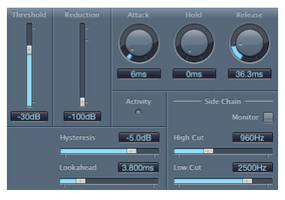
One problem that most of the snare drums I hear is a large amount of spill, from either the Hi-Hats, the Kick or in-fact both. Spill makes it more difficult as any processing will affect the spill as well as your track. A Gate or Expander can really help you clean up a Snare Drum track. One key for this is to set the gate/expander so that none of the Snare hits get cut off too soon. This gate will also help clean up any reverb that you place on the snare. Compression can add punch and sustain to the Snare and get it sounding consistent. There are a few good places to start when compressing Snare. A mid-high ratio works well, and anywhere between 4–10:1 will sound great depending on the Snare used for recording. Attack times of between anything from 1–6ms can work, depending on whether you are trying to achieve more punch, or more sustain. A faster release time will allow the compressor to reset, without sucking and pumping. If a knee setting is available then a hard setting works much better than a softer one. If you aim for a gain reduction value of between 4–10 dB, however anything up to 15 dB gain reduction can work in certain situations, but this is to taste.
Make it shine
A well-tuned and recorded Snare drum will not need a lot of work. On the flip side, a poorly tuned and recorded Snare will never sound great. EQ can really add a shimmer to a snare drum with a few Key frequencies that can clean up the snare and give it that little something. Lets take a look at a few:
- Below 150Hz can be cut with HPF
- 150–200 Hz can add weight to the snare
- 400–500Hz can be cut, to reduce some of the Waffle
- 850–1.5 kHz can add the sound of the Rim, but too much boosting will cause a tinny sound
- 1.75– 2.5 kHz can add some crack to the Snare
- 3–5 kHz can really make the underside snares shine, yet too much can add a tubby characteristic
- A little extra 10kHz can brighten up the snare and give it that extra little shine
Use your ears, as the snare can sound brighter or duller, wetter, or dryer. So with your ears set to stun, play around with the frequency dial, and sweep the above frequencies as a starting place, and if wrong, or not ideal, move up or down a little bit. Because of its versatility Eqing snare drums can be a very Trial and Error, learning experience, but with some effort and patience, you’ll get the job done.
Alive
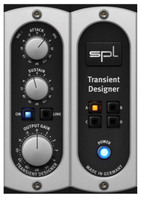
If your snare either lacks punch or sustain then all is not lost. Transient Designers really can add this back in. Here at the HSR studio we use the SPL Transient Designer, which has two controls, Attack and Sustain. The first adding to the punch, and the second adding some sustain. Watch out, as adding too much will cause your tracks to clip.
If you feel your Snare lacks a bit of weight there are ways aside from EQ that can solve this, just hit duplicate track and reach for your Pitch Shifter. If we pitch this track down and balance it with the snare, it appears to add weight. A good starting place is about 5 semitones, however play around, less could work, more could work. Once you are happy with the sound print the effect to the track. You may notice the snare sounds like it is miss firing. This is because most pitch shift will cause time compressions. To combat this just cut the front off the track and manually re-align them. Take the time to balance this down tuned snare with the first one, until the desired weight has been added. One thing to remember is to pan this down tuned snare so that it sits along with the original. When adding reverb, you will get a cleaner sounding one by just using the original.
Give it some space
Reverb and Snare drums go hand in hand, in most genres. But sometimes a Snare reverb can lack definition and be un-focused. One reason for this is a lot of snare drums have some kick and hat spill on them, so your snare verb is being triggered by elements lower and higher than the snare, which can result in a muddy sounding Verb. There’s a great way to combat this by following a few easy steps:
- Create a Mono Send from your Snare Track (Pre-Fader is recommended)
- On this send place an EQ Plug-In, A Noise Gate and Your Chosen Reverb Plug-in
- With the EQ Plug-In roll off all frequencies below your Snare, to get rid of all Kick Rumble (140Hz is a good starting place)
- With the same EQ filter out above about 7kHz to get rid of any Hi-Hat or Cymbal spill
- Use the Noise Gate to remove any more unwanted noise from your Snare, you should be left with just the Snare drum, in its purest form, if not a little on the dry side
- Place your chosen Plate Reverb on the Send and set controls so they fit the Snare Drums
- Pan the Send to the same place the Original Snare is, so that is sits on top nicely
- And there you should have a cleaner reverb, with more definition.
Conclusion
There are probably 101+ other tips and tricks out there for Snare, so go have a look, many engineers and producers = many methods. If you have any comments, questions or anything you would like to add, then please let us know via the comment box below.
This article was originally published on Home Studio Review. Reprinted by permission.


