AVID, formerly Digidesign, took advantage of last year's re-branding to present the third generation of its digital audio budget interfaces: the Mbox series. Today, we'll give the Mbox Pro a try, the biggest member of the family.
For many years, Mbox interfaces were the entrance ticket to Pro Tools and were an essential tool for home studio owners who wanted to use the famous Digidesign (now AVID) platform. But things have changed a lot recently and now Pro Tools 9 can be used with any digital audio interface. The Mbox series also changed. Even if they already supported other sequencers in the past, they can now be used (and more than ever) with other programs like Cubase, Logic and company. However, the link between Pro Tools and the Mbox is still very strong, especially in terms of some very appealing bundles. Let’s start by unpacking the Mbox Pro.
Out of the Box
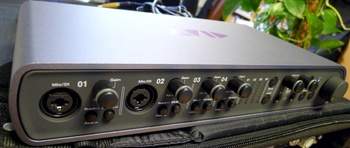
Inside the nice black box with the AVID logo is the interface itself, which makes a good impression at first sight. The design is very appealing, professional but not austere. It looks quite sturdy due to the fact that it has a metal housing and not less due to its heaviness (6.2 lb!). With such a weight, you can be sure it wont slip down from your desk! The dimensions are also generous: 13.7" × 7.6" × 2.3". The knobs are made out of plastic but seem quite rugged. The look of the new Mbox generation is pretty convincing. AVID did a very nice job compared to former versions. However, mobile sound freaks will find that the weight and bulky dimensions of the Mbox Pro are no advantage. In that case we recommend the Mbox and Mbox Mini, which are lighter and ought to be enough if you don’t need many ins/outs. However, it’s important to point out that the three interfaces don’t have the same specs (S/N ratio, dynamic range, etc.), so the differences between the three models are not limited to the number of connections.
Now, let’s have a look at the front and rear panels…
Panels
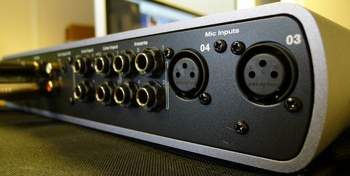
On the well-equipped rear panel you have six analog outs and four analog ins on 1/4" TRS jacks with switchable +4dBu/-10dBV sensitivity. You also get four inserts on 1/4" TRS jacks. The inserts are placed between the preamp and the A/D converter in the signal path. The effect send and return are in the same TRS jack (tip=send, ring=return, sleeve=ground). You also get a stereo Aux input on RCAs or minijack. On the right corner there are two mic inputs (3 and 4) on XLR connectors, while on the left corner you have a pair of FireWire ports. Notice that the interface must be connected to its external PSU because it cannot be powered via the FireWire bus of the computer. A 1/4" footswitch jack will allow you to punch in and out while recording or start playing back audio — very practical! Finally, a D-Sub port provides you with a MIDI in/out on 5-pin DIN connectors, a coaxial S/PDIF connector and a BNC to feed it a wordclock signal using the provided breakout cable. The only regret of the connections is the lack of an ADAT connector!
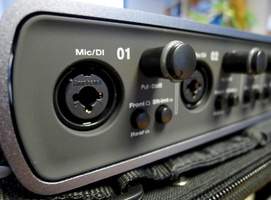
The front panel is also very comprehensive: a pair of XLR/TRS combos for mic inputs 1 and 2 and the two instrument inputs. They all have two switches: the first one to switch between the front inputs 1/2 (mic and instrument) and the two rear line inputs, and the second one to activate the soft limiter (which is a very rare feature on interfaces in this price range). Also notice that all four gain controls are push/pull pots allowing you to activate –20dB pads. In the middle of the front panel, you’ll find four meters with eight-LEDs each. Nice! Next to the meters, there are two buttons: the first one can be assigned to different Pro Tools functions (we already mentioned that the link between the house’s own hardware and software is still strong!) while the other one allows you to turn the 48V phantom power on/off.
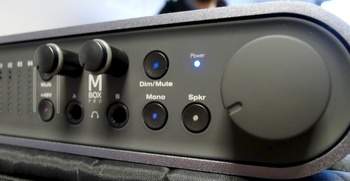
You also get two fully independent headphones outputs: they are assigned to different channels and have their own volume control. Sweet! On the right corner you’ll find a big volume control as well as three keys assigned to the master out: a Dim/Mute switch that allows you to cut or decrease the volume of the main output, a Mono switch, and a Speaker button to toggle between three pairs of monitor speakers connected to the analog outs on the rear panel. Once again: very nice!
Now, let’s talk about the software…
Driver
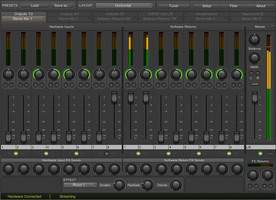
We won’t beat around the bush: the software impressed us a lot due to its a well-designed and convenient virtual mixer. Once you install the driver, you’ll access a clear and easily readable GUI. First of all, notice that there are several layouts provided. These allow you to order the faders horizontally or vertically, or even to hide them so that only the meters are displayed.
The design is quite standard: on the left side you’ll find all eight hardware inputs, on the right side all eight software returns (of your sequencer); all of them can be renamed. On each channel, you have a level meter, a pan control, mute and solo buttons, a virtual fader and a link button to create stereo channels. Apart form that, you can also adjust the send level to the FX bus. The latter provides you with not less than six reverb algorithms (three rooms, two halls and one plate), a delay and an echo. Each effect has two parameters: duration and feedback. In the master section, you can adjust the stereo width from mono to stereo, you can mute the left or right channels and invert them: very practical. Finally, on the right bottom corner is the stereo return of the FX bus.
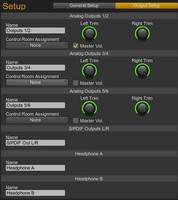
The audio interface has six stereo hardware outs: three line-level analog outs, one digital S/PDIF out and two phones outs. These six output pairs are fully independent so that you can assign them different mixes. A very good feature. You can even route a software return or an input directly to an output by simply selecting the source below the output name.
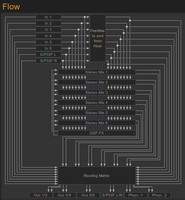
Let’s end with some additional features: a tuner for guitar players (they can connect directly to the instrument input), and the possibility to display the signal flow from the input to the output. You can also adjust different parameters in the setup menu: sampling rate, clock source, and even a high-pass filter for the first four inputs. You can also select the operating mode of the interface: standalone (AD/DA converter, mixer or preamp) and various GUI settings (pre/post fader meters, etc.).
In short, the software of the Mbox Pro is fully packed with features and it is easy to learn and use. We like the fact that six different sources can be assigned to the six hardware outputs. During the review, the interface was very reliable with our iMac (2011 model). We would’ve liked to have some more processing capabilities, for example an EQ or a compressor. However, singers have the possibility to get a reverb in their monitoring headphones… They say they like that!
Good, it’s time to get the sequencers running and plug our instruments!
Mboxed
We used several sequencers for the review: Pro Tools 9, of course, but also Cubase 6 in order to check out the behavior of the interface with a third-party software. With Pro Tools you can use the Multi button on the front panel to assign it to different functions: add a track, recording start/stop, tap tempo, go to previous/next marker or save.
We didn’t have a problem with Cubase and the CoreAudio driver, except for the fact that the actual in/out numbers on the hardware didn’t match the numbers displayed in the sequencer, which is a bit annoying but not insurmountable. The system was very stable. The sound samples were made using Cubase. As for latency time, we were able to work with an input and output latency of 2,721ms with Cubase, setting the driver to 32 samples.
In order to assess the quality of the preamps and converters, we compared them to the RME Babyface. We fed the same signal (an Oktava MK-012 small capsule condenser mic in front of a nylon-string guitar using an Y-cable) into both interfaces. After having calibrated the input level on the interfaces (we placed a microphone in front of a speaker playing white noise), we recorded the signal in two different Cubase 6 sessions (one with the Babyface, the other one with the Mbox Pro). Where headroom is concerned, the Mbox ensures the same performance as the Babyface (we set the gain control to 12 o’clock on both interfaces to get the same recording level). When it comes to sound, it’s almost impossible to decide between both interfaces, as both of them deliver very good results. Just listen to both sound samples:

- babyface00:42
- mboxpro00:42
Conclusion
The new Mbox Pro interface is a success: it offers a very nice design, it is robust, provides very comprehensive connections, and includes an easy-to-use virtual mixer. Add the effect section and you get a very appealing audio interface, even if it is not perfect. In fact, we missed an ADAT in/out and some additional effects like an EQ and/or a compressor. Moreover, the weight and the size of this interface are not that convenient for mobile recording.
When it comes to software, although the system worked perfectly with Cubase, we recommend to use it with Pro Tools for several reasons. First, the convenient Multi button you can assign to different functions, but especially because of the Pro Tools 9 bundles that can save you up to $200 on the sequencer price (the Mbox Pro alone costs $729 and only $999 with Pro Tools 9). Users of other sequencers might want to check competitor products that provide more features for the same price. But if you are looking for a high-quality audio interface and want to start working with Pro Tools 9 without spending a lot of money, the Mbox range is the way to go.

