We have been discussing reverb for quite some time now, although in a more or less theoretical way. I know it can get a bit frustrating but, trust me, it was necessary. Now that we are done with all the theory, it's time to move on to more practical things. Hallelujah my friends, the fun begins!
First steps

To get ready for the task at hand, I suggest that you consider using something like the setup I’m about to describe. I find it particularly useful, and it’s the one I use whenever I get to this stage in the mix. But by no means do I intend to impose this method on you or claim that it’s better than anything else out there. However, I do think that this template is a solid foundation for you to create your own workflow on.
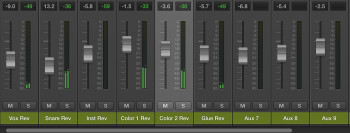
Okay, it’s time to walk the talk. My setup basically consists of 9 aux buses:
- The first one is entirely dedicated to vocals
- The second one is for the snare
- The third one for solo instruments
- The fourth one is to color some tracks
- The fifth one is pretty much like the fourth one but with a different coloration
- The sixth one is to manage the “glue” effect
- The last three buses I use to determine the position in the stereo field.
A brief remark though. The fact that I have nine buses at my disposal doesn’t mean that I always have to use all nine of them. I only use the ones I need for any given track and leave the rest unused. Along the same lines, if I don’t think there’s a need to use a supplementary reverb I don’t even bother to create a single aux bus. But then why nine buses? Well basically because, after many years of experience, I have come to realize that this setup allows me to get to work without really needing to add or take out too much. Albeit, it might turn out that this doesn’t work for you, so you’ll have to adapt the template to your needs.
As you probably imagine, in my template I have given all the different aux buses a specific name and I’ve also added my favorite reverb plug-ins, followed or preceded by any eventual compressors, gates, and EQs, all bypassed of course, but all ready to go if needed. You obviously haven’t gotten to this point yet, which is why I recommend that you create, and if your DAW allows you to, save your own template right away. This will save you lots of precious time in the future.
The next step is to pick the right presets. So, the work you’ve been carrying out the last couple of weeks will finally bear its fruits. Right, but what about the amount of signal you need to send to these buses? Well, for the time being there’s not much to do about that. Start by adjusting the sends loosely so you can clearly hear the effect, without overdoing it though. You’ll fine-tune the settings later on. Right now you only need to be able to asses whether the preset is adequate or not. Which is something we’ll address in the next article…
