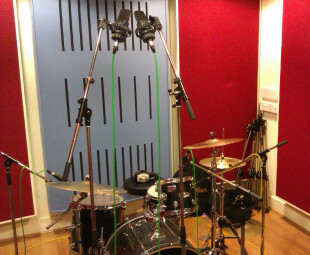
In this episode we will look into a new method to record the Stereo Room tracks, as well as one of its numerous variants, which, in my opinion, is particularly interesting.

Get a room
The technique we are about to see is very simple right from the get-go: you simply need to place a stereo couple in XY or ORTF configuration at a good distance from the drum kit on the same axis as the kick drum. However, behind this apparent simplicity lie some issues you need to solve first.
To begin with, you have to choose whether the mics will point towards the kit or, on the contrary, away from it. As usual, it all depends on the sound you want to get. In the first case, the mics will capture a mix of direct and reverberated sound, while in the second there will be almost no direct sound because the kit is in the mics’ blind spot. Both positions can work well, depending on what you want to achieve.
Now, regarding the height of the mics. The lower they are, the more low frequencies you’ll get, so make sure that the low mids aren’t too muddled. Conversely, the higher the mics, the more high end you’ll get, which might result in you ending up with very sharp cymbals. Also note that, unless you are aiming for a special effect of sorts, you shouldn’t place the mics too close to the ceiling or a corner of the room: you will seldom get anything interesting due to the multiple reflections that interfere with each other at these places.
Finally, the last issue you need to deal with is the distance between the kit and the mics. Unfortunately, there are no magic formulas in this regard, because it all depends on the room you are recording in, the kit, the drummer’s playing, and the song you are working on. That being said, there is a trick that will make your life much easier. The principle is very simple and is based more or less on the proof by contradiction concept in mathematics. Use closed headphones to listen to the Overheads in mono. Now, take one of the Stereo Room mics, reverse its polarity and move around the room. When the sum of the mono Overheads and this mic make the drums seem aggressive and/or without life, that means you are standing in an interesting spot. Switch back the phase of the mic, change the overheads to stereo and place the mics right there. Generally speaking this technique will allow you to find good spots to place the Stereo Room mics. Try it out and let me know what you think about it!
I’ll finish today with a particularly interesting variant of this method: Instead of using the XY or ORTF techniques, you might want to go for M/S. Why, you ask? Well, for starters, it will provide you an excellent mono compatibility; and you will have much more control between direct and reverberated sound, as long as the mics are pointing towards the drum kit, of course. Indeed, the figure-8 mic will capture almost exclusively reverberated sound, while the cardioid one will capture a mix of direct and reverberated sound. This means you will be able to choose the best balance for the song playing with the Mid/Side signals during mixdown. Isn’t life beautiful?
And that’s it for today. Stay tuned for the next installment on recording techniques for the Stereo Room tracks!

