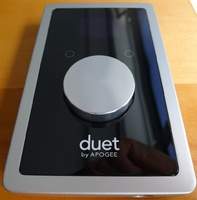
About four years ago, Apogee launched a digital audio FireWire interface called Duet that offered two analog ins and outs. In the meantime, competitors have brought out some very interesting products, especially RME with its attractive Babyface. The brand with the violet logo couldn't keep its arms crossed so they launched an improved version 2. The verdict?
The FireWire format, which disappeared from the MacBook some time ago only to reappear a few months later, seemed not to convince Apogee. Since the interfaces of this manufacturer are only compatible with Apple computers, they depend on the decisions of Steve Jobs and his friends. That’s why Apogee decided to change its strategy and add a USB controller to its compact interface One. The Duet 2 we review today went the same path — USB instead of FireWire. Is it the only change? No, but before we go any further let’s start unpacking the new Duet.
Unpacking
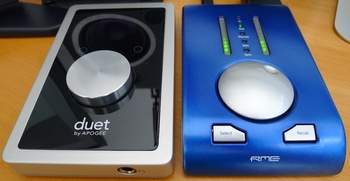
Let’s say it like it is: the Duet 2 impressed us as soon as we unpacked it. It looks very nice, professional and rugged. It is miles away from the plastic-looking One and it looks more modern and classy than the Babyface. In summary, it looks great and reliable, a bit like Apple computers… As for the weight and dimensions, the Duet is a bit bigger and heavier than the RME Babyface — its main competitor —, even if the difference is minor.
Along with the interface came a breakout cable with the mic/instrument inputs on big (huge!) XLR and 1/4" TRS combo connectors, as well as outputs on 1/4" TRS jacks for your speakers. A small aluminum box is available if you want XLR outputs and separate mic and instrument inputs. Why? For a more convenient fixed installation. Price? €81.33, VAT incl. It’s up to you…
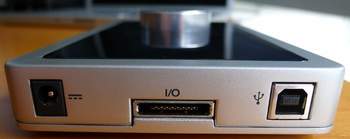
On the front of the interface you’ll find a handy headphones out; The rear side includes a connector for the breakout cable, a USB port and the power connection. An external PSU is also provided but we didn’t use it since our MacBook Pro was powerful enough to feed the Duet 2. The interface has only the essential connections: neither digital nor MIDI ins/outs… A pity considering that the Babyface does have them.
Installation and Use
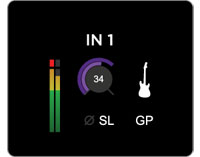
The Maestro 2 (Mac only) driver installation is very simple, as well as its use. From the very beginning, the contrast, colors and readability of the OLED display impressed us. The display really sets the interface apart from its competitors: it looks great and provides all necessary information. The VU-meters work precisely and you can adjust output volume and input gain turning the big encoder. Clicking on the latter allows you to change its assignation (master volume, headphone volume, inputs gain…), a bit like on the One or the Babyface. Two touch-sensitive buttons above the encoder can be assigned to different functions like dim, sum to mono, mute or to change the signal source of the headphones… not bad at all, and you can have them assigned as you wish, depending on the application (recording or mixing).
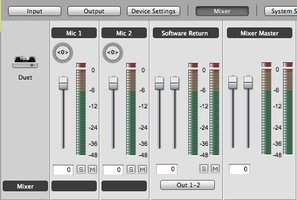
The window of the Maestro 2 software and the overall product are less complex than RME’s TotalMix. On the other hand, you don’t get the same number of ins/outs! Moreover, the BabyFace provides the user with processing facilities (EQ, reverb) and more advanced routing possibilities. However, beginners will appreciate the ease of use of the Duet 2. There is only one virtual mixer whose output can be assigned to the connected headphones or the speakers. So, you can route outputs 1–2, 3–4 or the mixer to the headphones or the speakers. Generally, for tracking, you’ll assign the mixer to the headphones and output 1–2 to the speakers. For DJing, it’s possible to send different mixes to the headphones and the speakers.
You access the different setup panels via the tabs on the top of the interface. As for the inputs, you can select their level (-10 dBV, +4 dBu, instrument or microphone), switch on a soft limiter (to avoid digital clipping, which is a very nice feature!), the 48V phantom power, or the phase inverter. In the Device Settings tab you can assign a function to the two buttons on the interface. In System Setup, you can select parameters like sample rate or the behavior of the VU-meters. Last but not least, the Mixer page allows you to mix the incoming signals (your mic for example) with the return signal of your software program (generally a sequencer) with a low latency.
Well, that’s it, now you know how to use the Duet 2. The possibilities are more limited than on the BabyFace, but Maestro has the advantage of having a very easy learning curve.
Display
The interface’s main advantage is the OLED display that indicates (very precisely) the different levels on the main page: mic and instrument input, headphones and speakers out. When you touch the jog wheel, the display shows the input gain or output volume value depending on the page you are at. You can change the page just clicking on the big encoder. It’s simple and effective! Here is a short video of the Duet 2 in action:
As for the technical data, you can record at 24 bit/192 kHz with a minimum latency time of 3.6 ms (32 sample buffer, 96 kHz). The preamps offer a comfortable gain range of 75 dB and the interface supports CoreAudio, which means most audio software for Mac.
Sound
To try out the newcomer, we used our classical guitar, our Audio-Technica AT-4040 transformer mic and an insert cable to route the signal at the same time to the Duet 2 and the RME BabyFace. Each interface was connected to a Mac computer running Cubase 6, so you won’t be able to compare Mac vs PC or Logic/Cubase/Pro Tools — however, you can compare the two interfaces! We calibrated the preamp gain (30 dB on the BabyFace and 39 dB on the Duet 2) to get approximately the same input level.
The least we can say is that it is difficult to take a decision based solely on their sound. Both interfaces give good results and have enough headroom. More than enough for most musicians! Here are some sound samples so that you can make your own opinion:

- apogee guitare00:23
- rme guitare00:23
Note that we didn’t have any drop outs or crashes during the recording, which is a good point.
Conclusion
Among high-end mobile interfaces, the Apogee Duet 2 has some important advantages against competitors, like its looks, the manufacturing quality, the OLED display, the soft limiter, and the quality of the preamps and converters. On the other hand, the interface has neither digital nor MIDI ins/outs and provides no processing facilities (EQ, reverb) while some others (e.g. the Babyface) do offer these features for the same price. Moreover, PC users won’t have the possibility to use the Duet 2 — typical Apogee. These are many cons but some Mac users will be seduced by the simplicity of the Maestro software.

