After having seen the ORTF, XY and M/S techniques, we'll look now into two other methods to record drum overheads.
The A-B technique
This is surely the most widespread method for recording overheads. While based on a very simple concept, it’s unfortunately the hardest to implement, if you ask me
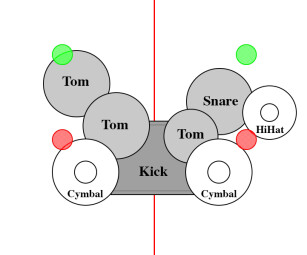
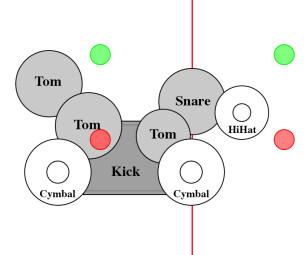
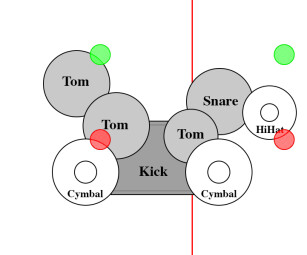
The A-B technique basically comes down to placing two paired microphones to the left and right of the drum kit. The mics can have cardioid or figure-8 polar pattern, or they can even be omni to capture the sound from the entire room. Also note that the direction of the capsules (pointing towards the inside or the outside of the kit, as well as their tilting) and their height affect this parameter, too. You just need to know how to place the mics in relation to the drums… And there are different schools for doing that. At the heart of the problem is the choice of an axis of symmetry along which both microphones will be placed equidistantly. Some choose the kick as the axis, some others the snare or even the junction between kick and snare. Since a picture can say more than a thousand words, take a look at the following images to understand better what I’ talking about. By the way, also note that the mics can move along the axis: the red couple will capture more of the cymbals while the green one will get more of the hits.
After looking at the pictures I guess you have already realized the cons of each of the axis. In the first case the snare will be off center, in the second one it’s the kick that’s off center, and in the third case it will be a compromise between the two previous ones. And, obviously, each of these combinations will entail mono compatibility issues. But then what’s the point of it, you ask? Well, it just so happens that the A-B technique is the one that allows you to get the widest stereo image. In fact, you can get a “larger than life” sound playing with the separation between mics, always in relation to the axis of symmetry. So, the A-B stereo miking technique can be a wise choice when you are going for an extraordinarily large sound, but you need to be aware that the drawbacks are not insignificant.
A brave new world
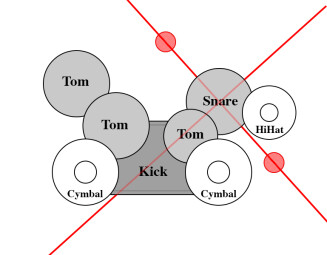
The last option we’ll see is derived from the A-B method above. And I don’t even know if it has a name or not… The principle is exactly the same as above, except for one detail: the choice of the famous axis of symmetry. In this case the axis of symmetry goes right through the kick and snare, as shown in the image on the right.
This might seem somewhat unnatural at first, but trust me it’s incredibly useful! The two main elements of the kit are pinned down to the center of the stereo image and you can easily work on the width by playing with the separation of the mics to the axis. At the same time, if you move the mics along the axis you can choose to get more of the snare and hi-hat or the kick, toms and cymbals. Besides, the mono compatibility of the result is pretty decent. In short, this technique will work wonders when you need effectiveness and modernity, regardless of whether it’s a rock, pop, metal, reggae, or other sort of production.
Next week I’ll give you some advice to fine tune your overhead recordings.


