In this episode I invite you to discover a trick that every beginner ought to know, the so-called 3:1 rule.
As you have surely realized by now, since the beginning of this series I have always tried to record each instrument with only one microphone. Maybe it has something to do with southern France roots… Or maybe not. Don’t get me wrong, I don’t deny my roots, but I’m pretty sure my southern flame doesn’t have the slightest to do with it and it hardly gets in the way when it comes to my passion for audio. Then it must be the hardware constraints I imposed on myself for this series, right? Well, yes, to a certain extent. When your goal is to pass on something that can be easily reproduced by the largest amount of people, simplicity is a must. Moreover, the soundcard I have features only two mic preamps, which obviously doesn’t encourage an excess in the use of microphones. However, you can rest assured that in most cases, even without these limitations, I would’ve made the same choices. I would certainly have used some outboard gear and other mics better adapted to the situation, but always with the same minimalist approach of reducing the number of mics to the strictly necessary.
Why this obsession with using only one mic, you ask? Firstly because, within the context of a “modern production” where all tracks are recorded separately, most instruments are mono and a poor spatial placement might result in phase issues later on, especially when you are dealing with home studio acoustics. Although it’s an entire different story when the instruments are stereo, when the composition requires only one or two musicians, or when you record a combo “live, ” for instance.
Second, I like to spare myself the trouble that working with several mics entails, like having to choose during mixdown. Which mic(s) will I keep? Will I mix all of them? Does it really make a substantial difference? Being human implies needing to justify all your actions afterwards, even if it means going against your original goals. An urban engineer friend of mine once told me that it’s extremely rare for people to turn around when they’ve realized they’ve gone down the wrong road. Nine out of ten times, we’d rather take a detour to try to land on your feet rather than go back the way we came, basically because it’s shorter. Well something similar happens when you have several tracks for a single instrument.. I mean you already have them, so why not use them, right? Well, because it isn’t always for the best.
Another issue related to tracking with several mics has to do with phase. In case you don’t know what I’m talking about, I invite you to read this series of three articles. You can obviously correct phase issues during mixdown. But why would you make it harder on yourself when you can avoid it from the start?
So, to sum it all up: If you can get the sound you want with one mic, there’s no need to complicate things further.
However, you won’t always be able to achieve what you want with one mic. The previous article is the perfect example: I had to use a second mic to get some of the “slap” of the upright bass. And as usual, the Golden Rule #1 of recording applies here, too, and you should never hesitate using all the means at your disposal to get the result you’re looking for. But then, how do you avoid these phase issues? That’s what we are about to discover…
The method
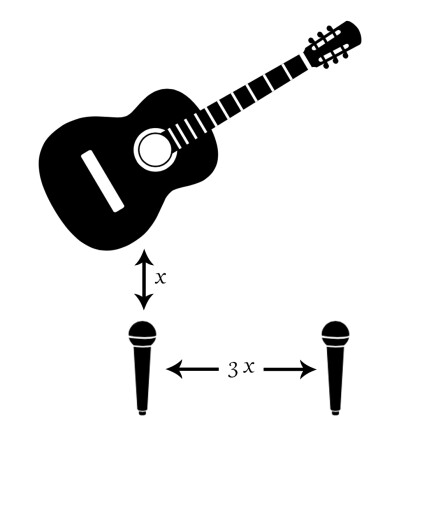
The 3:1 rule is pretty basic: the distance from the first to the second mic should be at least three times the distance from the source to the first mic. Here’s a diagram that illustrates this better:
I won’t go into the whys, but this way of doing things does help minimize any eventual phase issues. Nevertheless, here are a couple of remarks regarding this method:
- The goal is to minimize the problem, which won’t magically go away – it’s impossible!
- This is only a rule of thumb and it’s up to you to find the relative positions that work best for the song you’re recording
- This doesn’t spare you from having to visually check the coherence of the waveforms after the fact so you can realign the tracks in your DAW, if needed
- Nothing stops you from using the comb filtering produced in a creative way if that’s what you are looking for
- In the end, your ears should have the final word, so trust them
To finish, do note that the 3:1 rule is also a good starting point to limit mic bleed when you are close miking several instruments at the same time.


