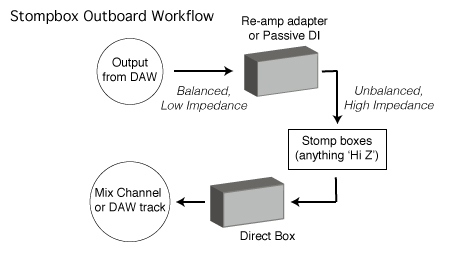
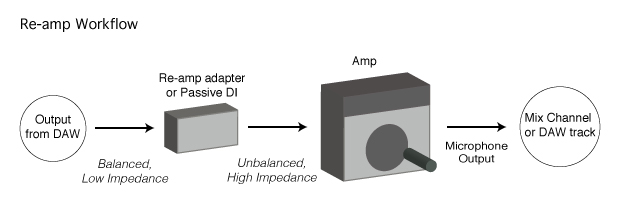
Re-amping is a technique that gained a lot of popularity in the last 15 years. The technique’s obvious advantages are numerous...
Direct recording is an ideal way to reserve tonal flexibility for mixing (especially useful in the DIY world);
Instrument amplifiers and stomp boxes offer virtually limitless opportunities to create the right sound with a not-so-virtual interface;
It’s fun, which is still allowed.
Sometimes the re-amping goal is simple. An electric guitar can be recorded direct while monitoring a software amp simulator. During mixing the direct guitar track (sans faux amp) will be re-recorded through an actual amp.
Other popular uses include adding some grit to a direct bass track, rescuing underwhelming keyboard sounds, or using your favorite stomp boxes as outboard processing. In any case, if the goal of the process is amp-related, you can be sure it is also more or less distortion-related.

Here are some ideas about how to get the most out of the re-amping process.
Gain Staging
As pictured above, the re-amp process requires us to adapt the balanced, relatively low impedance output from our DAW to the unbalanced, high impedance input of the amp or pedal(s) in question. The biggest factor in managing the gain staging of your re-amping signal chain is your choice of adapter. The two choices are:
-
A purpose built adapter, like the ones made by the company called Reamp, or Radial Engineering; or
-
A passive direct box (so say some).
The purpose-built re-amping devices (most of which are derivative of John Cuniberti’s early 1990’s design) have the distinct advantage of being designed to operate in the amplitude and impedance ranges typically found in +4dBu pro audio and the instrument amplifier world. The same cannot be said of a typical passive direct box. These are important characteristics of inductive systems. That’s not to say you can’t get the signal flow happening with a passive DI and an adequate amount of attenuation. However, the passive DI fails to simply supply a properly adapted signal. If you’re goal is to use the amps and pedals as signal processors, the adapter ought to facilitate that work, not pile on it’s own distortion.
Relative Phase
In applications where the originally recorded signal and the re-amped signal will be used in the mix together, their relative phase is an important tone-shaping factor. There are two great options for addressing the relative phase of these two signals (options that put a polarity switch to shame):
-
Speaker to mic distance. For many signals, moving the microphone back and forth along the pick-up axis will reveal a dramatic range of tonal difference. This can be particularly apparent with signals that have complex midrange harmonic content.
-
Phase ‘alignment’ tools, like the IBP from Little Labs. Used as the re-amping adapter or after the mic pre-amplified return, these devices provide sweepable electronic control over relative phase. This allows the mic to stay in the spot you liked the most.
Regardless of your choice of tool, remember that relative phase is a subjective tone control in this setting. Don’t think about what’s right or wrong.
Either or Both?
Sometimes it can be difficult to decide whether the original signal should be used in combination with the re-amped signal. In these cases there’s usually something unique about each signal, but they may not be working together well. This conflict can often be resolved by creating more contrast between the original and re-amped signals. On keyboard tracks, for example, I will frequently make significant, crossover-style EQ choices that allow me to more subtly combine the unique elements of each signal type. Another technique that can be used with remarkable ease is one I dubiously call “Sum and Amp-ness”. I think it kills for gritty bass, particularly with tight, close drums.
-
Use a DI bass right up the middle of your mix. Get it sounding great, and setup a re-amp path;
-
Setup a nicely overdriven bass tone on an amp. Somewhere in signal flow, HPF this path in the 300 – 500Hz neighborhood. I like to do it before the amp;
-
Use the return from the amp just as you would use the ‘side’ component of a mid-side mic array. For maximum sum and difference affect, mic the amp off-axis.
This set-up leaves you with strong, centered low frequency focus, but adds an interesting distorted ‘width’ component. Try it out in mono-tending drum and bass situations. Finally, don’t be afraid to let the re-amp path hang out in input monitoring while you mix. There’s no real reason to record it until you’re getting close to printing mixes. It’s incredibly easy to make changes as long as it’s all still live.
For more articles on audio recording, mixing, and production visit The Pro Audio Files.
Rob Schlette is chief mastering engineer and owner of Anthem Mastering, in St. Louis, MO. Visit anthemmastering.com to learn more.

