Second part dedicated to trying to solve the question of whether you should record an electric guitar with or without effects.

Solution(s)
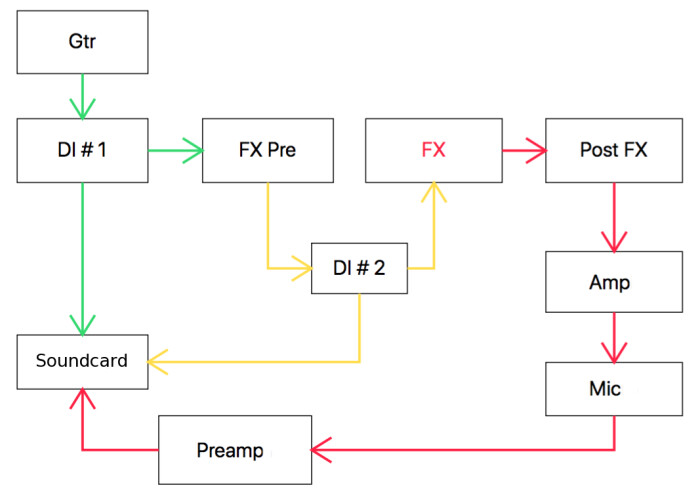
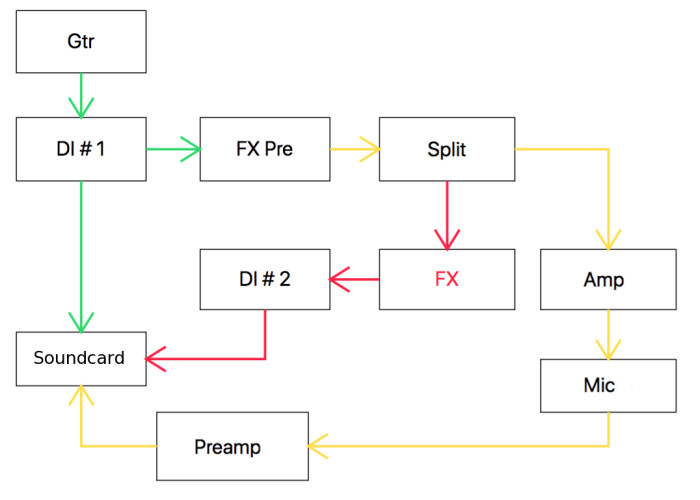
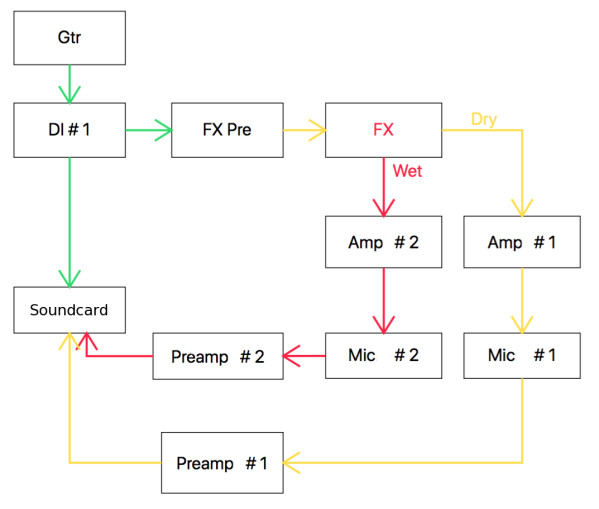
As you saw last time, and similarly to the conclusions we arrived to when talking about bass guitar, the bare minimum consists in recording the signal of the electric guitar with a DI while at the same time tracking it with a mic placed in front of the amp. That said, when the guitarist uses certain effects whose sound varies significantly in time (see previous installment), it might be wise to add a third track. The basic idea is very simple: one way or another you need to record a third version of the signal, without the “problematic” effects and as late as possible in the overall effects chain. Problem is, as simple as it might sound, it’s not that easy to put into practice. There is in fact only one way to go about it. It all depends on two factors: the effects chain of the guitarist and the hardware you have at your disposal. I made some diagrams illustrating three different scenarios so you can wrap your head around it better. The green arrows correspond to the flow of the “naked” signal, the yellow ones to the “good” signal and the red to the less “reliable” signal.
The first diagram describes the following situation: the effect to be avoided is right at the middle of the effects chain, which means you should take the signal right before the effect. To do this you’ll need a DI box to send the “good” signal to the audio interface.
On the second diagram, the “problematic” effect is at the end of the effects chain. This means you can split the signal just before the effect with a pedal like the A/B box and take the “good” signal from the amp while the less “reliable” signal is sent to the audio interface via a DI box.
The third diagram shows a situation that can only be found in well-off studios because you need a comprehensive backline as well as two separate recording rooms so each of the guitar amps is not disturbed by the other one. Do note that, in this case, the “problematic” effect features two outputs: one with the wet signal and one with the source signal, like is the case with some delays, for instance. If the effect in question does not offer that possibility, you can always split the signal right before it, like in the second diagram.
I could’ve gone on forever with such diagrams depicting, for instance, effects placed in the amp’s effects loop or the use of stereo effects. But to what use? I think with these three examples you get the point. Each case will be different and you will need to make use of your cleverness to achieve your goals, choosing the routing that best adapts to the situation.
But there’s one thing I can guarantee: it’s not going to be easy! Is it really worth it, then? Well that’s something we’ll discuss in the next installment…


